-
Be sure to read this post! Beware of scammers. https://www.indianagunowners.com/threads/classifieds-new-online-payment-guidelines-rules-paypal-venmo-zelle-etc.511734/

You are using an out of date browser. It may not display this or other websites correctly.
You should upgrade or use an alternative browser.
You should upgrade or use an alternative browser.
All Things Woodworking
- Thread starter ATOMonkey
- Start date
The #1 community for Gun Owners in Indiana
Member Benefits:
Fewer Ads! Discuss all aspects of firearm ownership Discuss anti-gun legislation Buy, sell, and trade in the classified section Chat with Local gun shops, ranges, trainers & other businesses Discover free outdoor shooting areas View up to date on firearm-related events Share photos & video with other members ...and so much more!
Member Benefits:

Nice work.
Thanks.
I have now proved I can do "real woodworking".
Now back to quicker modern techniques.
olhorseman
Sharpshooter
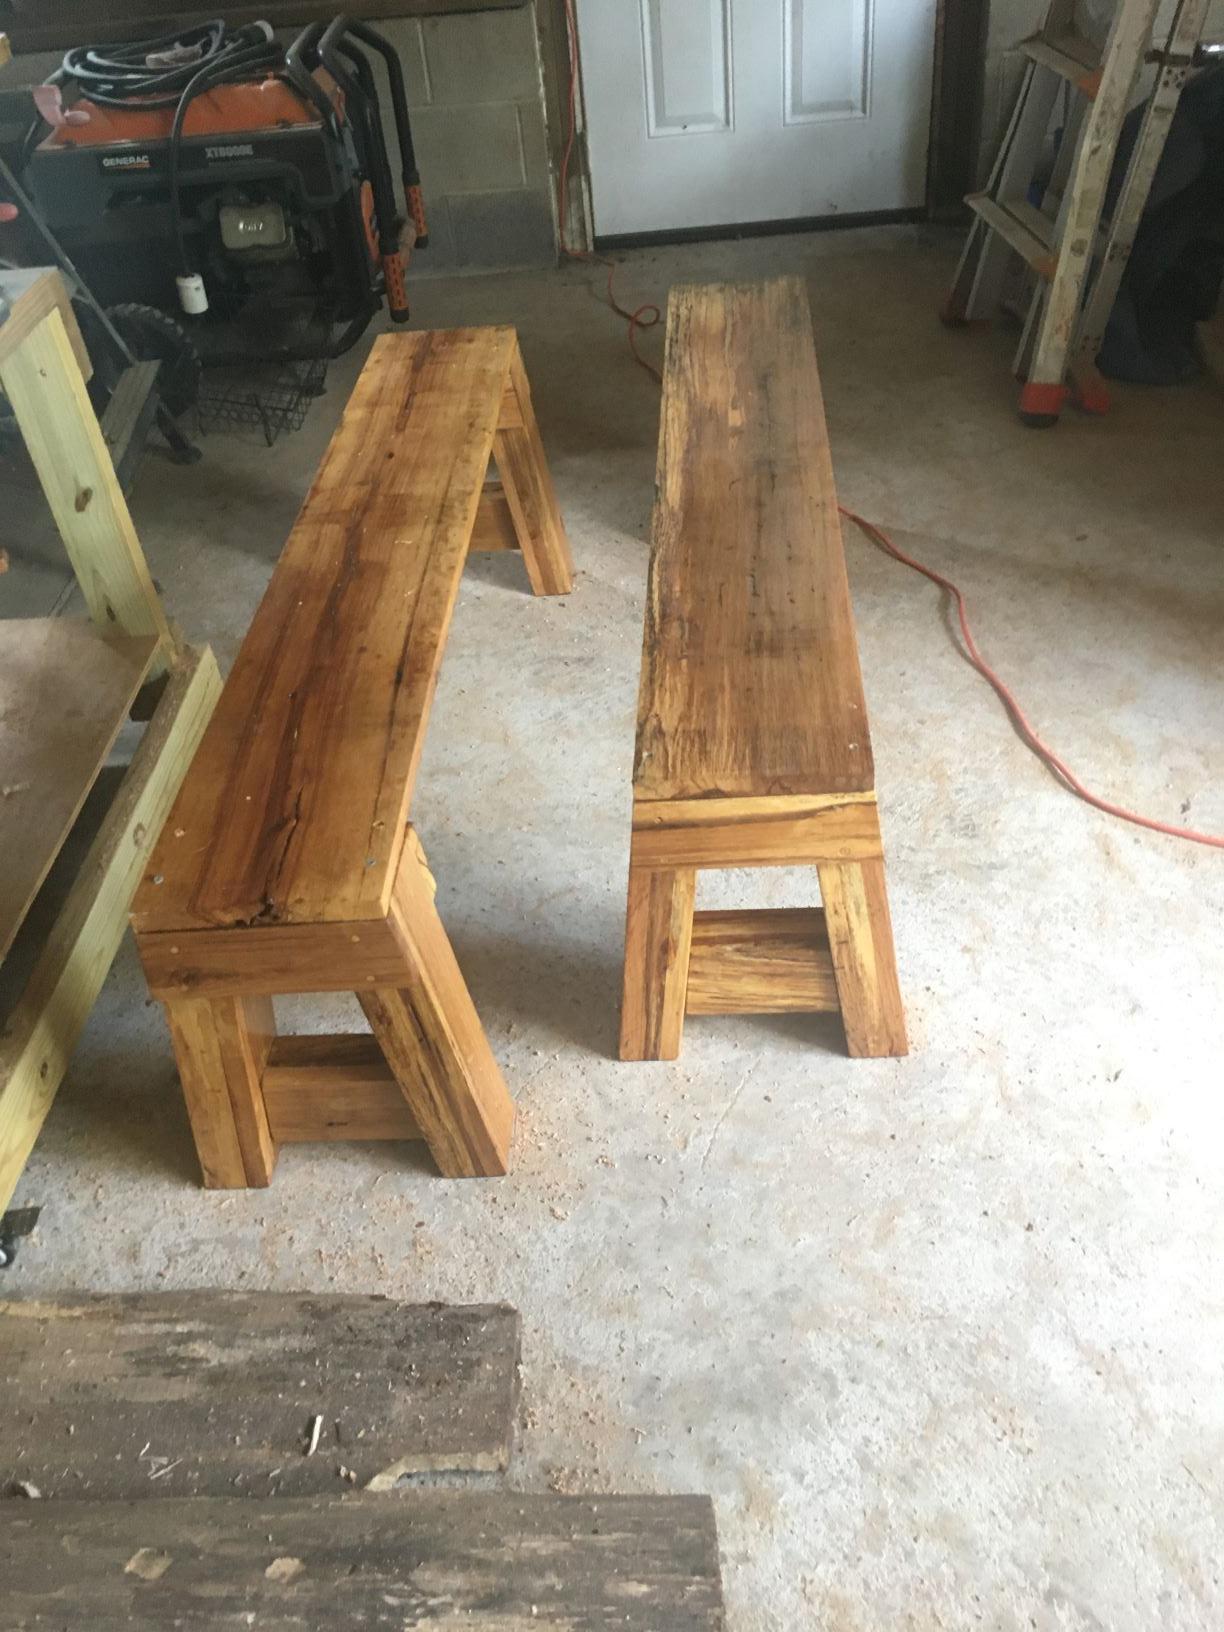
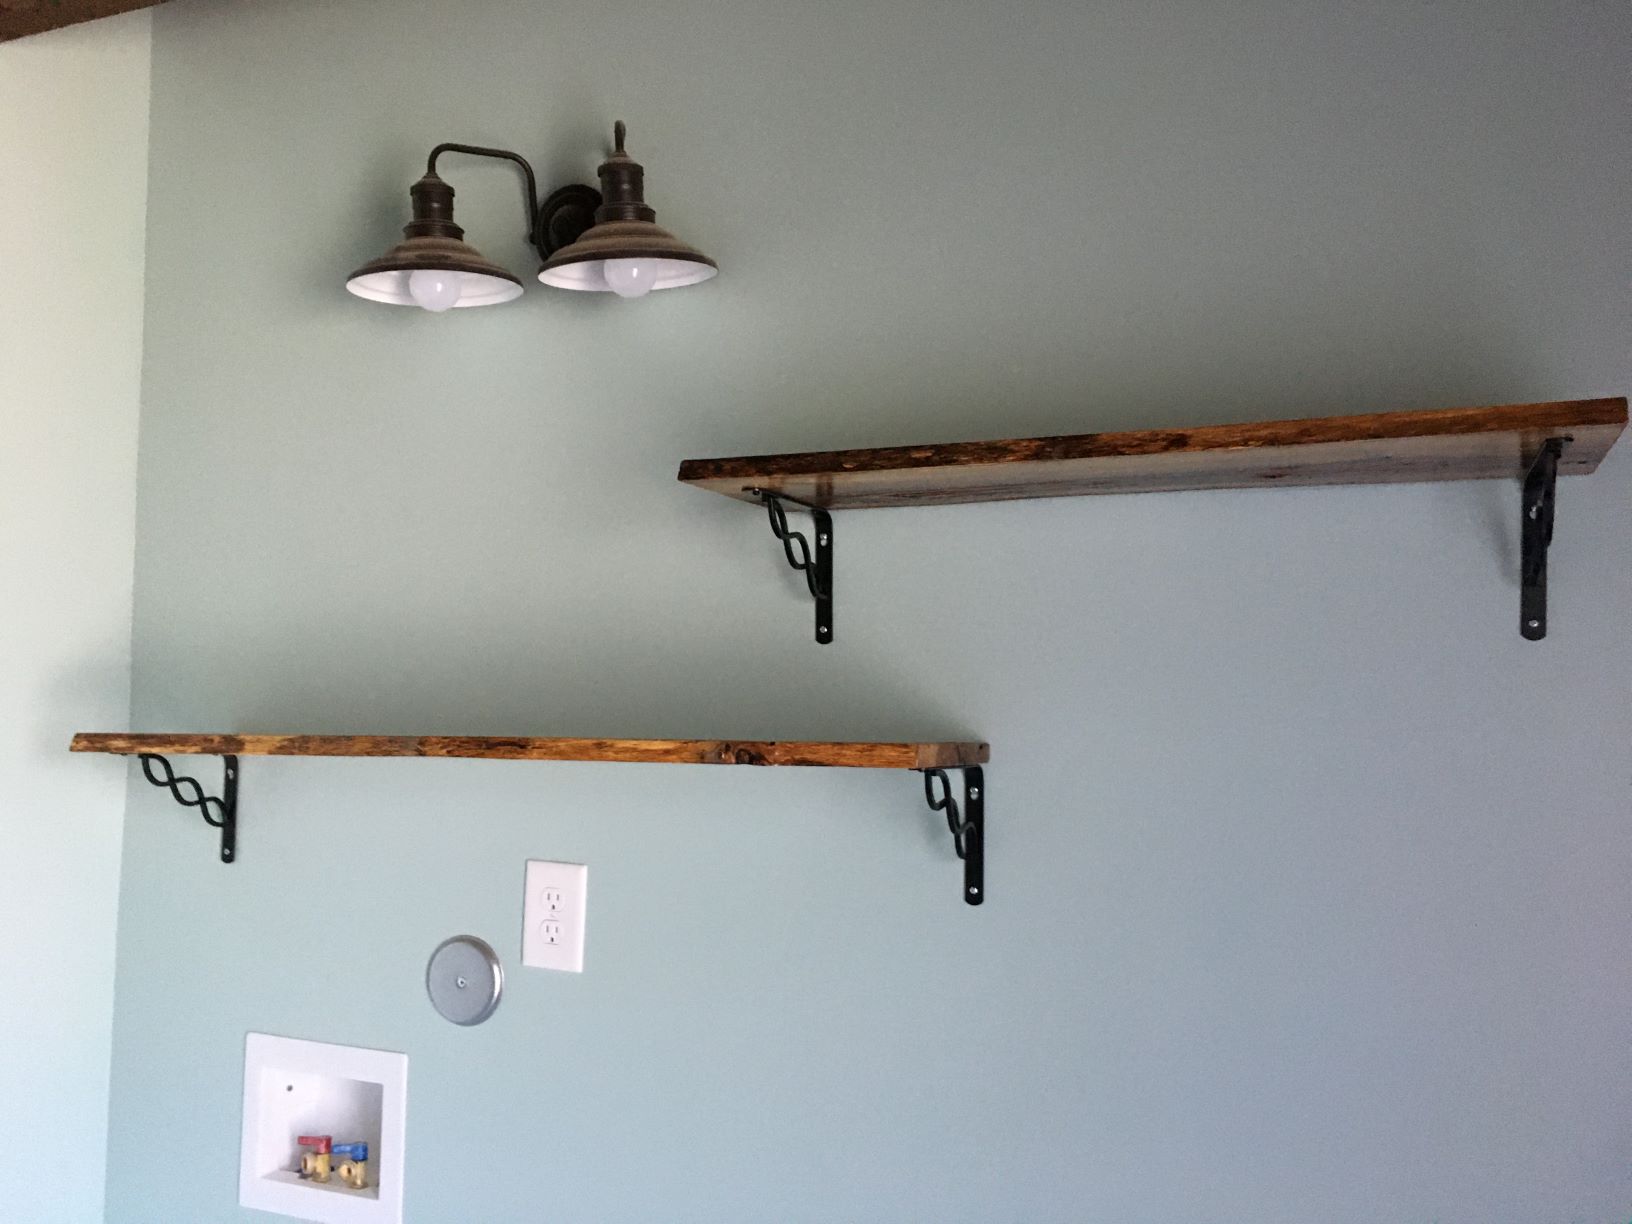
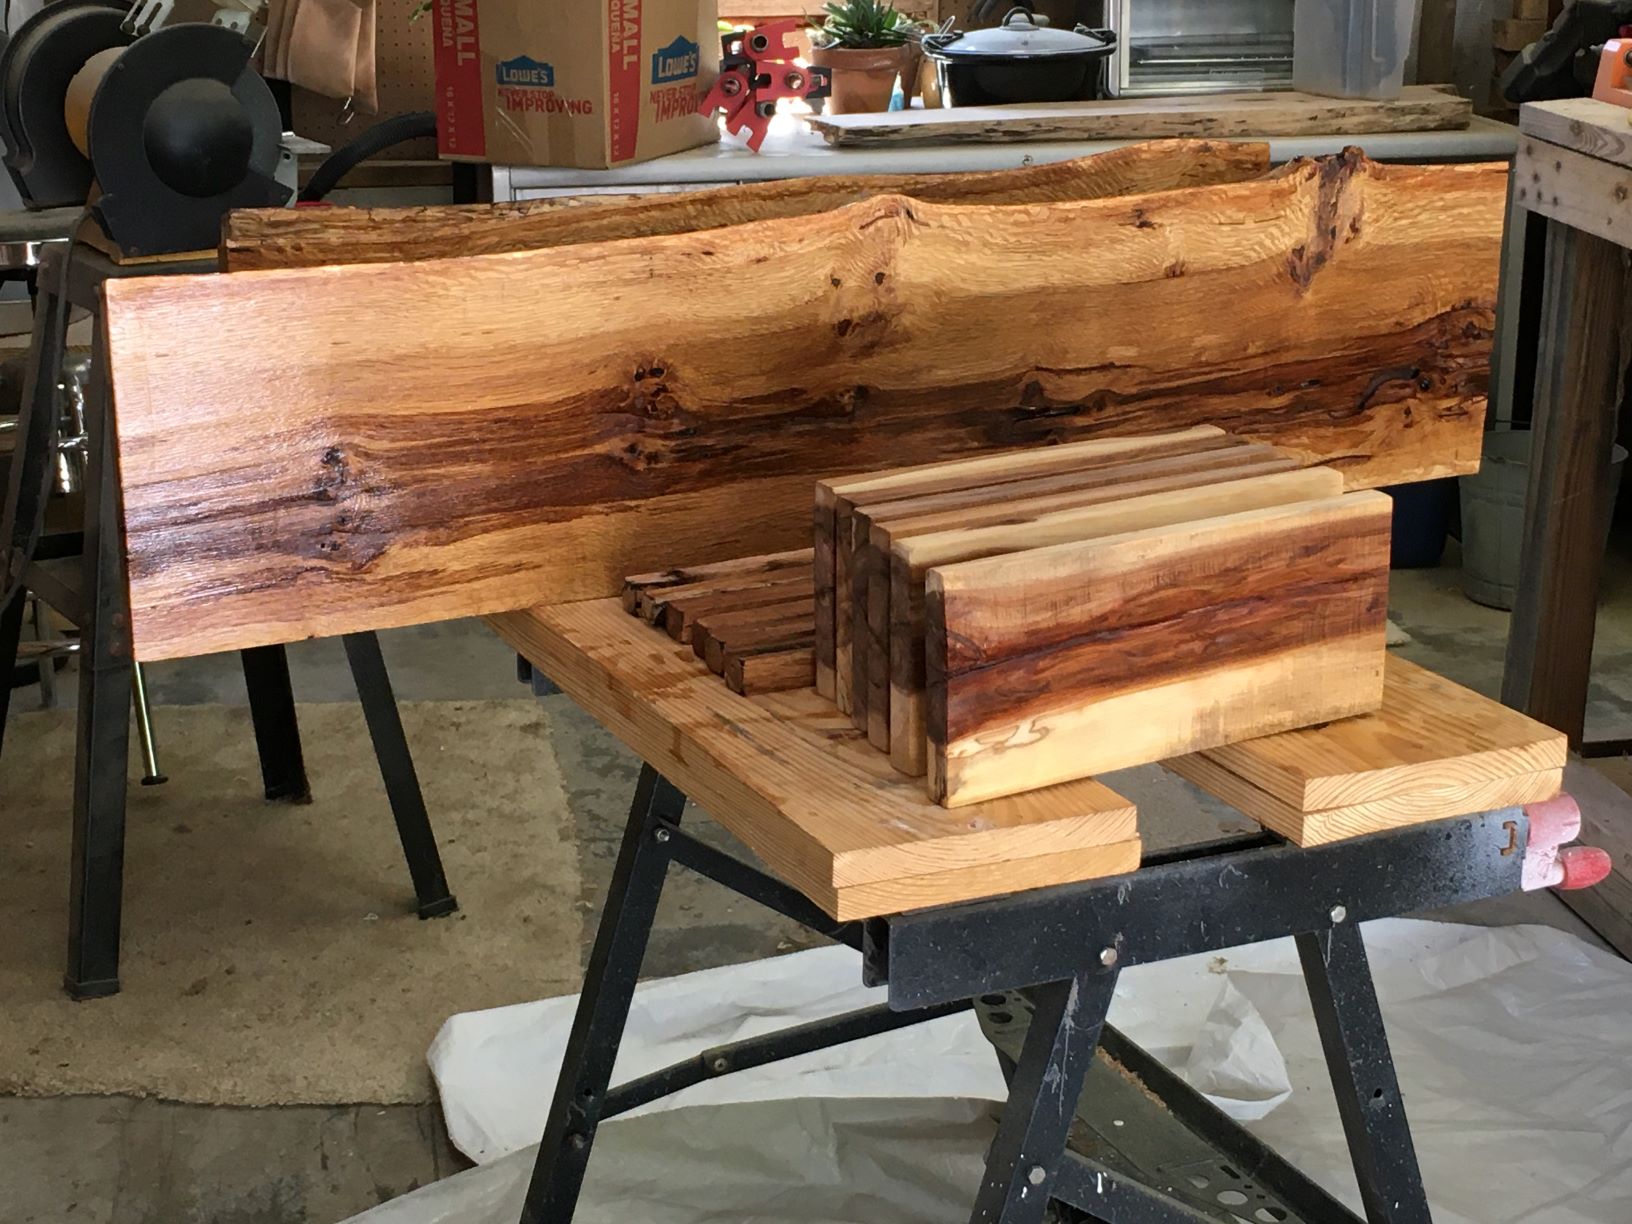
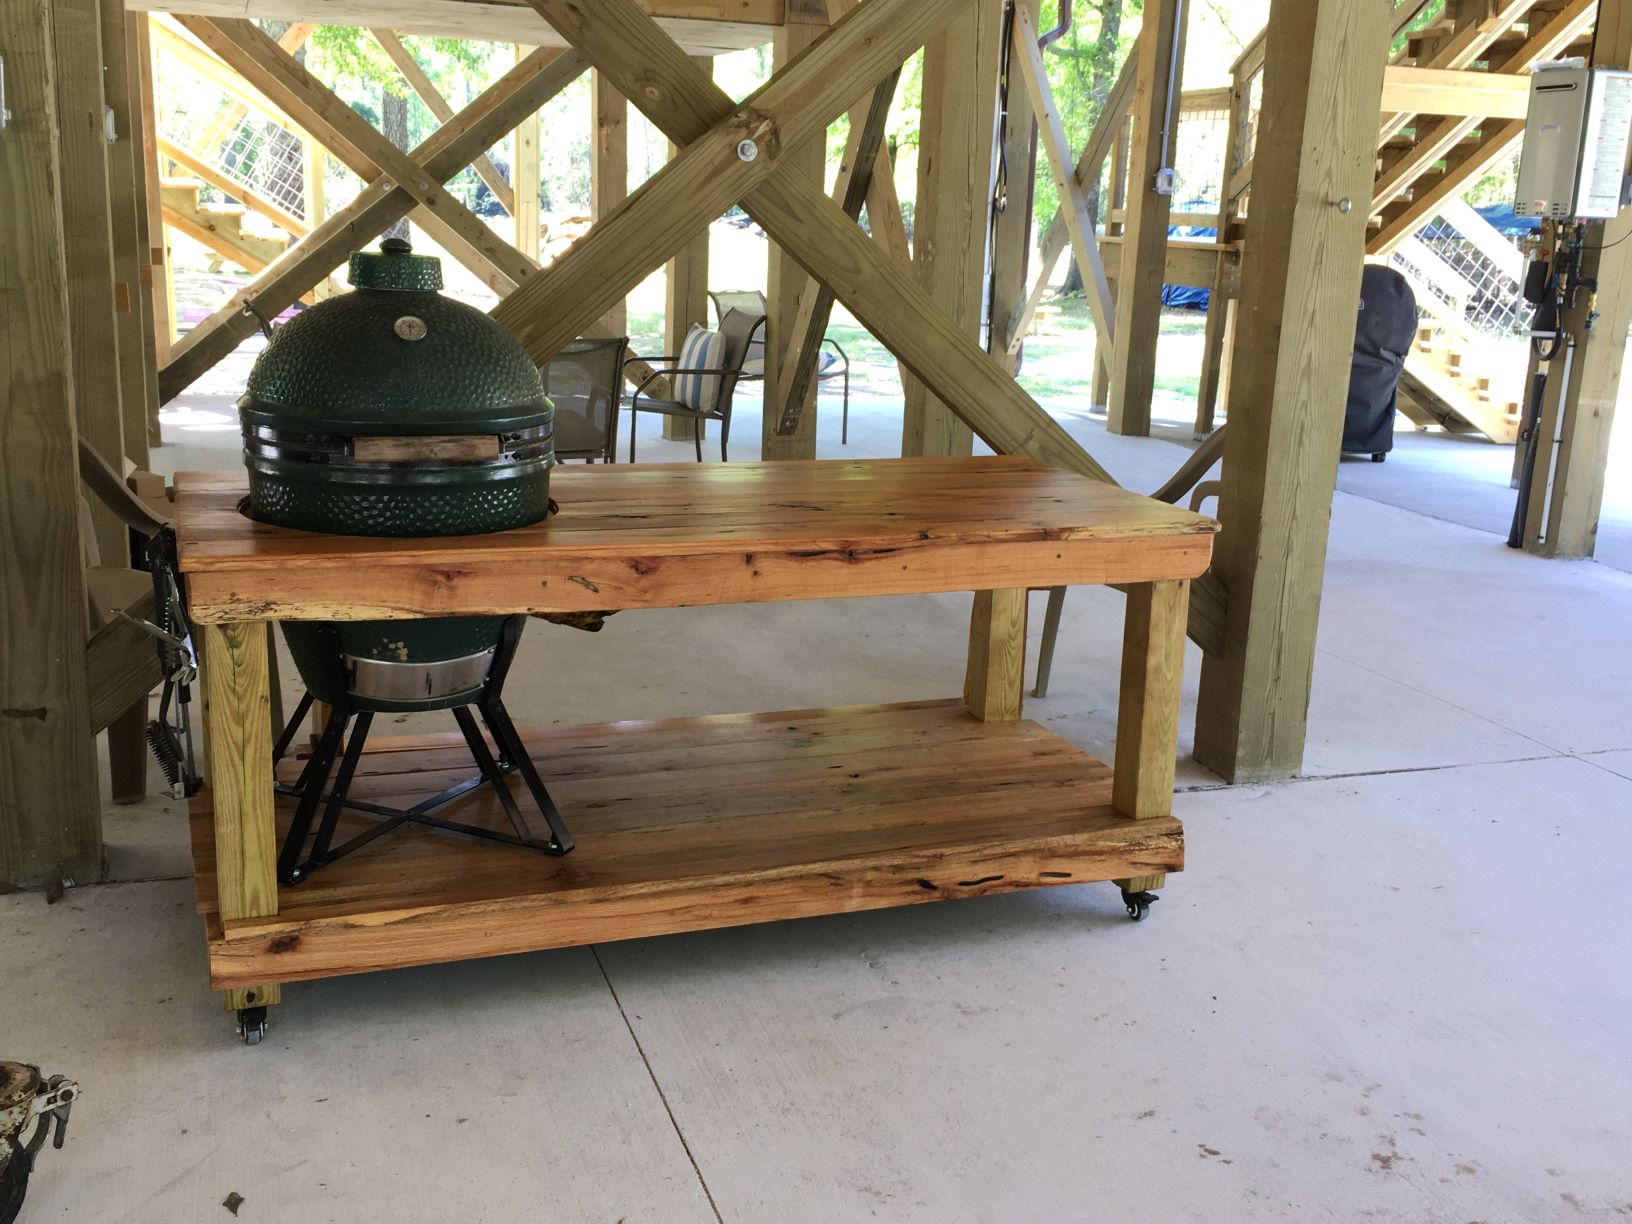
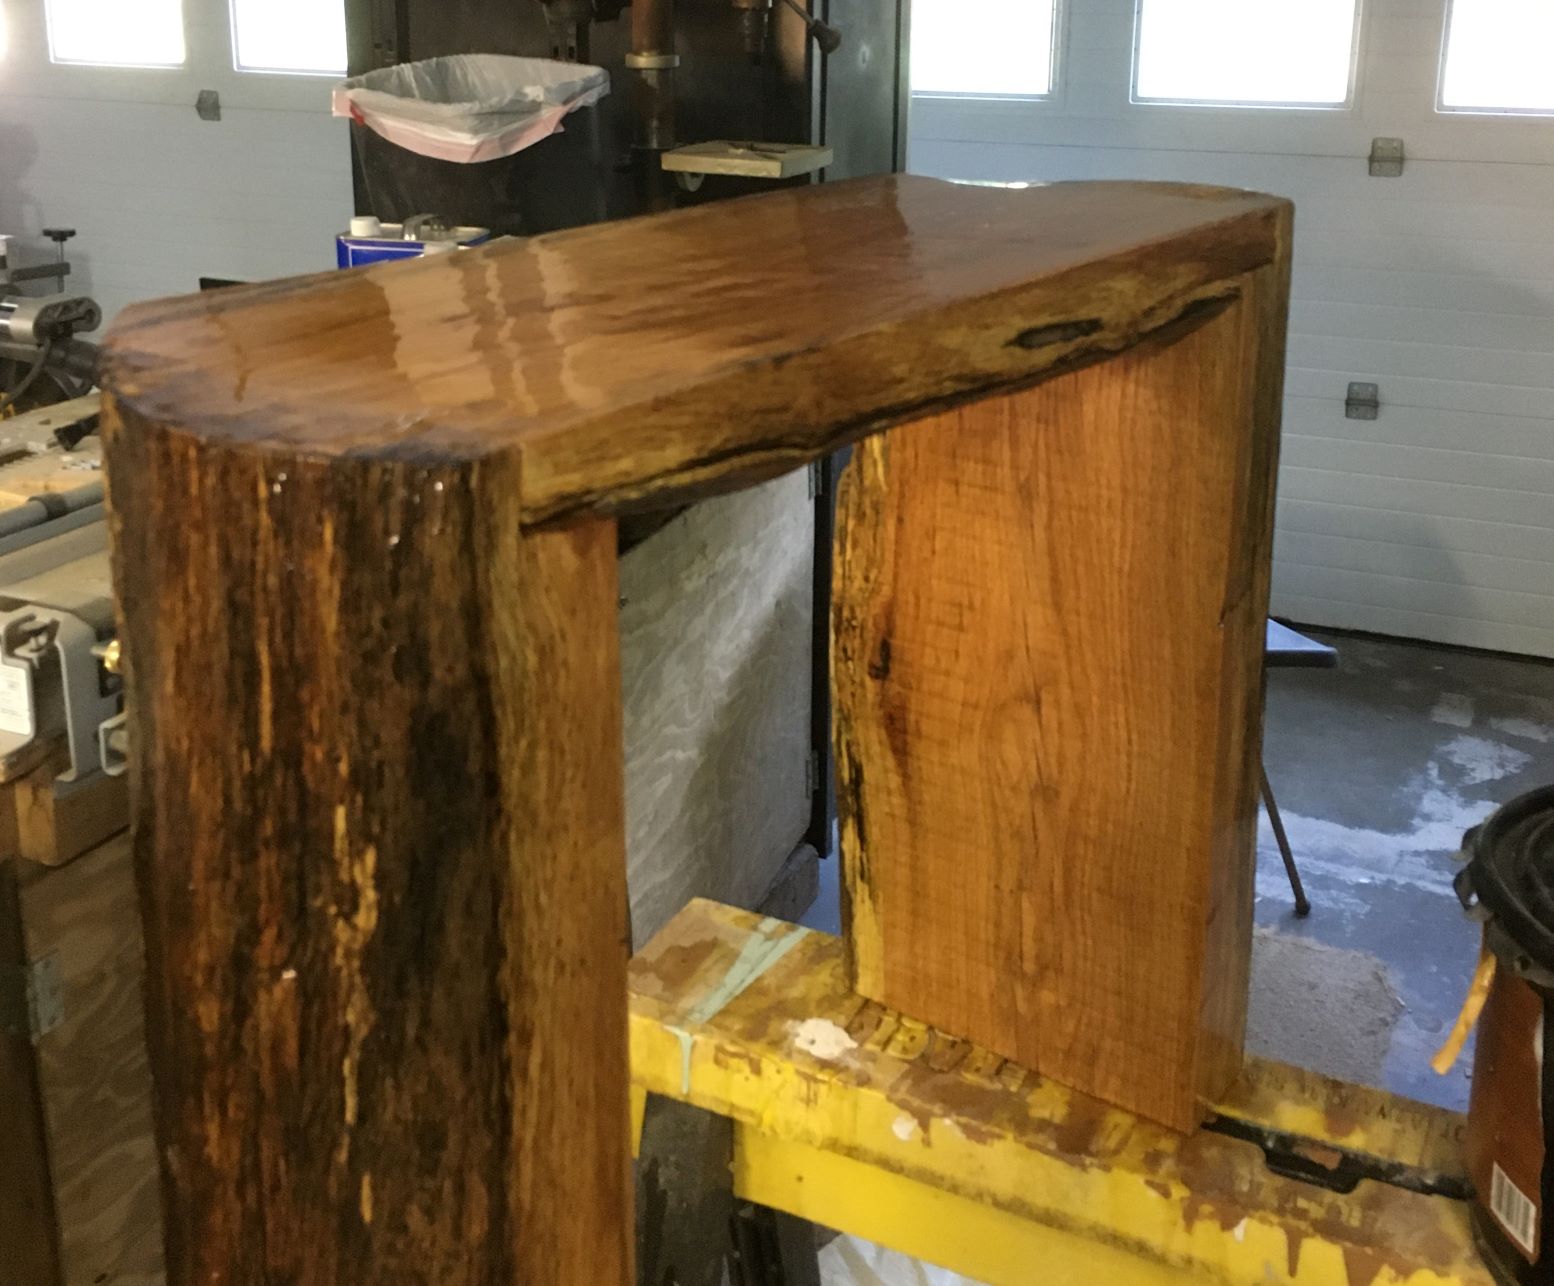
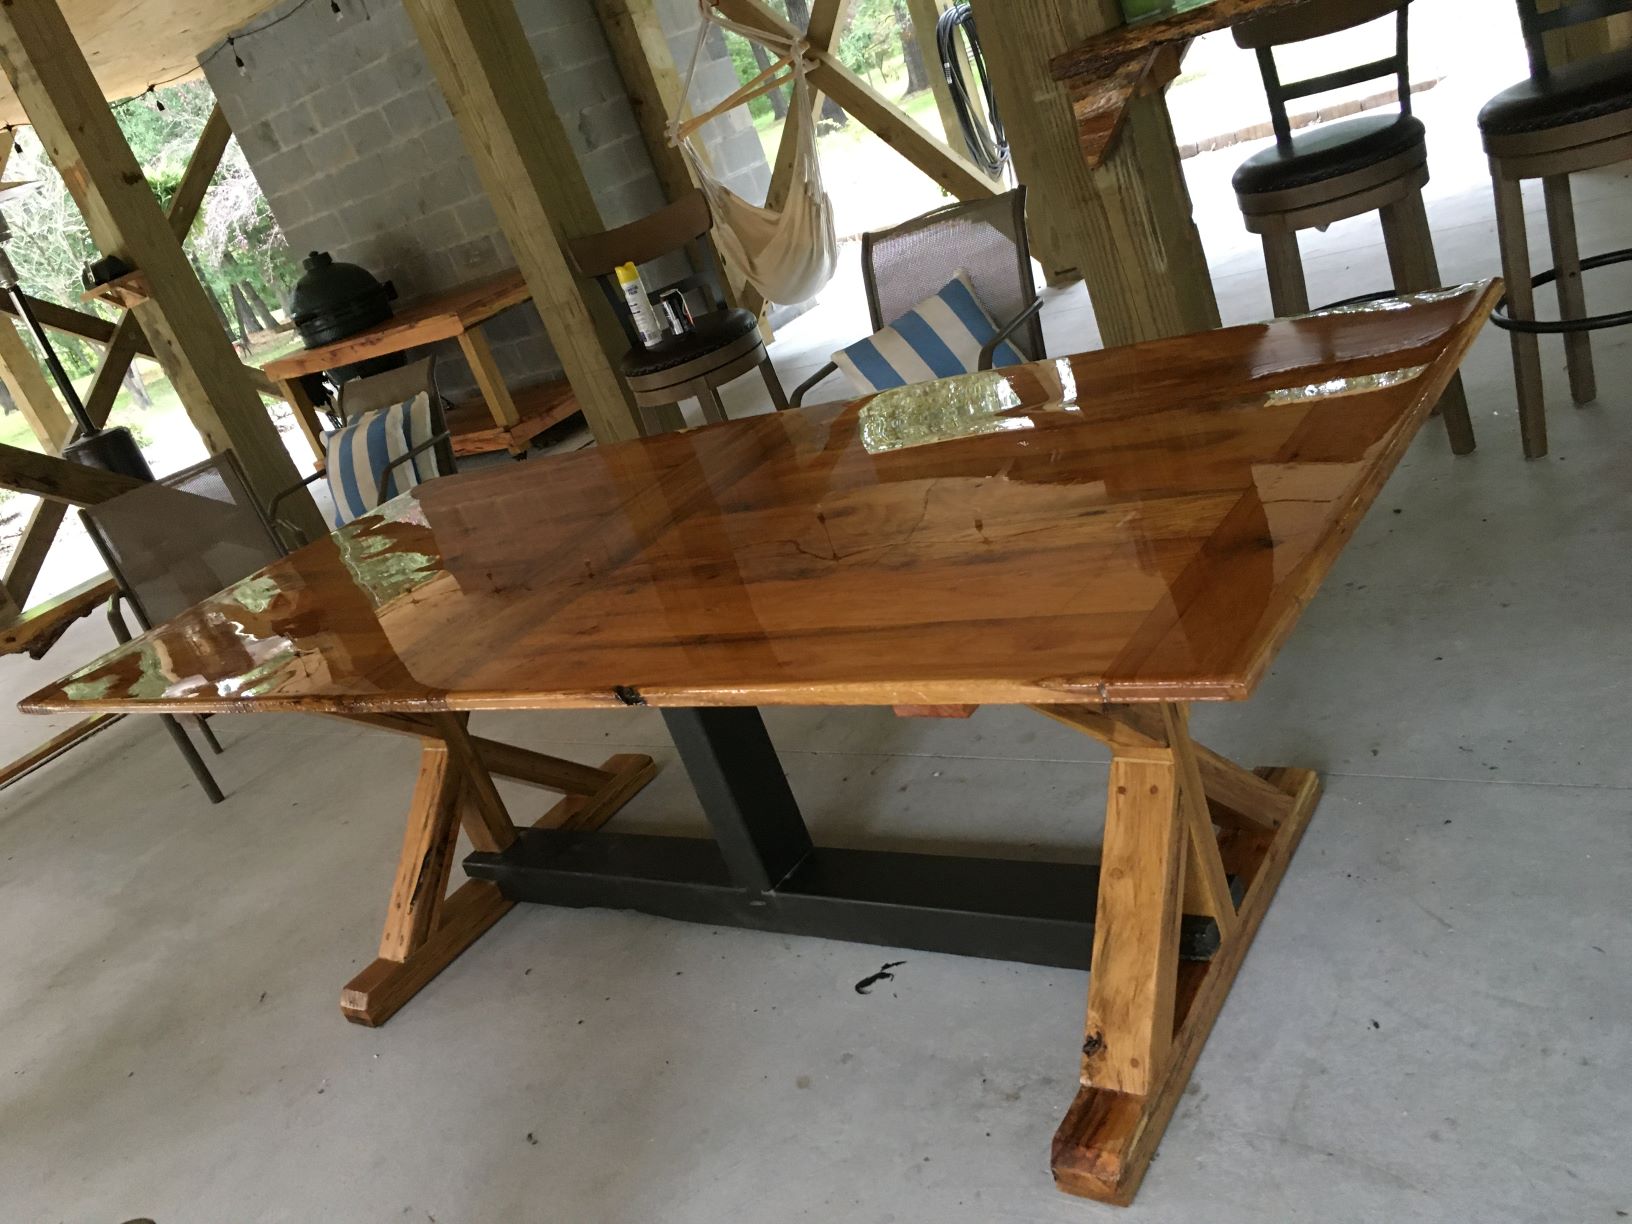
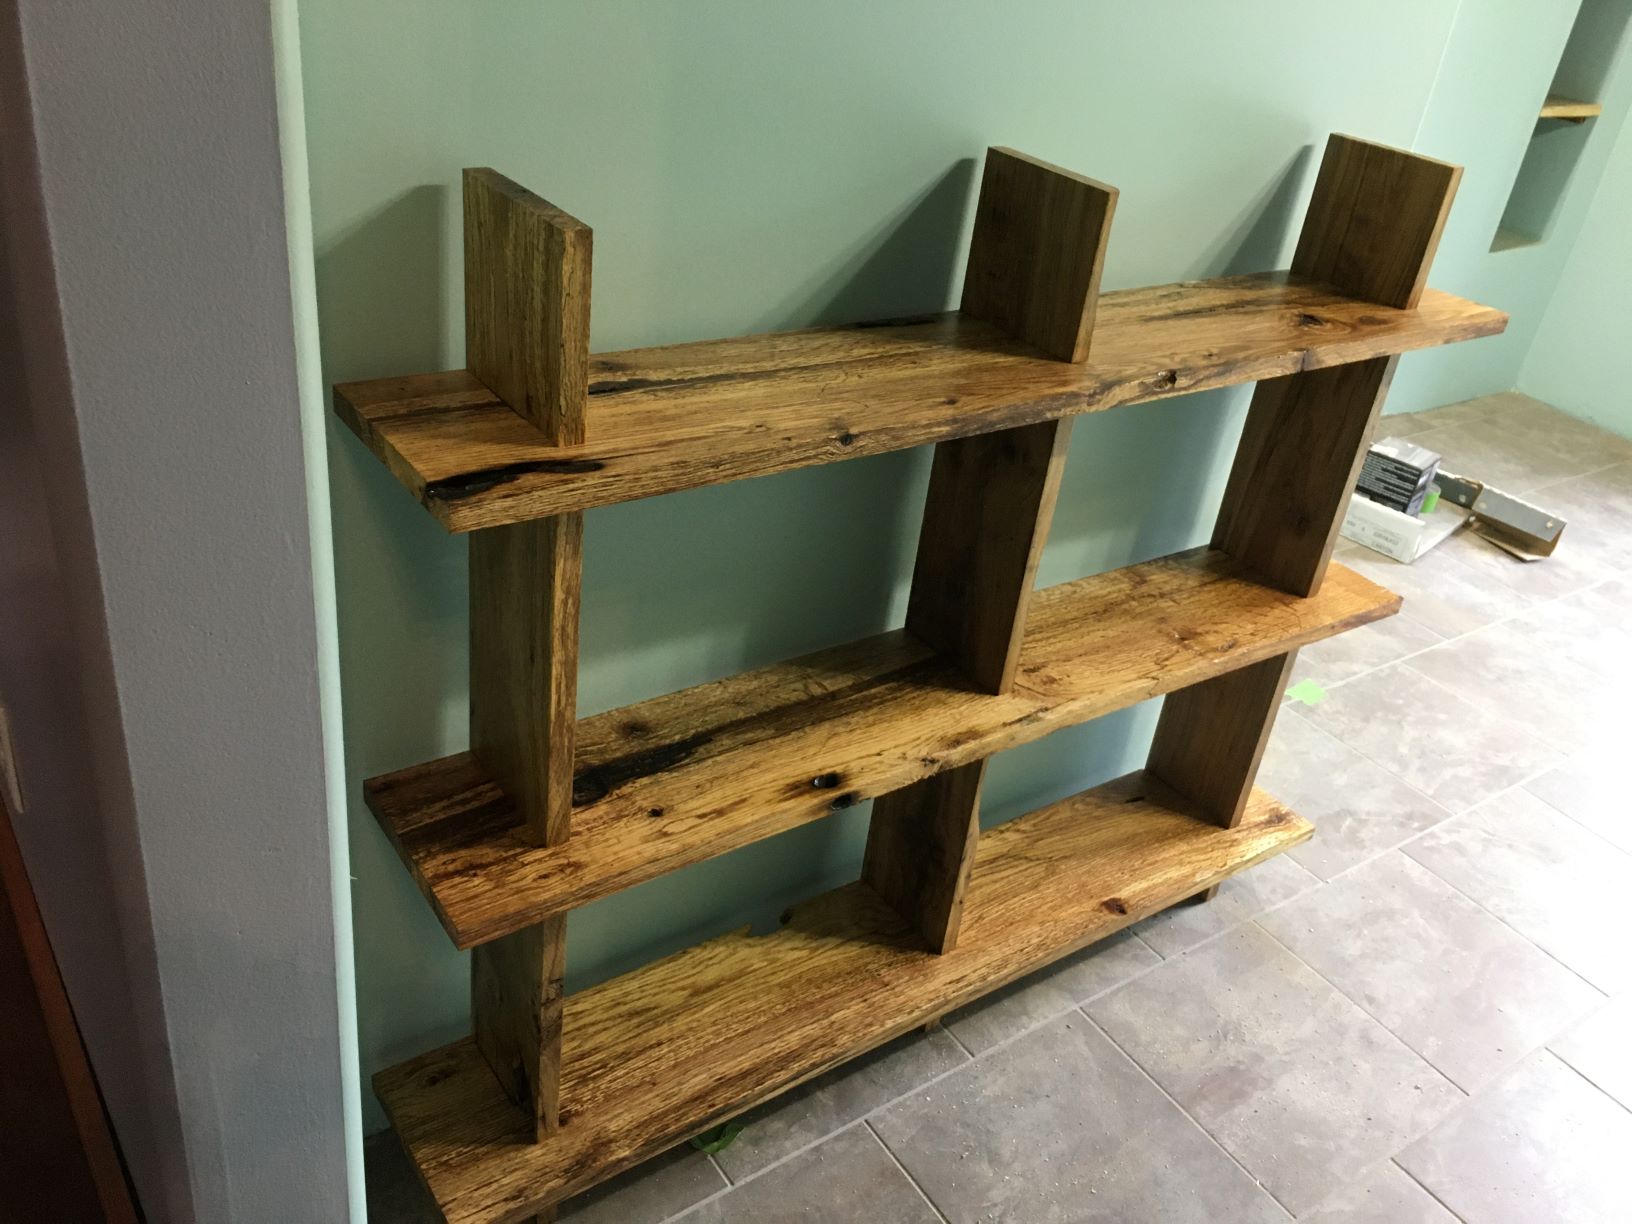
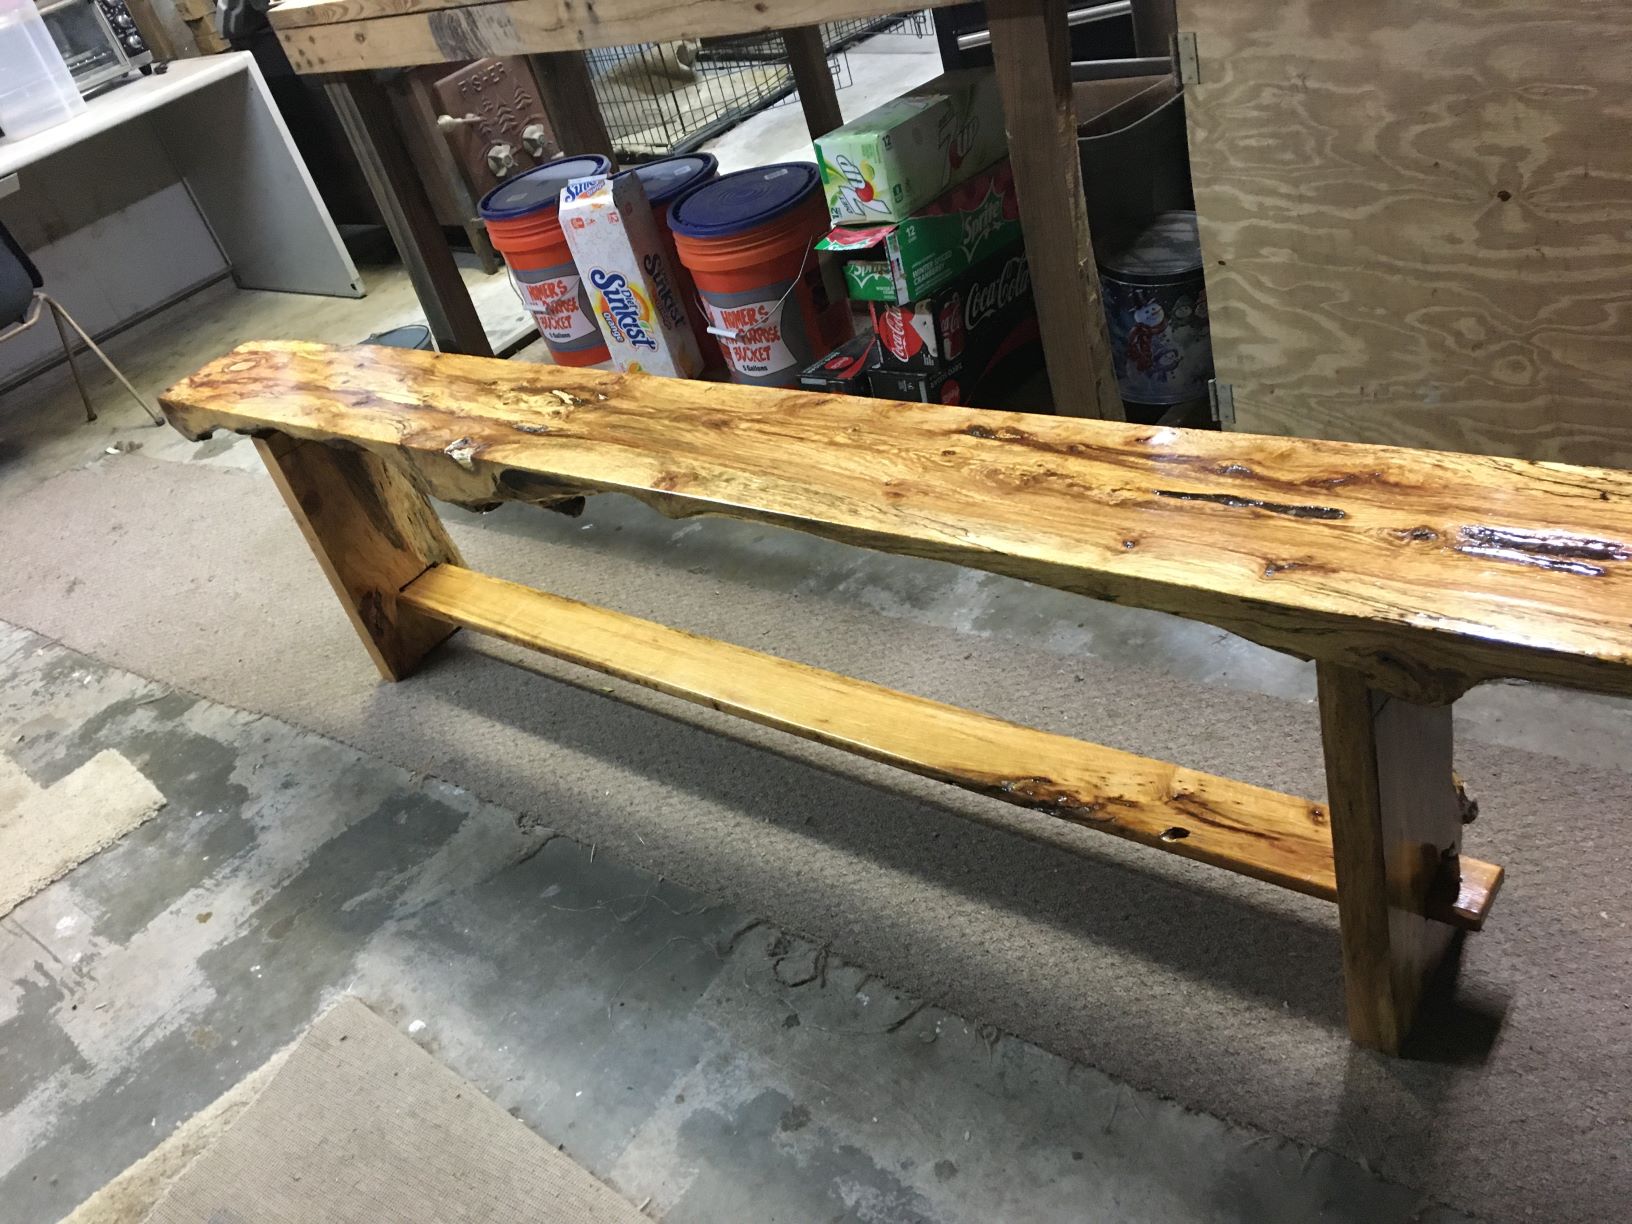
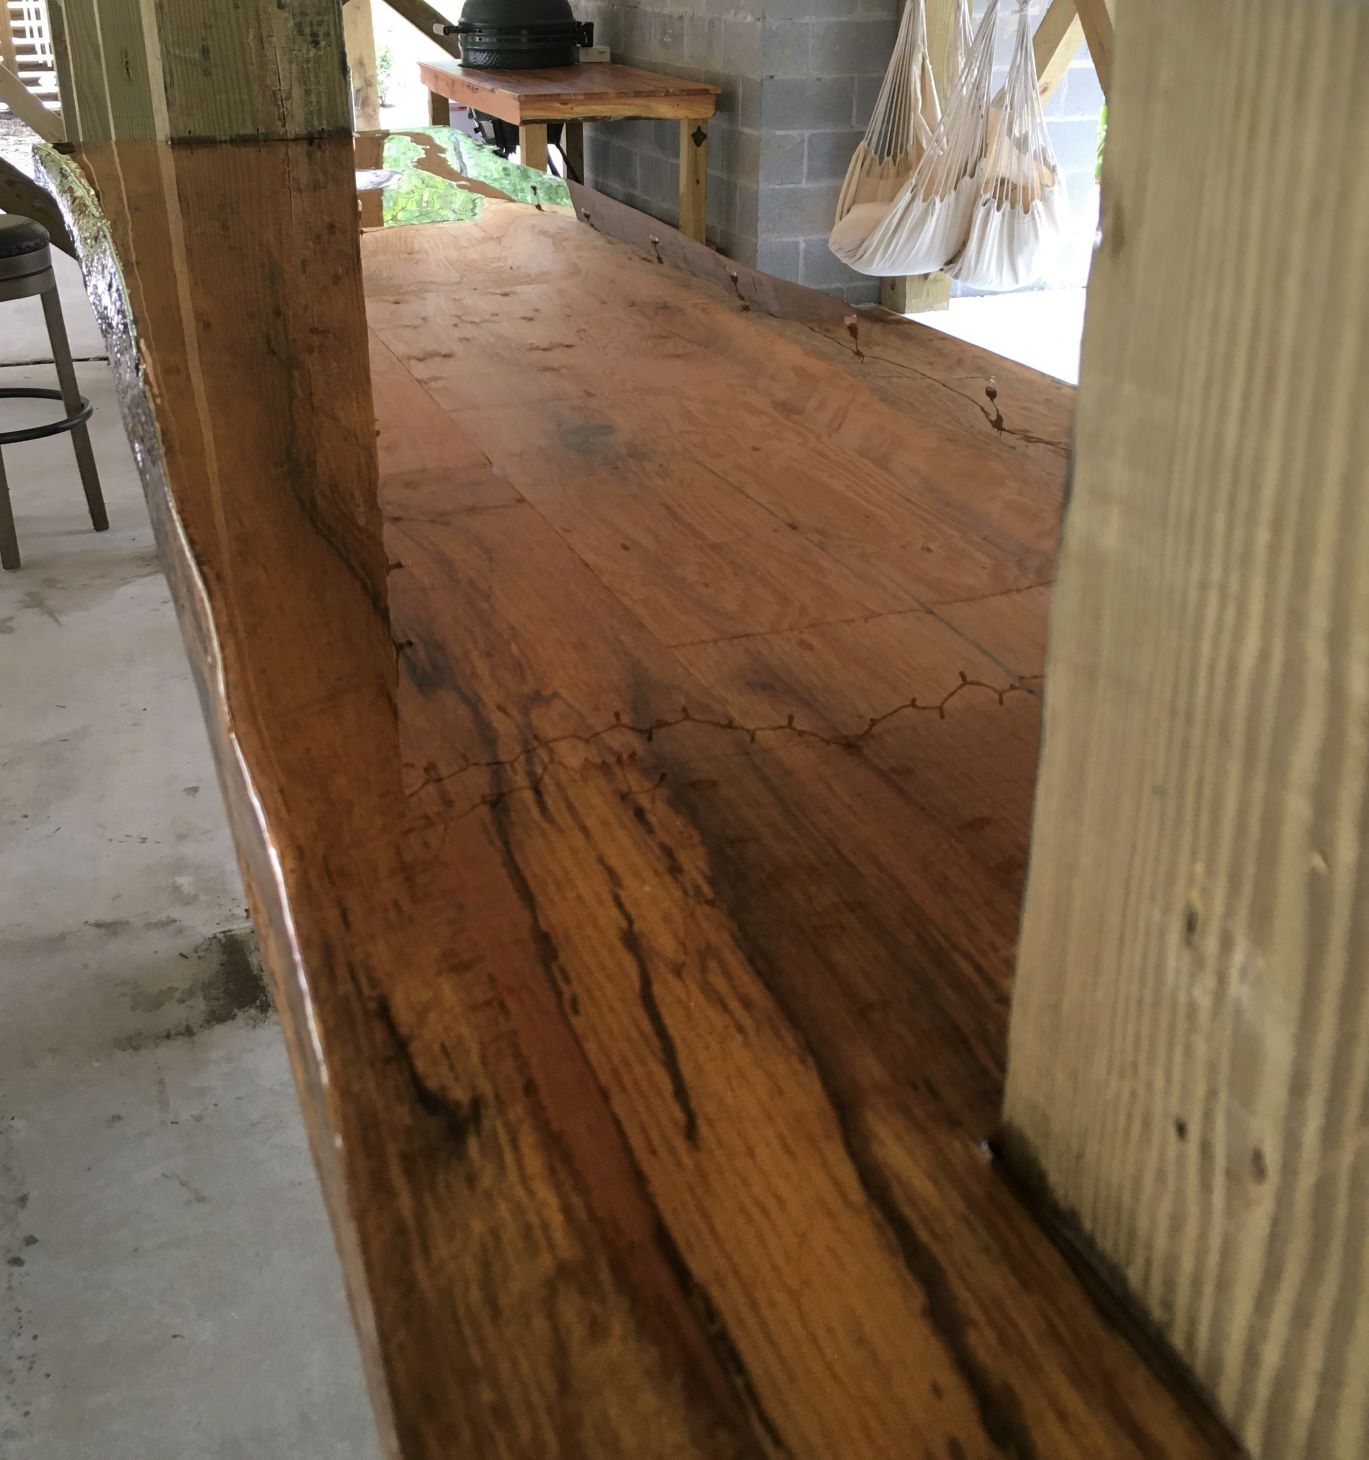
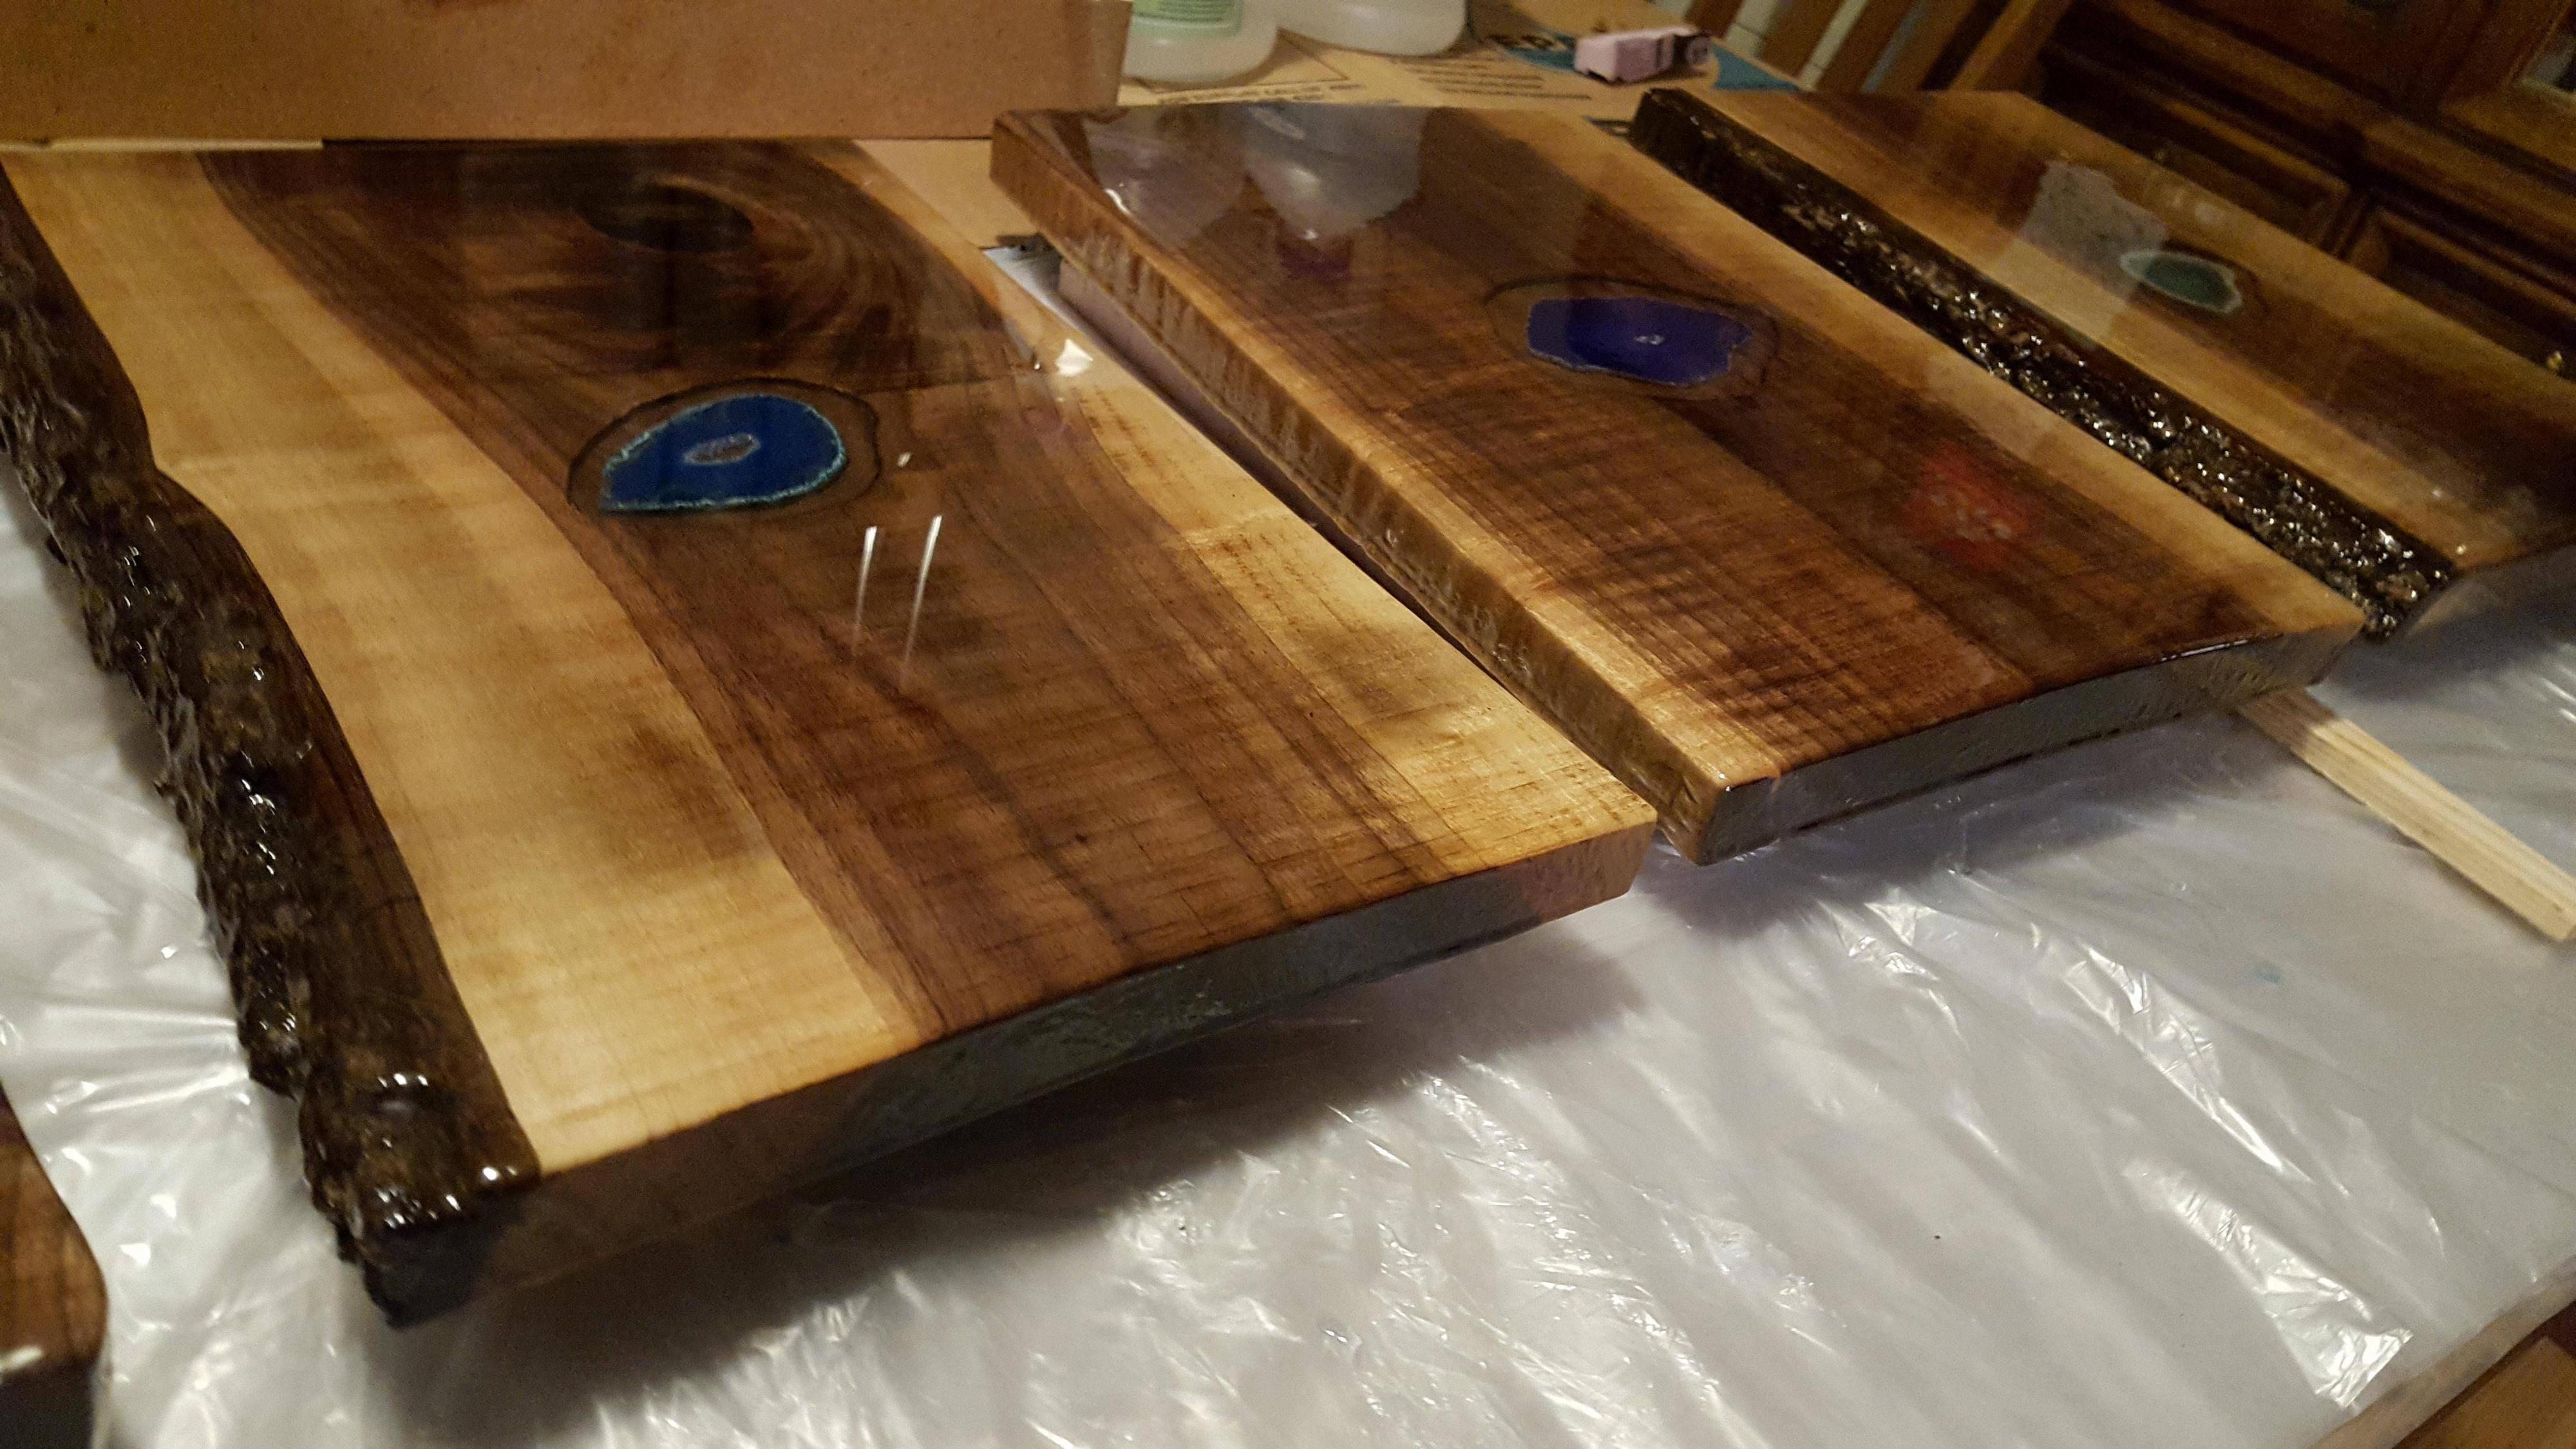
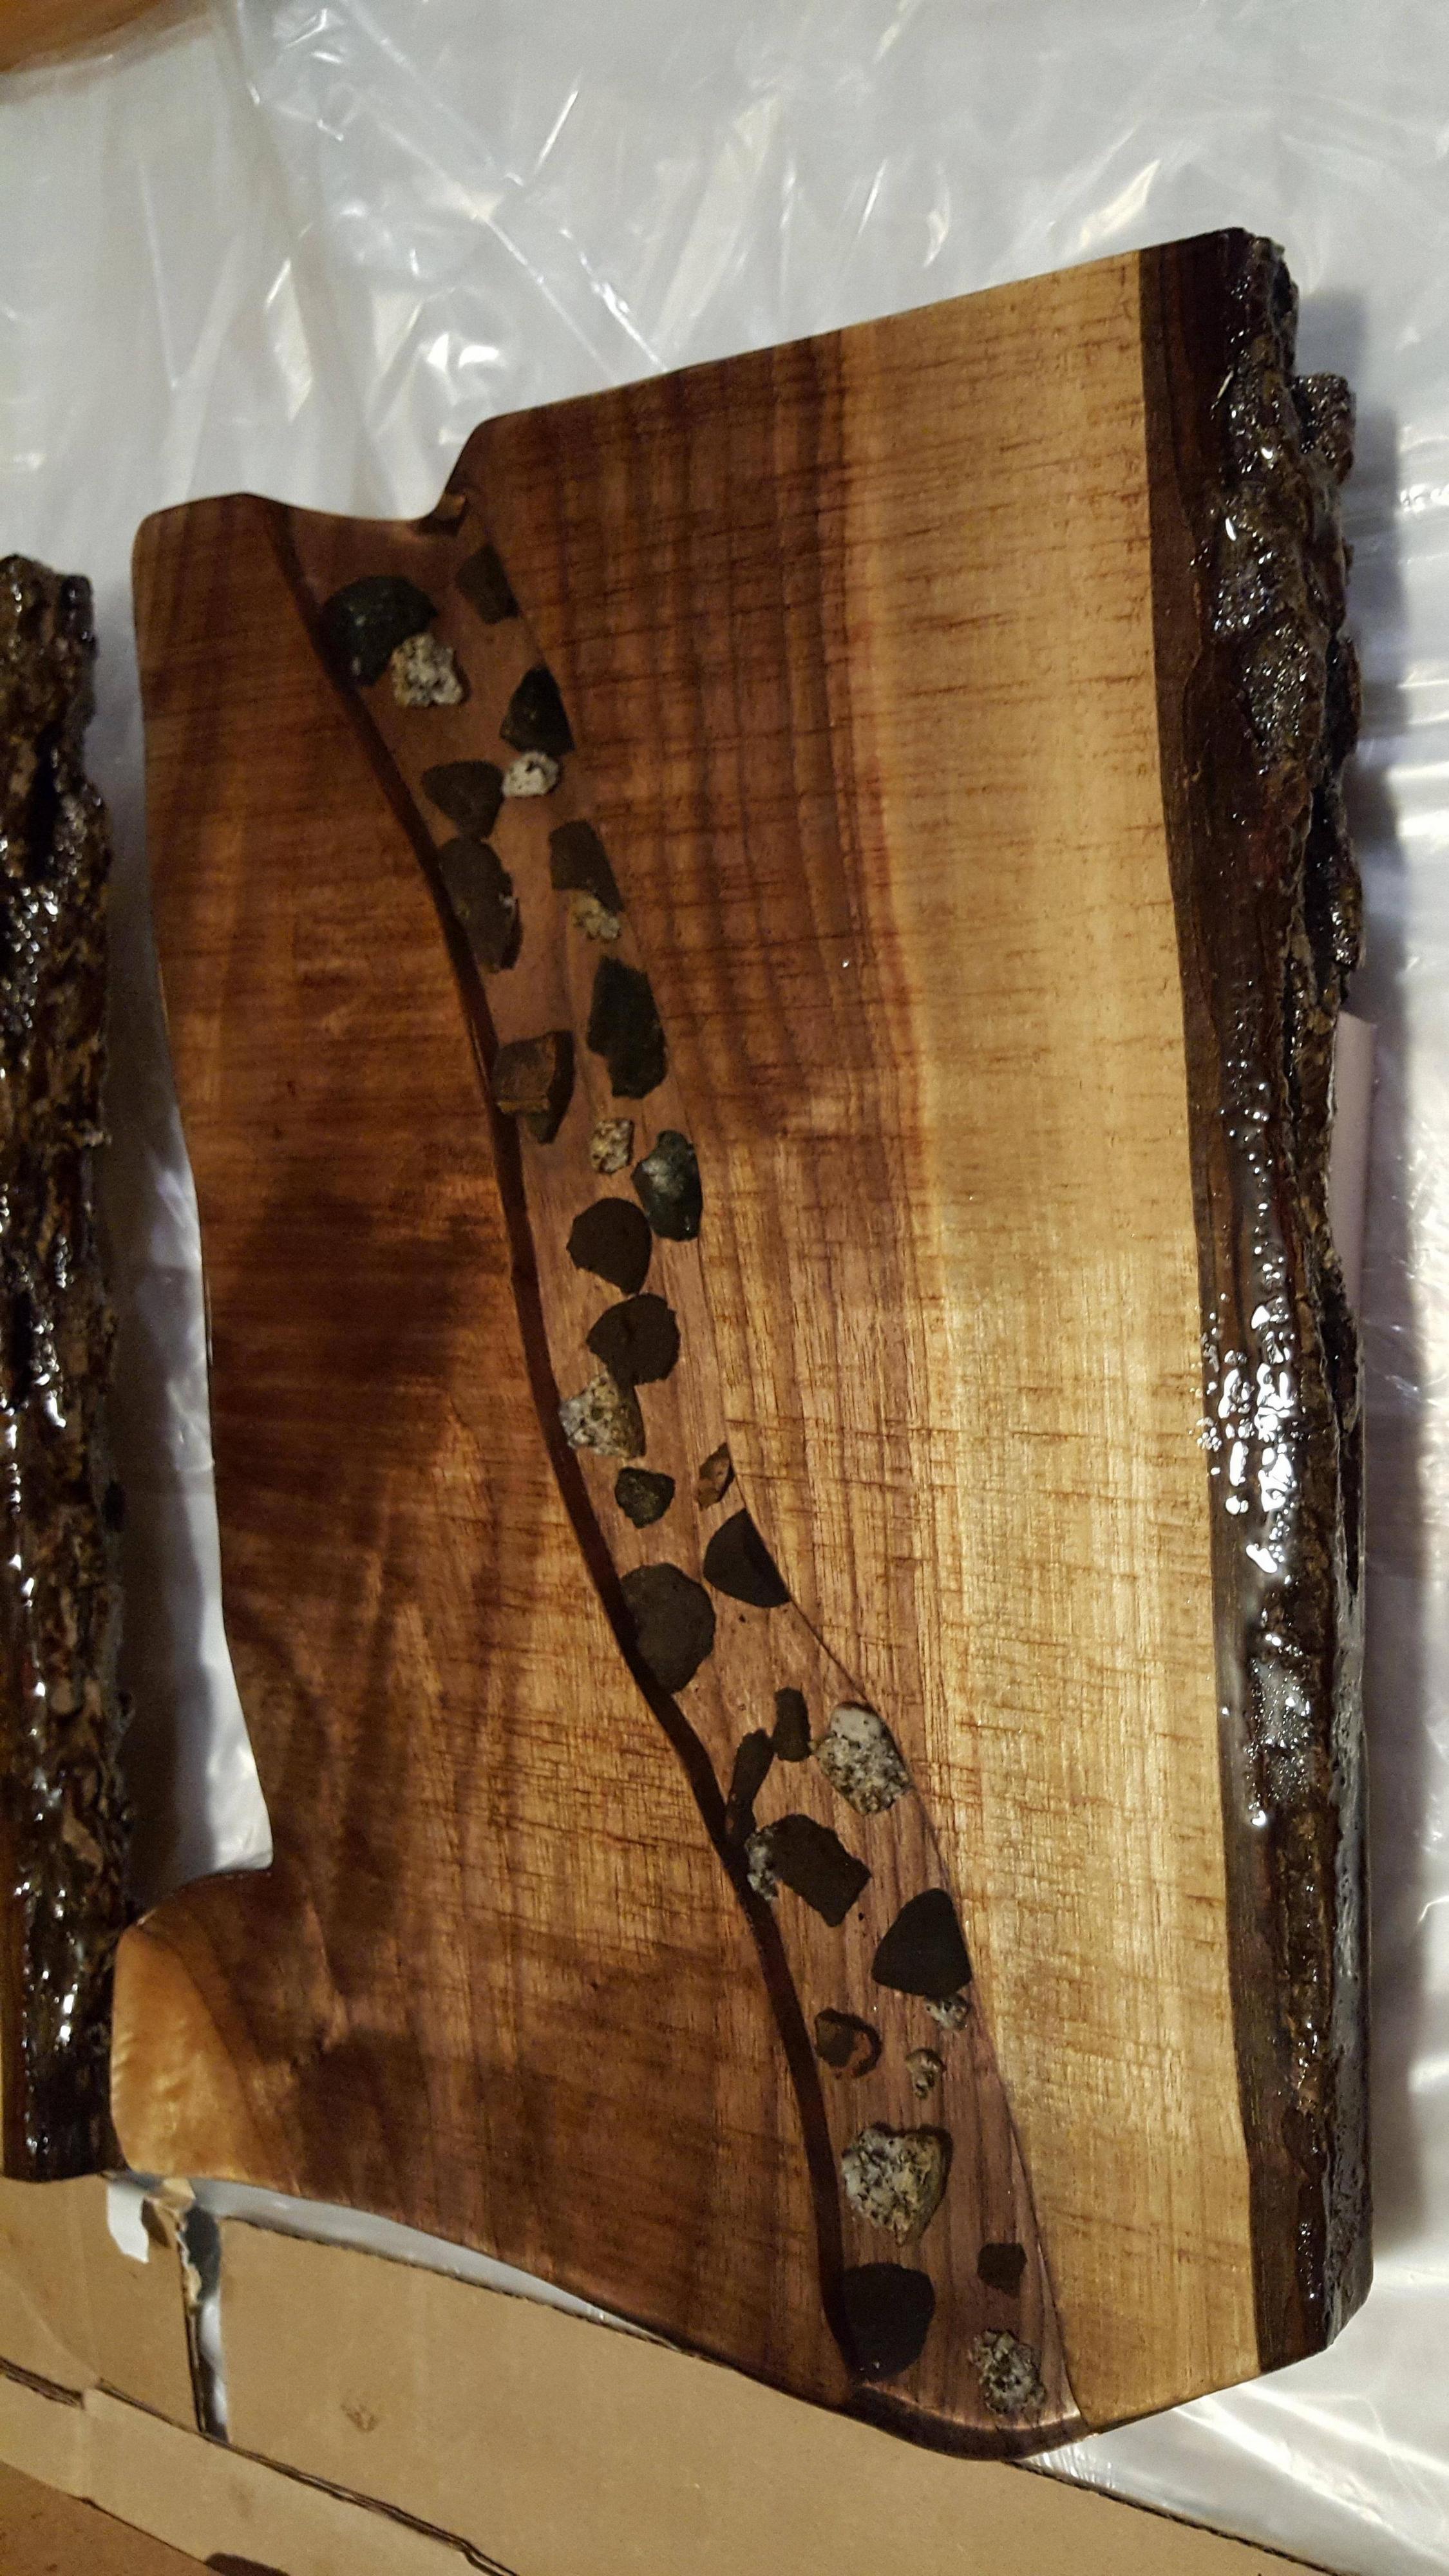
Almost exactly two years ago we were flooded by hurricane Florence and had a dozen or more oaks and hickories uprooted. Since then we have rebuilt, elevated, and moved back into our log cabin. I have also cut and milled many of the fallen trees. Below are some of the works from that lumber.
I used the lumber to replace the shelving in the cabin lost to the flooding. The benches next to the generator I am finishing this weekend. The bar top and farm table both have epoxy finishes so you are seeing a lot of reflections on the surface.<br><br>
 <br>
<br>
 <br>
<br>
 <br>
<br>
 <br>
<br>
 <br>
<br>
 <br>
<br>
 <br>
<br>
 <br>
<br>
 <br>
<br>
 <br><br>
I used the lumber to replace the shelving in the cabin lost to the flooding. The benches next to the generator I am finishing this weekend. The bar top and farm table both have epoxy finishes so you are seeing a lot of reflections on the surface.<br><br>
I have a volunteer black walnut killing various of my plants out front. It's gotten big enough I can make some stuff out of it. Mostly things like rifle stocks, I want to see how it does as a guitar neck, maybe a body
(these are solid body electrics), picture frames, that kind of thing. Then I can put a real walnut tree there or something else farmer's market friendly. If I ever do go insane again and want some black walnuts, the neighbors have plenty. That's ok. They can have them.
(these are solid body electrics), picture frames, that kind of thing. Then I can put a real walnut tree there or something else farmer's market friendly. If I ever do go insane again and want some black walnuts, the neighbors have plenty. That's ok. They can have them.
hoosierdoc
Freed prisoner
anyone do any poured resin tables? I want to do one with a ship's wheel inside. watching a ton of YouTube videos
Clay Pigeon
Shooter
Looks nice OP, pssst... Paint the screws black on your shelf brackets..... 
anyone do any poured resin tables? I want to do one with a ship's wheel inside. watching a ton of YouTube videos
lookin at doing a desk with guns and parts in it.. Some real neat work in videos.
Clay Pigeon
Shooter
anyone do any poured resin tables? I want to do one with a ship's wheel inside. watching a ton of YouTube videos
I did one of those Cypress stump cutoff kits they sell in VA and SC out of the swamp, it turned out nice.
My ex got custody of it in the divorce..... #sadface
There used to be a local sail-boaters bar in Annapolis/Eastport called Marmadukes, in part of the bar was a small stainless wheel off a sailboat under resin.
Now it a Ruths Chris... ##sadface
olhorseman
Sharpshooter
Here are a few of the the things I learned in doing the table in post#123 above.anyone do any poured resin tables? I want to do one with a ship's wheel inside. watching a ton of YouTube videos
1. Use plenty of seal coats - at least 3 (and seal any openings on bottom that could allow bubbles on top - modeling clay can be used on bottom and removed after project completion)
2. Temperature and humidity are very important - higher temperature means faster curing which can trap air bubbles before they reach the surface. High humidity can cloud the epoxy. Ideal temp - 70 and <60% humidity.
3. Prepare more mixture than you think you need.
4. Don't be afraid to fix it if it doesn't come out right. Just sand the entire surface enough to rough the surface for the next layer to adhere. (The sanded surface won't look good but will turn out fine after the next pour.)
anyone do any poured resin tables? I want to do one with a ship's wheel inside. watching a ton of YouTube videos
Here are a few of the the things I learned in doing the table in post#123 above.
1. Use plenty of seal coats - at least 3 (and seal any openings on bottom that could allow bubbles on top - modeling clay can be used on bottom and removed after project completion)
2. Temperature and humidity are very important - higher temperature means faster curing which can trap air bubbles before they reach the surface. High humidity can cloud the epoxy. Ideal temp - 70 and <60% humidity.
3. Prepare more mixture than you think you need.
4. Don't be afraid to fix it if it doesn't come out right. Just sand the entire surface enough to rough the surface for the next layer to adhere. (The sanded surface won't look good but will turn out fine after the next pour.)
I built a conference table a few years ago, reclaimed circle-sawn oak that they wanted to see the saw marks. I coated the top with about 3/16"-1/4" of epoxy to have a smooth writing surface. olhorseman has some good tips. One thing I learned is that bubbles can be coaxed out with a heat gun(some guys use a propane torch).
I used West systems epoxy, did it in two layers with a good sanding in between. I then sprayed a post-catalyzed conversion varnish over the top.
A ships wheel sounds like a fun project. Depending on how big the wheel is, that could take a lot of epoxy.
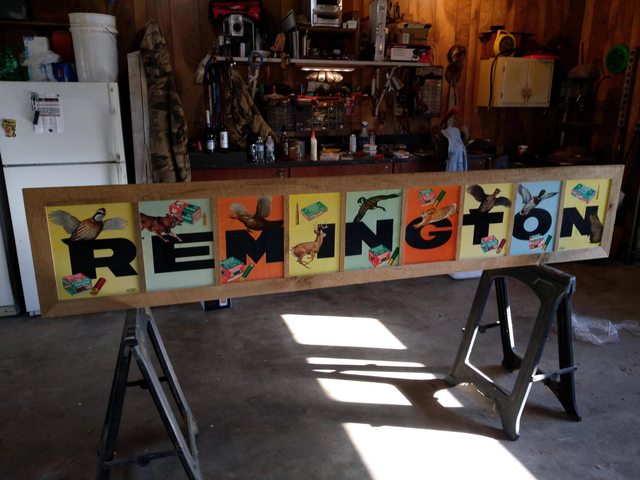
My little brother helped me with my porch roof last summer. More like, I helped him. He used to be roofer. I offered to pay him, beyond the beer we consumed doing the roof. He said no $$$, but he did want a couple picture frames made. I was like, no problem. How hard are a couple picture frames? When he brought the pieces he want framed, I was like, s**t.
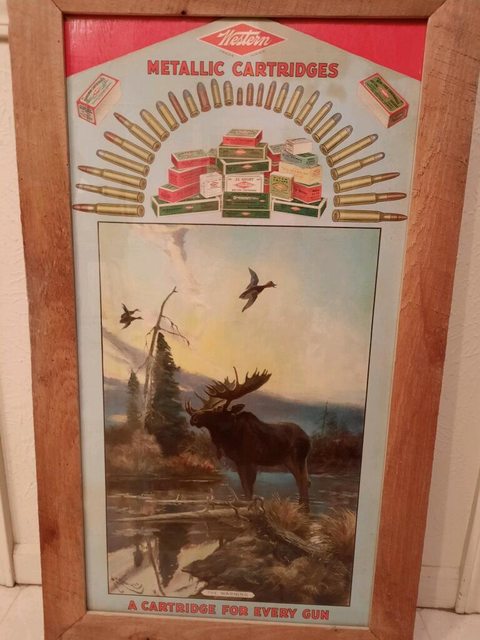
He's been collecting old hunting/fishing advertising for years. Had and Eagle Claw sign that was 2'x6', a Western Ammo sign that was 3'X4', and a Remington sign made up of 9 individual panels that were each 11"x14". He took them to a framing shop and was quoted around $600 to get it done. All he asked was that the frames be made from old, rough sawn lumber of which I have a large amount. Working with rough sawn lumber isn't my favorite thing to do on small pieces, but using it in 8'+ lengths just SUCKS.
I forgot to take pics of the two smaller ones, but I got this one as I wrapped it up on Sunday...
While I was cleaning up, the wife came home from what I pray was the final Christmas Shopping trip of the season. She was showing me her haul which included several charcuterie boards. Apparently, everybody needs one.
I was horrified at what she'd paid for a couple of them and expressed a small amount of displeasure. I don't complain much. As long as she does ALL the shopping, I'm pretty happy to fund the endeavor. Then she hinted around that she'd like one too, cause ya know, everybody needs a charcuterie board. Being a cheapskate possessed of a small degree of skill with woodwork, I figured I'd bang one out.
I had just the right slab of wood laying around and after 5 minutes with the chainsaw, hacked out a large chunk...
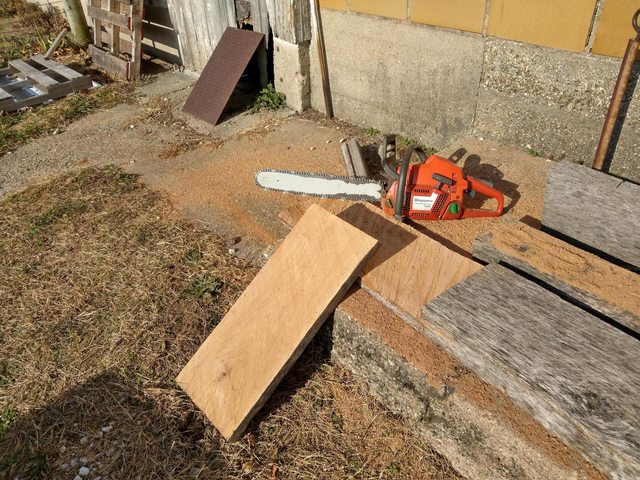
I cut it way bigger than I thought she'd want it and took my belt sander to the chainsawed side with a 36 grit belt to knock the highspots off. I was about to run it through the planer when wife came out to inspect progress and was like, STOP! It's perfect. Now I'm not really a fan of the rustic AF look, but if it involves less work, I guess I can be persuaded. So I sanded it up to 320 with the orbital, keeping a large amount of the chainsaw marks for character. I put a 20 degree bevel on the bottom edges so it's easy to pick up, well, kinda easy. It weighs 15 pounds. Gave it 4 coats of mineral oil and called it a day. She's happy and I probably saved $100, so I'm happy.

He's been collecting old hunting/fishing advertising for years. Had and Eagle Claw sign that was 2'x6', a Western Ammo sign that was 3'X4', and a Remington sign made up of 9 individual panels that were each 11"x14". He took them to a framing shop and was quoted around $600 to get it done. All he asked was that the frames be made from old, rough sawn lumber of which I have a large amount. Working with rough sawn lumber isn't my favorite thing to do on small pieces, but using it in 8'+ lengths just SUCKS.
I forgot to take pics of the two smaller ones, but I got this one as I wrapped it up on Sunday...
While I was cleaning up, the wife came home from what I pray was the final Christmas Shopping trip of the season. She was showing me her haul which included several charcuterie boards. Apparently, everybody needs one.
I was horrified at what she'd paid for a couple of them and expressed a small amount of displeasure. I don't complain much. As long as she does ALL the shopping, I'm pretty happy to fund the endeavor. Then she hinted around that she'd like one too, cause ya know, everybody needs a charcuterie board.
Being a cheapskate possessed of a small degree of skill with woodwork, I figured I'd bang one out.I had just the right slab of wood laying around and after 5 minutes with the chainsaw, hacked out a large chunk...
I cut it way bigger than I thought she'd want it and took my belt sander to the chainsawed side with a 36 grit belt to knock the highspots off. I was about to run it through the planer when wife came out to inspect progress and was like, STOP! It's perfect. Now I'm not really a fan of the rustic AF look, but if it involves less work, I guess I can be persuaded. So I sanded it up to 320 with the orbital, keeping a large amount of the chainsaw marks for character. I put a 20 degree bevel on the bottom edges so it's easy to pick up, well, kinda easy. It weighs 15 pounds. Gave it 4 coats of mineral oil and called it a day. She's happy and I probably saved $100, so I'm happy.


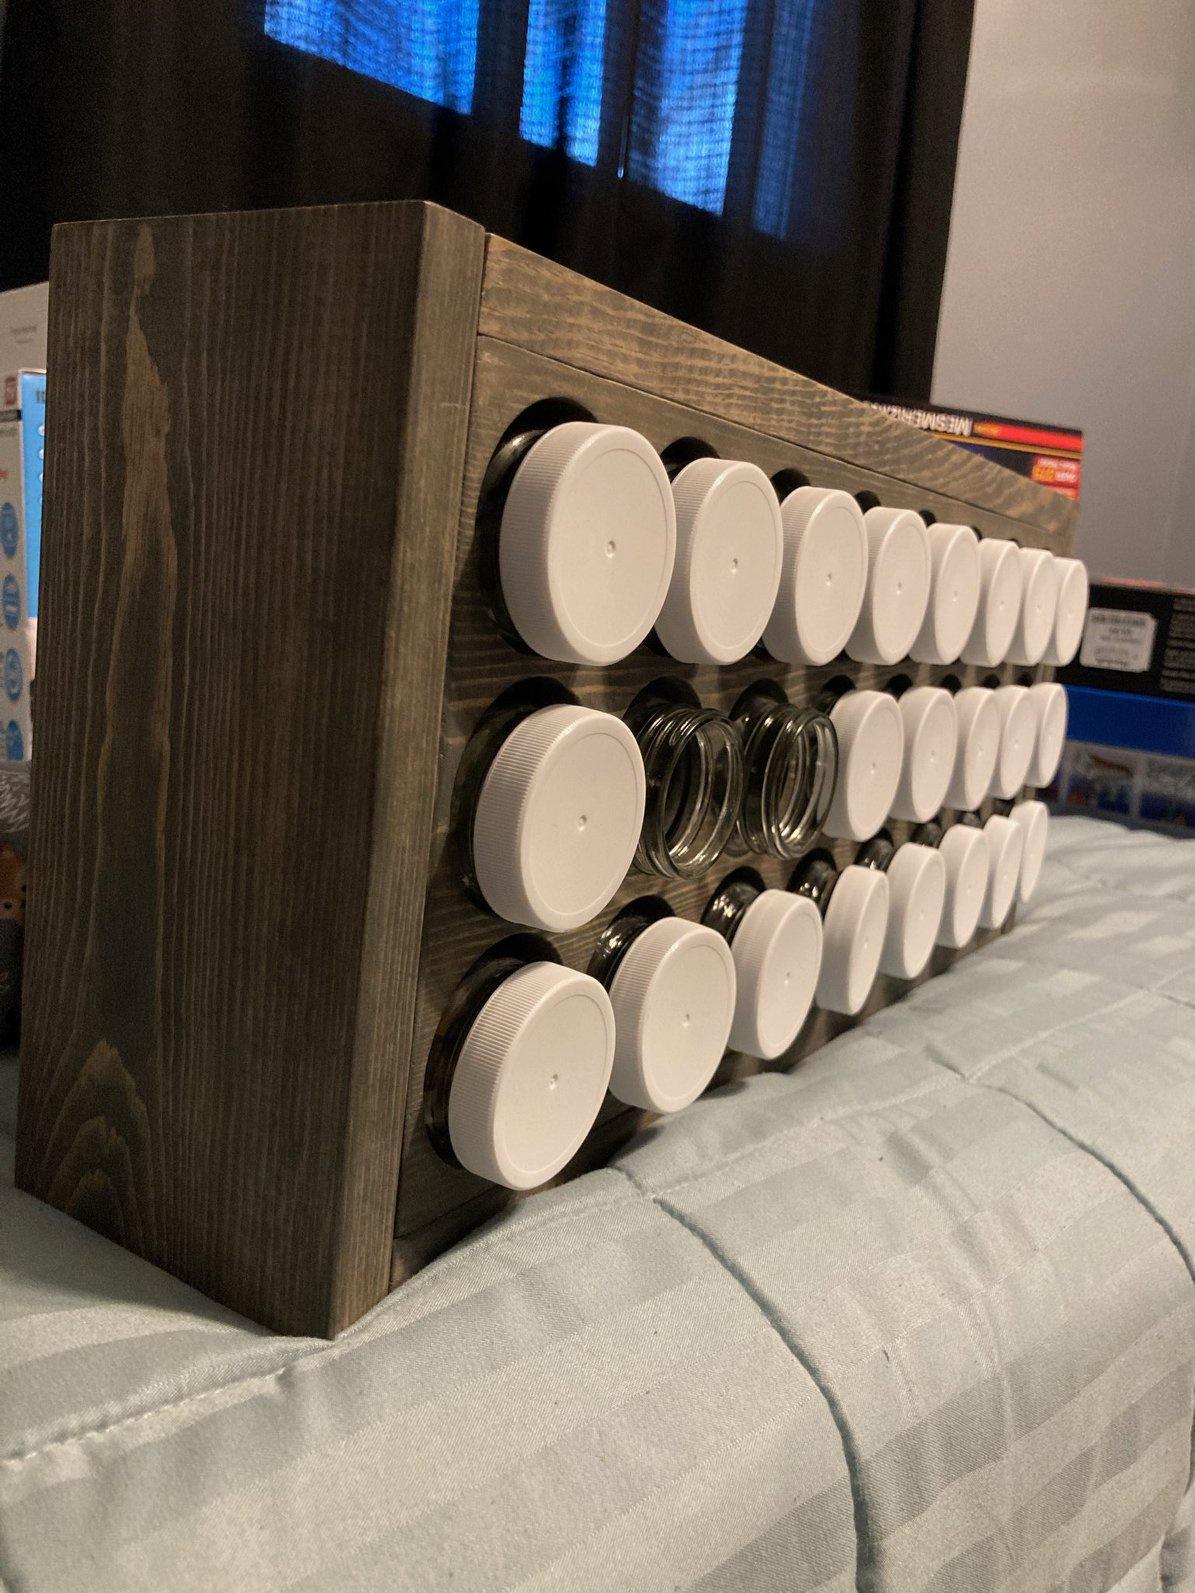
I have to brag about my wife. She wanted to make Christmas gifts this year. She has always wanted to get into woodworking as a hobby. I bought a lathe one year for her birthday. The idea was for her and her dad to spend time together making things (we stored it in his barn). My father in law made each of his kids something he turned on the lathe last Christmas. That was his last Christmas with us. My wife never got to learn from her dad. She has been toying with the lathe, but also made other things. She made each sibling a cutting board/trivet. The lumber is wood that came from her dad's property that he had milled with intentions to make something. The inserts are slices of geodes. The Oregon board is for her best friend who went camping with us this fall. The rocks in the "river" were collected at the various campsites on that trip. The spice rack is something she had seen. She drew it up, but is not confident in precision work. I was the lucky one that got to help plan it, measure and cut boards, and hole saw 24 holes!
Anyway, I am very proud of her as she has been working hard lately. Neither one of us are carpenters or veteran woodworkers, we just like to play around.
Some lessons learned....
Don't wait until 3 days before Christmas to realize the jars you ordered was missing 2 lids.
My wife hates epoxy. She says she will never use it again.
Remind your wife in the spring that if she wants to make gifts, get started then and not wait until 2 weeks before Christmas!
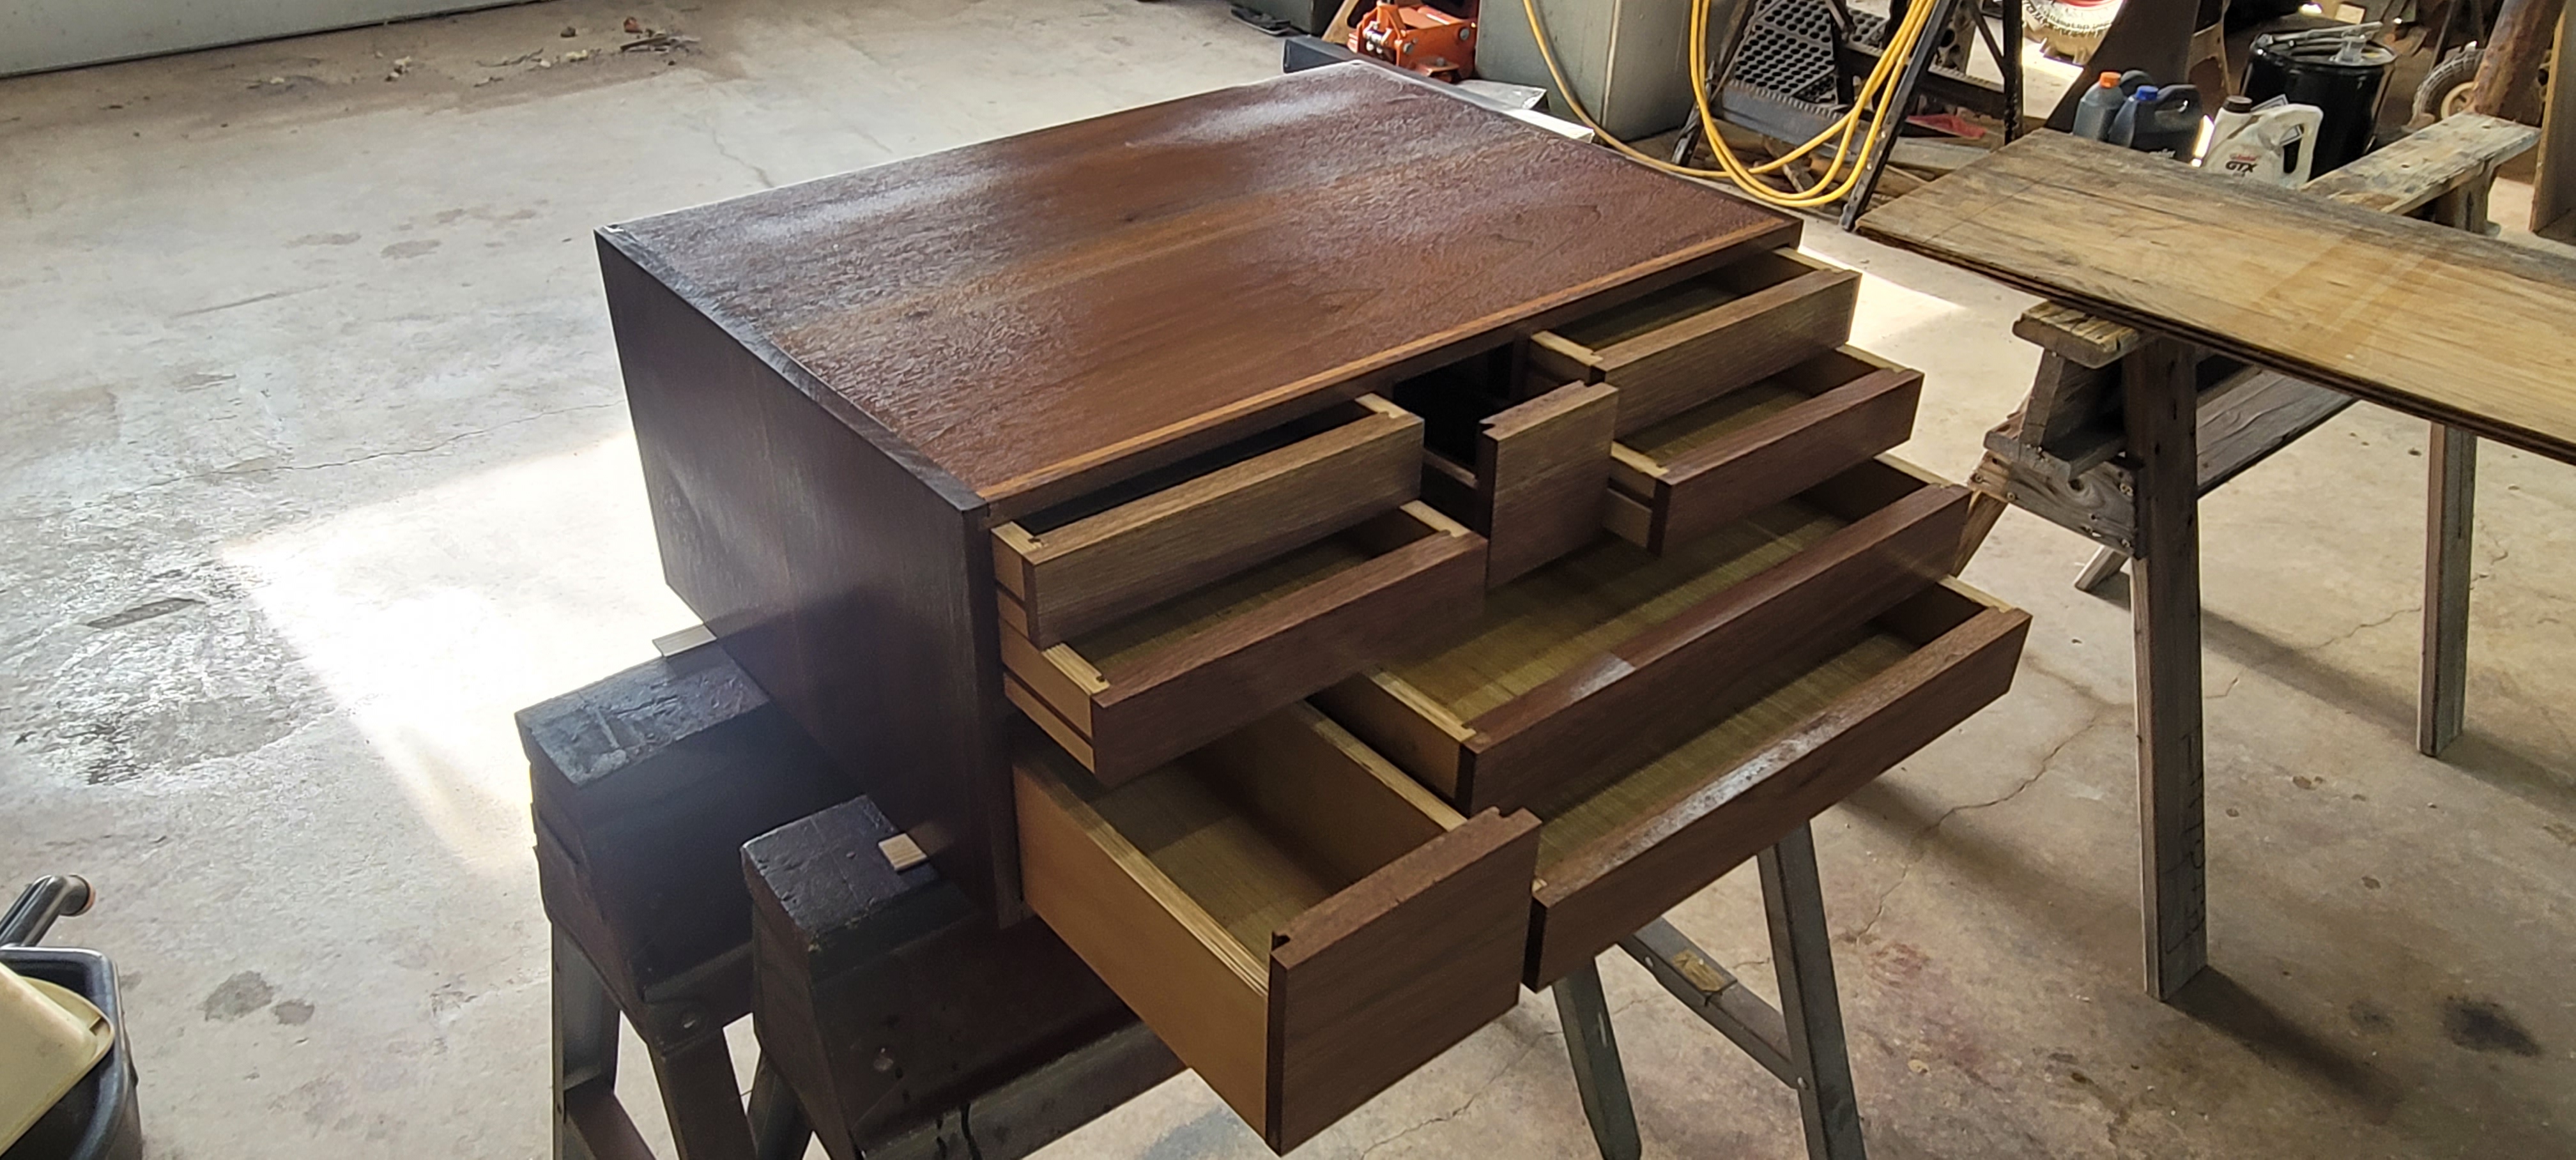
Custom toolbox
I've decided to share a couple projects I've been working on this year.
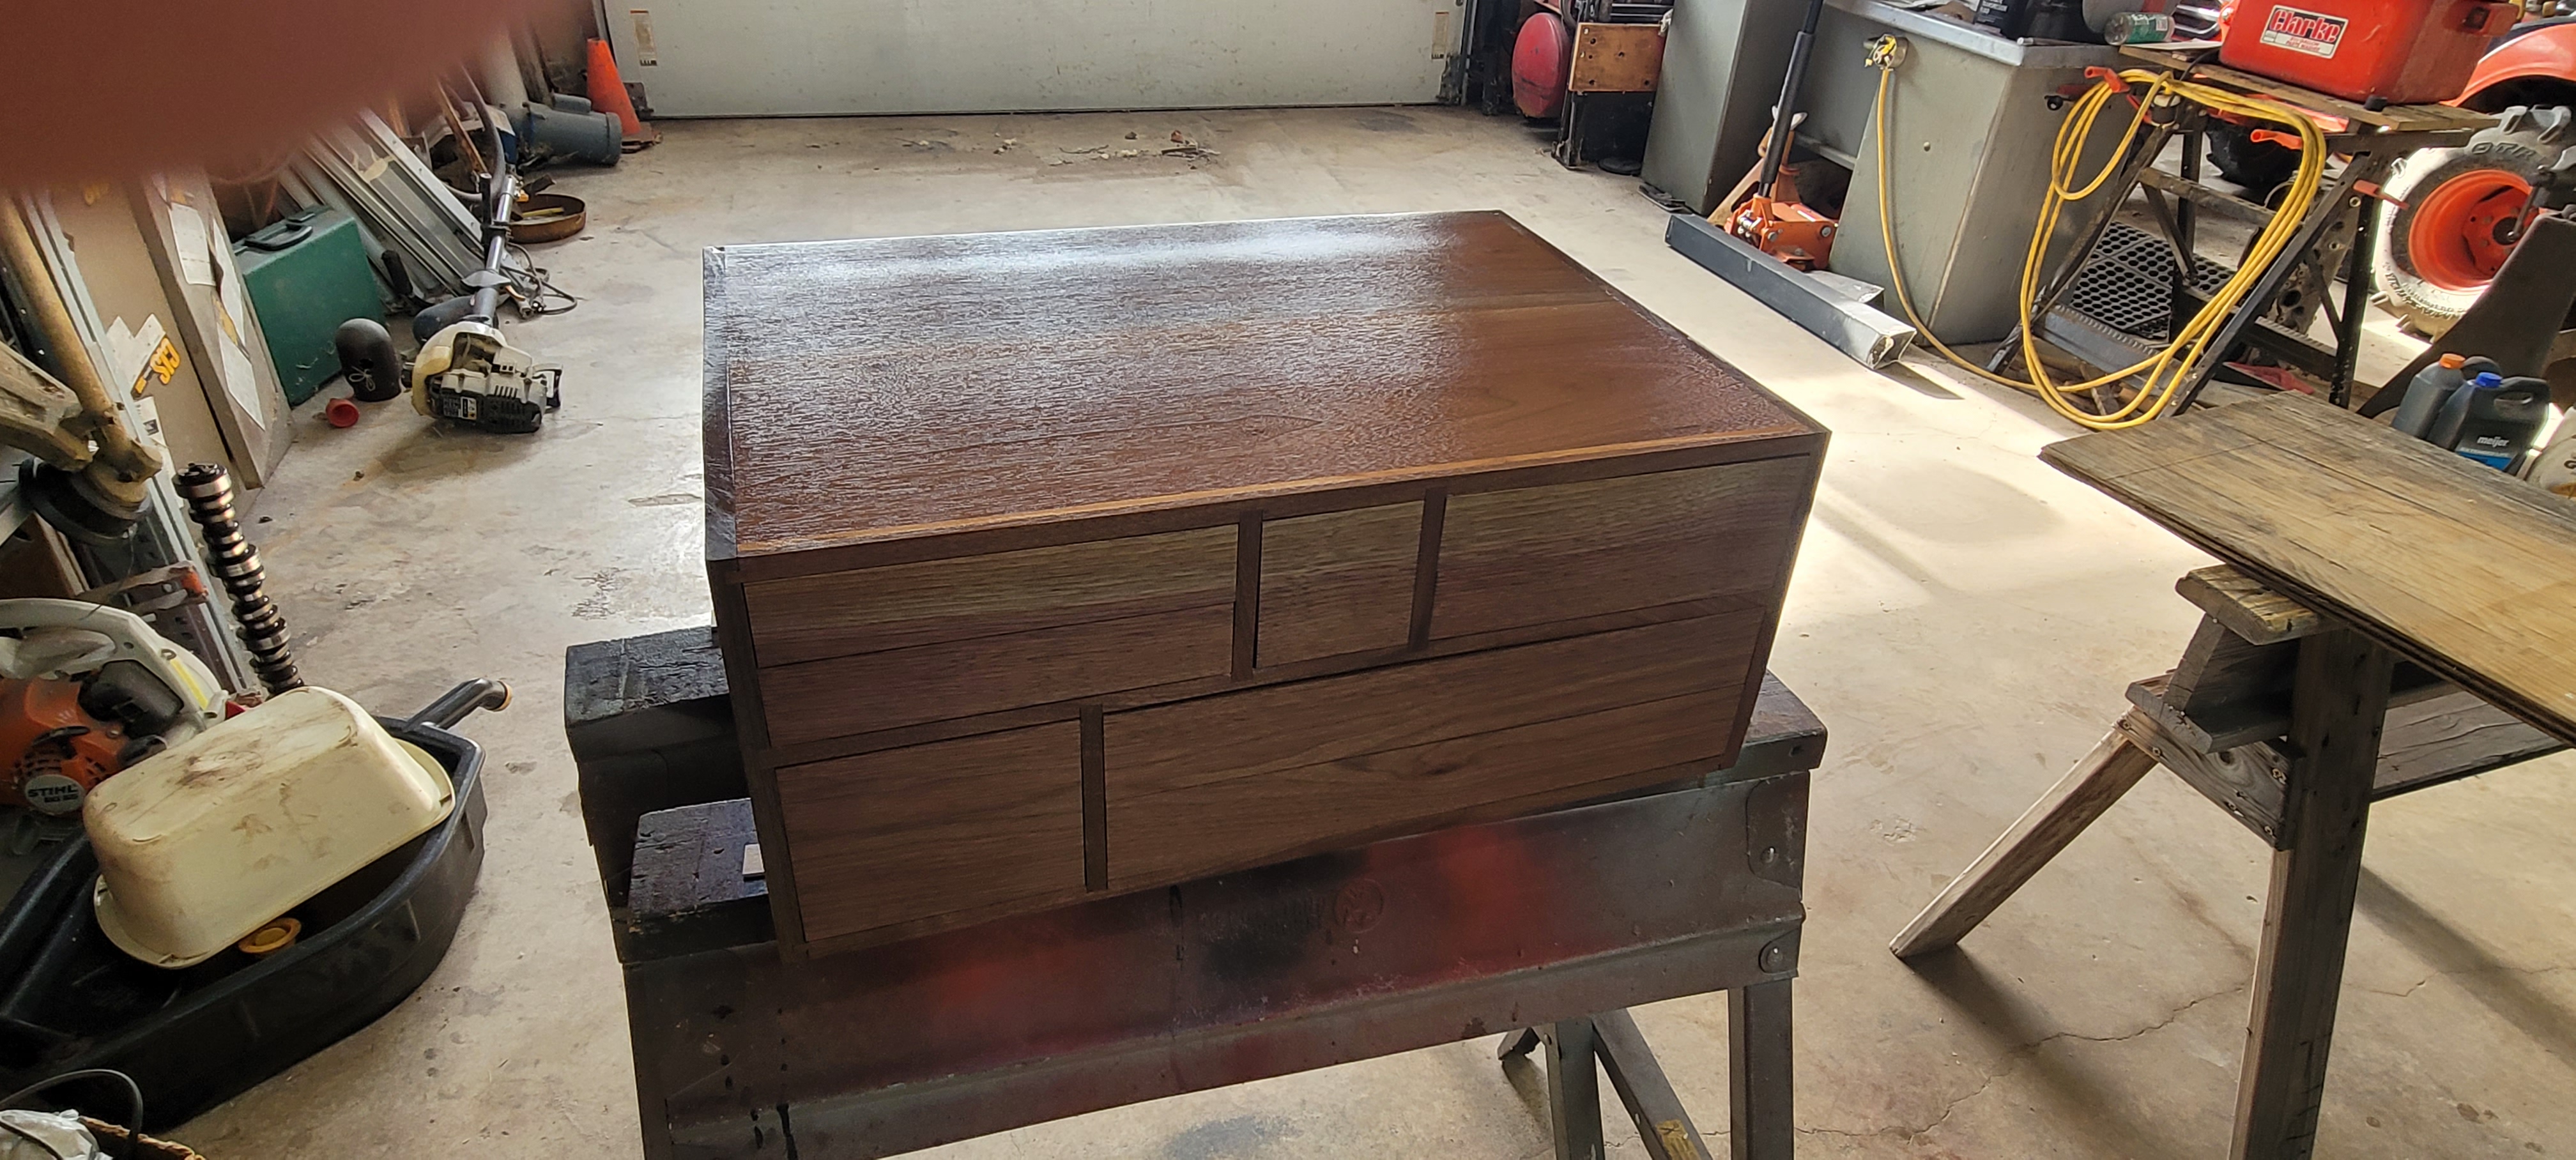
First is a machinist's tool cabinet I traded for some CNC machine work. It was custom fit for the space on the machinist's rolling bench and some of his tools. For instance, the lower left drawer is for his drill index. I didn't attach drawer pulls as he wanted to turn custom pulls himself.
I've decided to share a couple projects I've been working on this year.
First is a machinist's tool cabinet I traded for some CNC machine work. It was custom fit for the space on the machinist's rolling bench and some of his tools. For instance, the lower left drawer is for his drill index. I didn't attach drawer pulls as he wanted to turn custom pulls himself.
Last edited:
cutting boards
My next project was a set of 3 cutting boards for christmas gifts. These were made from plans published in Wood magazine and are made of walnut, cherry, and maple. I like how the 3D illusion flips depending on the light. I finished them by warming them in the oven and then melting a mix of beeswax and mineral oil and letting it absorb into the wood for a deep finish.
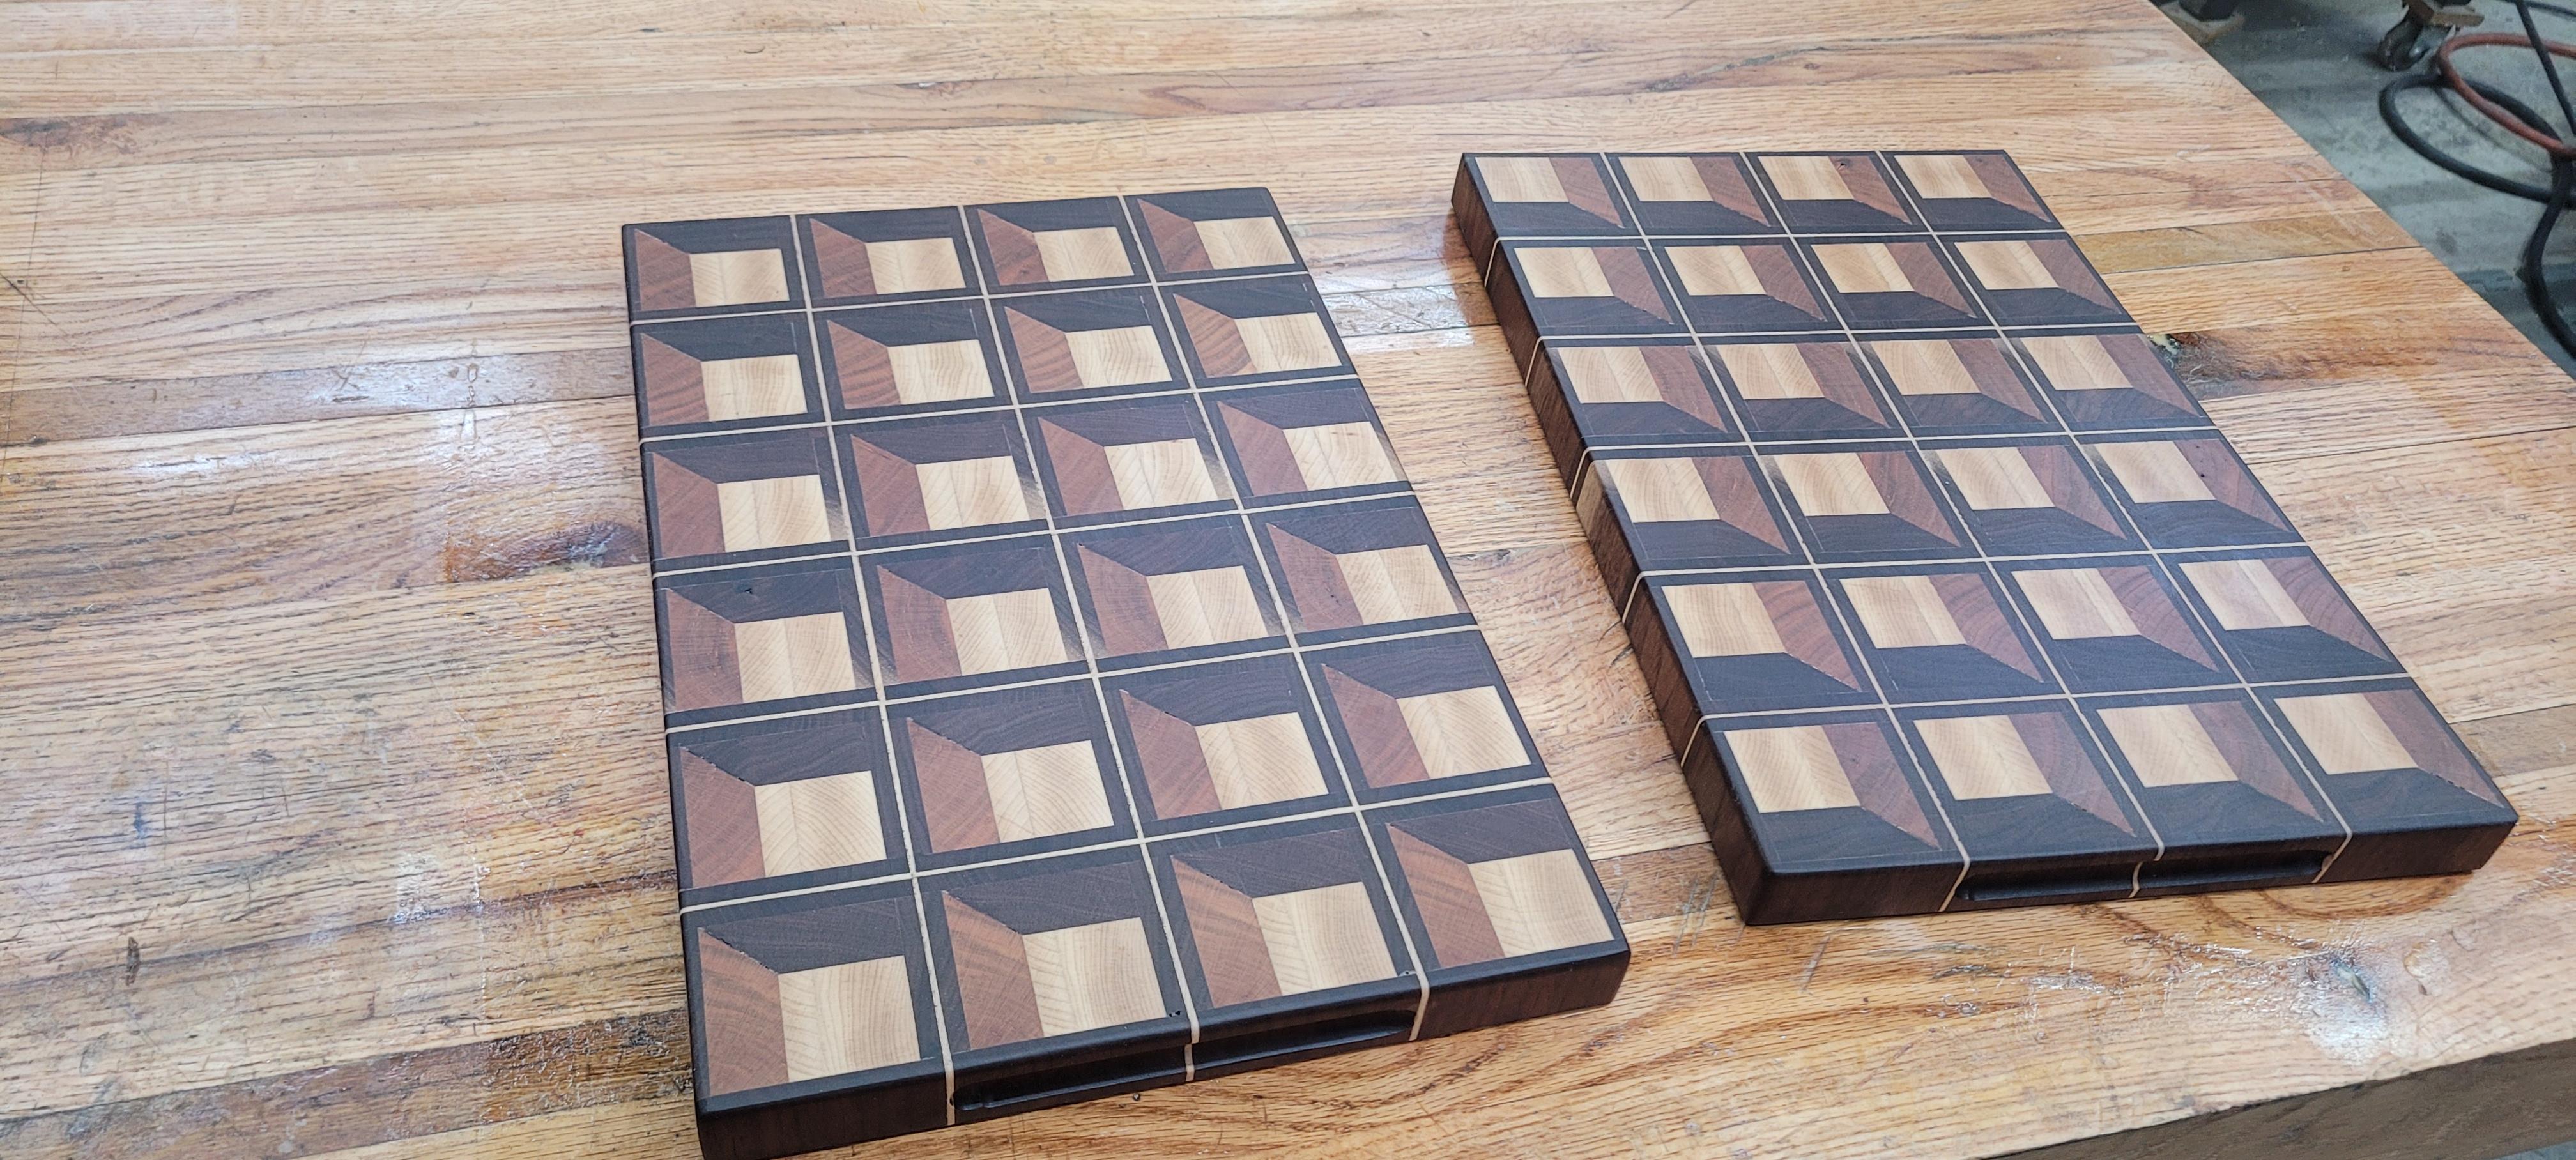
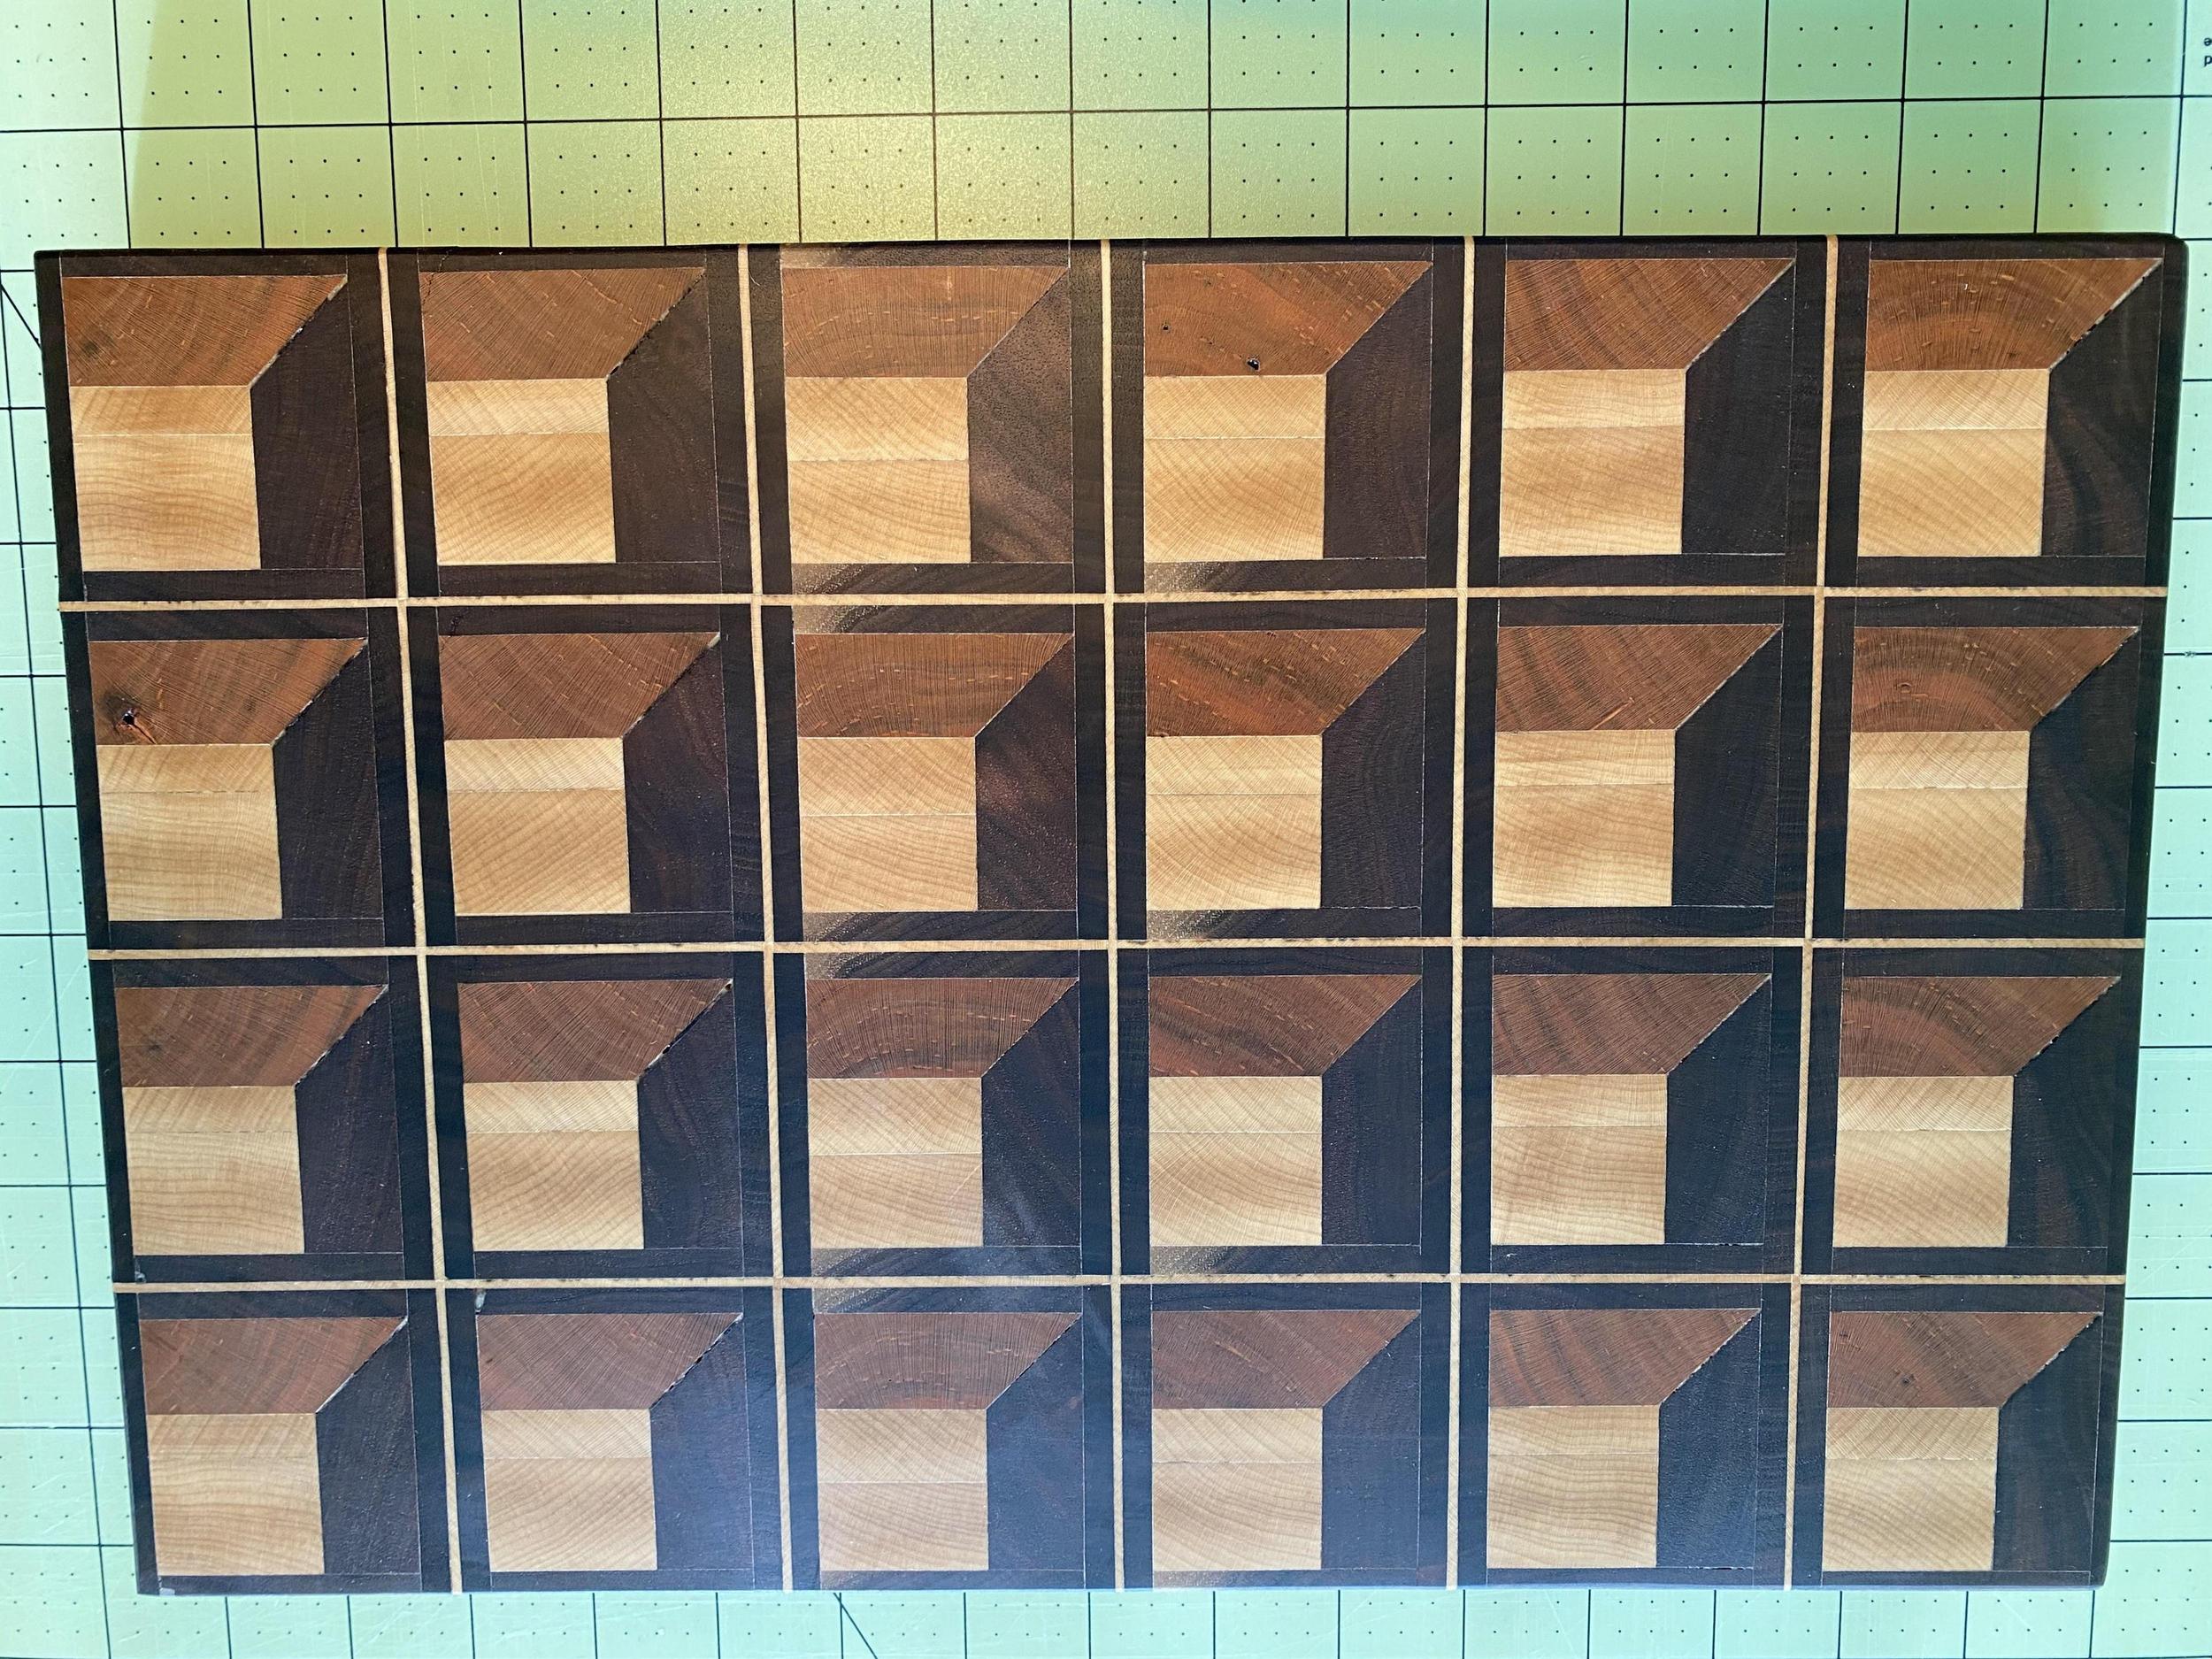
Hope you enjoy!
Rick
My next project was a set of 3 cutting boards for christmas gifts. These were made from plans published in Wood magazine and are made of walnut, cherry, and maple. I like how the 3D illusion flips depending on the light. I finished them by warming them in the oven and then melting a mix of beeswax and mineral oil and letting it absorb into the wood for a deep finish.
Hope you enjoy!
Rick
Schmart, that's some next level stuff, right there.
After 26 yrs, I have.I haven’t done any woodworking in a long time. Just don’t have the time.
I was ALMOST tempted to just retire from it.
Site Supporter

Members online
- Lee9
- target64
- Keith_Indy
- Altrex
- BillD
- David Rose
- Shooter5
- henry0reilly
- Jeffforpresident
- Dookie
- HoosierLife
- ljk
- BrentTheBoat
- nhgluff
- Dutchmaster
- Combat Engineer
- 76caprice
- rj3438
- DeadeyeChrista'sdad
- Dirtebiker
- ikky68
- Mr.Softball
- mcapo
- HCRMPD1
- Creedmoor
- Mauser Fanatic
- Reece'sPieces
- Irish354
- Vbob1
- GSPBirdDog
- wayneduke
- Timjoebillybob
- bowhunter_1978
- derrickgoins
- flyingsquirrel
- Firehawk
- Keoliver
- Hopper
- bcoe5371
- Skullglide
- 99zhuggerz99
- DoggyDaddy
- slims2002
- Leadeye
- femurphy77
- Born2vette
- Dog1
- nkhrfh
- led4thehed2
- gdun67
Total: 1,725 (members: 243, guests: 1,482)
