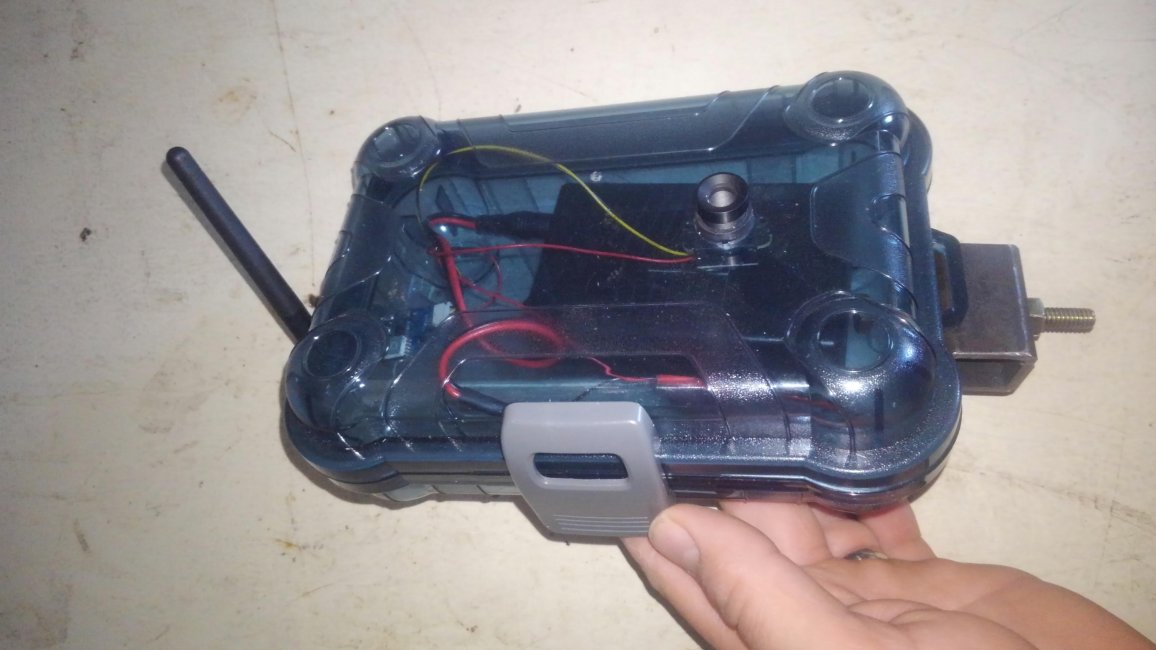
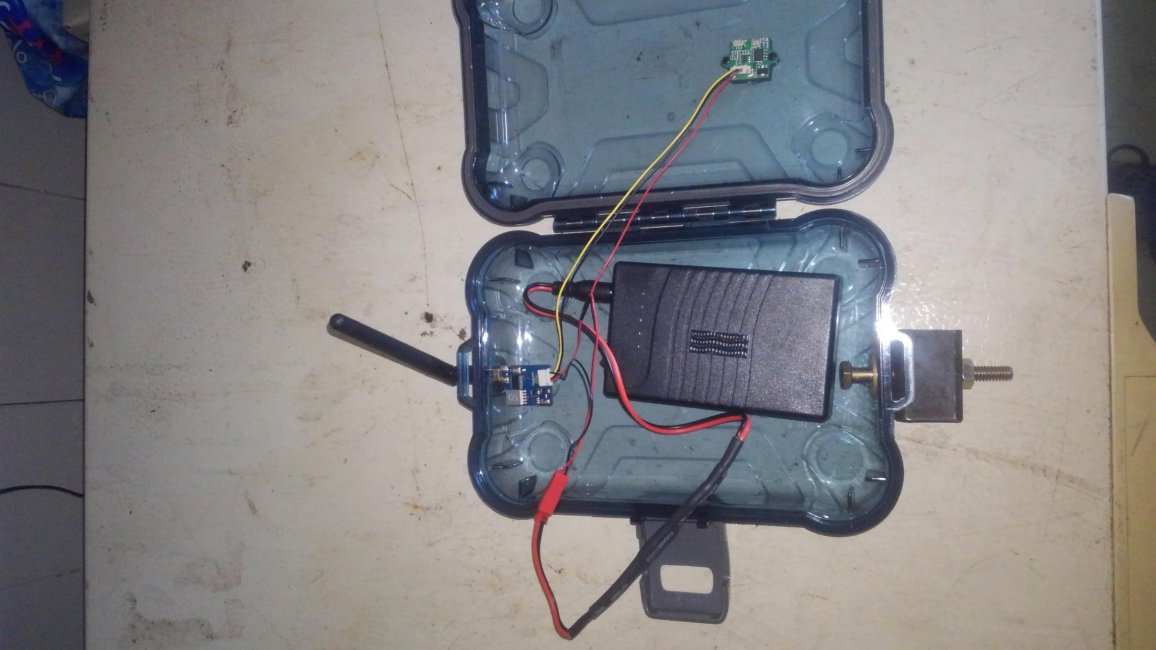
Sharing my long range target camera set up that I built last summer. I went through a couple of different hardware configurations trying to get the resolution that I wanted, which increased my cost. I am describing each component and why I'm using it instead of something else. Hope this helps others avoid the additional cost. I have used this system to 500 yds. Camera gets placed 10' to 15' in front of (and slightly to the side of) the target. I have no problems seeing 6.5mm holes in a sheet of printer paper. Mine displays on my android phone, and I have the downrange portion installed inside a waterproof box that I picked up from the camping section at Wally world for around $10. Total cost of my final set up was under $120. The only skill required for the build is to be able to solder a couple of wires together for the power supply wiring harness.
Camera+Transmitter+Wiring harness - current cost $26
https://www.amazon.com/gp/product/B07W97GTCS/ref=ppx_yo_dt_b_asin_title_o06_s01?ie=UTF8&psc=1
Key features of this option:
1000 TVL (camera's resolution = 1000 horizontal lines)
200 mW transmitter
-Comes with standard antenna good for 500 yds with no mods
7-24V input - Allows for a wide range of power supply options
-Comes pre-wired with a JST connector for supply power.
Camera has standard S mount (ie 12mm) lens
- lots of replacement options
I don't believe this is an IR camera
- My understanding is that an IR camera works better in really low light.
This is essentially a drone camera (FPV) setup. You can purchase the components individually off amazon, but the total cost is the same. I point this out because it makes the set up serviceable should you inadvertently destroy part of it, which I have not done... yet... The camera comes with a lens, but it needs to be replaced with one of the lenses below. Otherwise the field of view is too large to get the resolution needed to see your impacts OR you have to put the camera too close to the target face which increases the odds of destroying something.
Lens - 2 options. First is a zoom lens. Second is a fixed 12mm focal length lens.
https://www.amazon.com/gp/product/B01HH4MZCM/ref=ppx_yo_dt_b_asin_title_o05_s00?ie=UTF8&psc=1
This is the zoom lens. Current cost is $13. The zoom adjusts the focal length from 2.8 to 12mm. You want at least 12mm in your lens. There are other zoom lenses available with longer focal lengths. A 12mm focal length will allow you to place the camera 10' to 15' from the target face and still see at least a 22" tall viewing area with enough resolution to see your bullet holes. I believe some zoom lenses go out to 22mm and beyond, but I did not try any of them because I was worried about the amount of light needed to get a good image. My targets are in the woods (shade). As evening approaches, the available light MAY become an issue. I did not end up using this lens in my final solution because the focus adjustment is VERY touchy.
https://www.amazon.com/gp/product/B07JZBGC32/ref=ppx_yo_dt_b_asin_title_o01_s01?ie=UTF8&psc=1
This is the fixed 12mm focal length lens. Current cost is $8. It is also a 12mm S mount which fits the camera making the terminology a bit confusing, but the important thing here is the focal length. The focal length dictates how large your field of view is at a specific distance. You want 12mm or more so that you can place the camera far enough away from your target face. I prefer this over the zoom lens because the focus adjustment is substantially finer. The focus is adjusted by screwing the lens in our out of the camera body. The fine 12mm thread pitch makes focusing the camera very easy. A lock nut would be handy. They are available, and cheap, but I don't have one, nor do I have the part number for them.
Battery/Power Supply - Current Cost $23
https://www.amazon.com/gp/product/B00MHNQIR2/ref=ppx_yo_dt_b_asin_title_o07_s03?ie=UTF8&psc=1
This is a 12V 3000 mAh LiIon power cell designed to use with CCTVs. I've run my camera set up with it for 8 hours and had approx 50% left on the battery. This includes a 110V charger. Any power supply can be used, but you will most likely need to either solder in one or more new plugs or build a wiring harness to convert form one type of plug to another. This power pack uses bullet style connectors, and will not connect directly to the JST-RCY plug on the transmitter. I opted to build a wiring harness using the pigtails below so that I could still use the charger that came with the battery. I could have also replaced the JST-RCY plug on the transmitter with the bullet style plug below. I was learning, designing, and building as I went, so I opted for the wiring harness because it allowed me to recover from any design issues/mistakes more easily. Now that I know everything works together correctly, on a future build I would just replace the plug on the transmitter.
https://www.amazon.com/gp/product/B07R4YBXYX/ref=ppx_yo_dt_b_asin_title_o05_s00?ie=UTF8&psc=1
JST-RCY pigtails - 5 pair - Currrent cost $6
https://www.amazon.com/gp/product/B07C7VSRBG/ref=ppx_yo_dt_b_asin_title_o07_s00?ie=UTF8&psc=1
Bullet style pigtails - 10 pair - Current cost $9
Receiver - There are a few options for receivers. The one I'm using works with my Android phone. The same thing is available for iOS devices at a substantially higher price (due the apple licensing I presume). The other option is to buy a standard FPV receiver and build a slightly more custom solution for back and the bench. Very easy to do. Slightly more expensive, but also more versatile.
Android compatible - Current cost $30
https://www.amazon.com/gp/product/B071VZYLYH/ref=ppx_yo_dt_b_asin_title_o07_s02?ie=UTF8&psc=1
This receiver plugs into my android phone. You have to download the app from their website. The website address is provided in the product description but it can be hard to locate. I use the GoFPV app, but there are some others that work as well. The advantage of this option is that it minimizes the additional hardware required. The draw back is that it does drain the battery on my phone quite a bit, so be aware. Momentarily pressing the button on the receiver will jog it up by a few Hz at a time. Pressing and holding will cause the receiver to scan through the entire 5.8 Ghz range and land it back at the strongest signal (hopefully from your camera). The process takes a minute or so. I recommend watching it on your display (phone, tablet, laptop) so that if it lands you somewhere else, you know where to scroll to for your camera. You can repeat as often as you like. I believe this will also work with a laptops and android tablets, but I have not tried them yet.
FPV Receiver solution: Cost = $17 (receiver) + $25 (display) + $23 (same power supply as above)
CAUTION - I have not built this portion, and can not promise that it works.
https://www.amazon.com/gp/product/B01H36AIGY/ref=ox_sc_saved_title_10?smid=A3OXSXIHCGXXP4&psc=1
This is the standard FPV 5.8G receiver. You can use another 12V battery (duplicate of the one used for the camera) to power the receiver, but it will also require building the same pigtail adapter that was required for the camera. The receiver utilizes standard audio/video outputs (same inputs/outputs TVs VCRs, and gaming systems used back in the 90s before HDMI - Red, Yellow, and White bullet style connectors). You just need a way to supply power to it.
https://www.amazon.com/ePathChina-8...+display&qid=1577816496&s=electronics&sr=1-21
I believe this display will work with the above receiver. It appears to utilize the same bullet style connector as the battery so the custom pigtail adapter can be used to supply power to both the receiver and the display from the same battery.
Hope this is helpful to someone


