Disassembly/Reassembly of the Browning BPS Shotgun (12 gauge, 1986)

The #1 community for Gun Owners in Indiana

Member Benefits:

  • Fewer Ads!
  • Discuss all aspects of firearm ownership
  • Discuss anti-gun legislation
  • Buy, sell, and trade in the classified section
  • Chat with Local gun shops, ranges, trainers & other businesses
  • Discover free outdoor shooting areas
  • View up to date on firearm-related events
  • Share photos & video with other members
  • ...and so much more!
  • marvin02

    Don't Panic
    Site Supporter
    Rating - 100%
    56   0   0
    Jun 20, 2019
    5,252
    77
    Calumet Twp.
    Disclaimer: I am not responsible for any work that you do to your gun. The following describes how I disassembled/reassembled my Browning BPS Hunter 12 gauge shotgun. My gun was manufactured in 1986. Your gun may be different. Use the following information at your own risk.

    Some Resources to get you started:

    Brownells links


    Putting the Trigger in:


    After you read this note the difference in the placement of the pin to hold the cartridges stops in place and where these videos show it.

    Parts diagrams:



    Last edited:
    marvin02

    Don't Panic
    Site Supporter
    Rating - 100%
    56   0   0
    Jun 20, 2019
    5,252
    77
    Calumet Twp.
    Recommendations

    Do not start working on the gun unless you have plenty of time. If you can't walk away for a while, don't start. Disassembling/reassembling the BPS is not that difficult, but it can be frustrating. The disassembly actually goes so easy you wonder what the fuss is. The only tricky part is putting the trigger group back in the receiver during reassembly.

    Have a container for small parts and a designated place in your work area to place removed parts. Plan ahead of time and have enough space so that the parts and tools don't have to share room and both will be easy to locate.

    Read this completely through before starting. With the information here you should be able to complete the disassembly/reassembly. I have also included links to videos that show the work being done and to exploded diagrams of the BPS. I have tried to use the names of the parts as found on the exploded views that I linked to.


    Tools needed:
    • 9/64 inch punch for the trigger guard pin
    • 1/8 inch punch for the carrier retainer pin
    • bench block
    • hammer
    • a way to hold the shotgun with the bottom of the receiver held up (gun upside down). You want to have both hands for working on the receiver and not worry about the gun moving or falling. I used a bench vise with padded jaws.
    • Camera – to take pics of stuff as you take things apart. Important to get pics of the cartridge stops.

    Optional:

    • 1/8 inch rod for making a slave pin for the carrier. I used brass rod and the pin is 1 5/16 inches long.
    • Something to make a “pin” to hold the cartridge stops in place when you put the trigger group back in the receiver. Mine is 1 5/64 inch long. A wooden dowel will work. I made a piece from ¼ inch brass rod. You can get the trigger guard back in without this pin, but it will probably be more difficult.

    Safety

    Make sure that the chamber and magazine are empty.

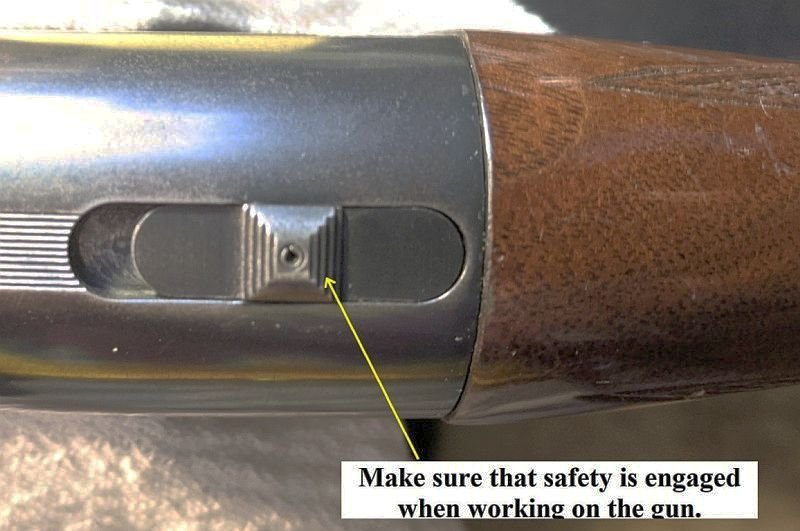
    Make sure that the safety is on (moved rearward as far as it will go)

    01 Safety Position 01.jpg
     
    Last edited:

    marvin02

    Don't Panic
    Site Supporter
    Rating - 100%
    56   0   0
    Jun 20, 2019
    5,252
    77
    Calumet Twp.
    Disassembly

    Make sure the hammer is cocked by pushing the forend back completely.

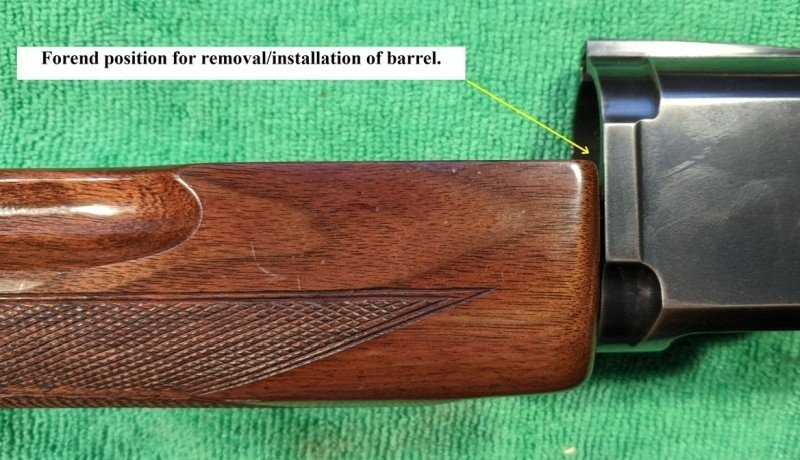
    Move the forend forward until the back of the forend is about even with the front of the receiver.

    Remove the magazine cap and remove the barrel.

    The barrel will only come off when the forend is positioned at a certain point, so you may have to move the forend slightly to allow for the barrel removal.
    02 Barrel Removal 02.jpg


    Once the barrel is removed move the forend to the forward position.

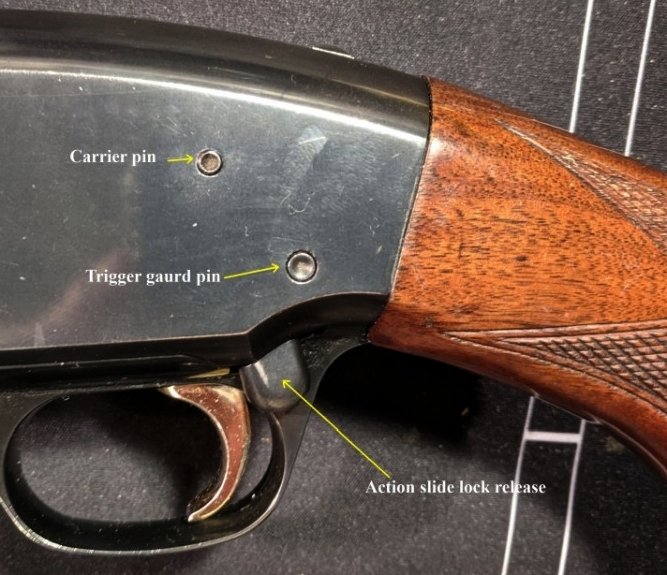
    Drive out the trigger guard retaining pin. It is the larger of the two pins and is lower on the receiver.

    03 Overview 01.jpg
     

    marvin02

    Don't Panic
    Site Supporter
    Rating - 100%
    56   0   0
    Jun 20, 2019
    5,252
    77
    Calumet Twp.
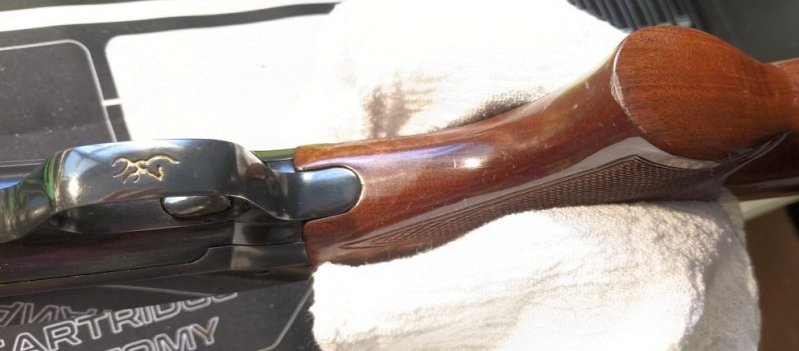
    Position the gun so that the trigger guard is facing up. Get a couple of pics of the position of the cartridge stops in position before you pull the trigger guard out.

    04 Working position 02.jpg


    Once the pin is driven out you can pull the trigger guard up and back to remove.

    Note the position of the cartridge stops. Also look at the orientation of the stops. You may want to get a couple of more pics now that trigger guard is out.

    05 Cartridge Stop Position Front 00.jpg


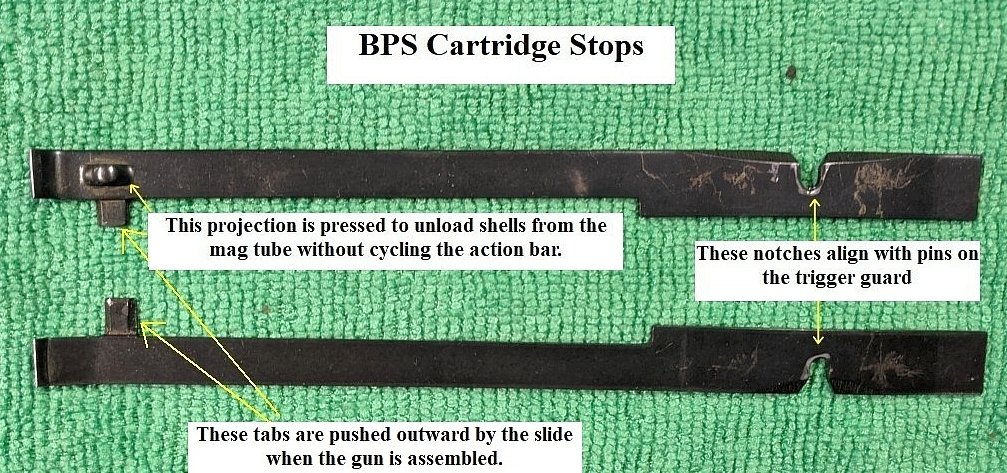
    There are tabs on the cartridge stops that fit are pushed outward by the slide, move the forearm back slightly and you can remove the cartridge stops. The cartridge stops sit in grooves on the side of the receiver when installed.

    06 Cartridge Stops 01.jpg
     

    marvin02

    Don't Panic
    Site Supporter
    Rating - 100%
    56   0   0
    Jun 20, 2019
    5,252
    77
    Calumet Twp.
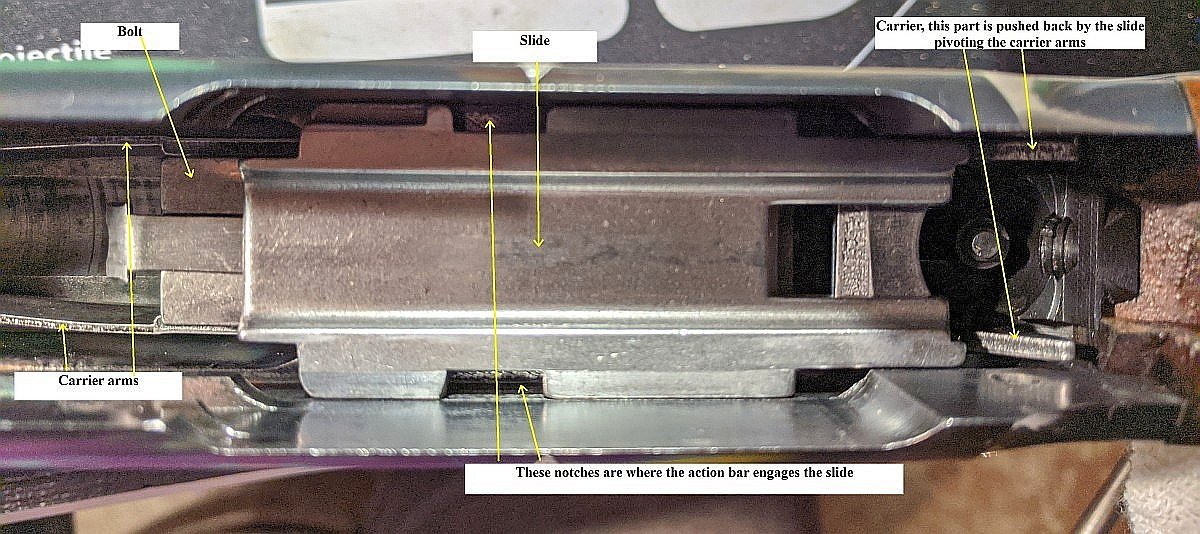
    Move the forearm back until you can lift the slide and bolt out of the receiver. The slide is the part that is connected to the action bar. The movement of the slide in relation to the bolt as the action bar moves causes the lock on the bolt to engage. The slide is also the part that actuates the carrier movement.

    07 BPS Bolt & Slide 01.jpg

    08 Slide Bolt wide 01.jpg
    09 Slide-Bolt Wide 02.jpg
     

    marvin02

    Don't Panic
    Site Supporter
    Rating - 100%
    56   0   0
    Jun 20, 2019
    5,252
    77
    Calumet Twp.
    At this point you can move the forend and action bar forward completely off the gun.

    10 BPS Forend & Action Bar 01.jpg 11 BPS Action Bar 01.jpg 11a Action Bar Slide Engagement 01.jpg


    The Action Bar was loose in the wooden forearm on my gun. I snugged up the retaining nut and used some purple Loc-Tite to secure it.
     

    marvin02

    Don't Panic
    Site Supporter
    Rating - 100%
    56   0   0
    Jun 20, 2019
    5,252
    77
    Calumet Twp.
    All that remains in the receiver is the shell carrier. You can clean the gun without removing this, but if you want to take it out drive the pin out that retains it and lift it out.

    11b BPS Carrier 00.jpg 12 BPS Carrier 01.jpg


    OK your BPS is disassembled, clean it with your favorite cleaning products. Before reassembling apply lubricant to the wear points.
     

    marvin02

    Don't Panic
    Site Supporter
    Rating - 100%
    56   0   0
    Jun 20, 2019
    5,252
    77
    Calumet Twp.
    Reassembly

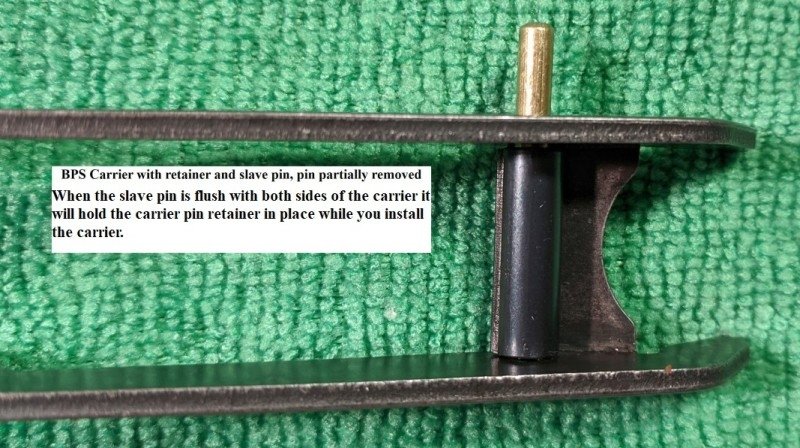
    The carrier is held by, and pivots on, a pin that runs through the receiver, both sides of the carrier and a split pin in between the arms of the carrier (carrier pin retainer).

    To make it easier to reinstall the carrier and split pin I made a slave pin from 1/8" brass rod. The slave pin is 15/16" (that's fifteen sixteenths) long and slides easily through the split pin. I put the carrier and split pin, held together by the slave pin into the receiver and then put a small punch through the receiver from one side pushing the slave pin out. Then you can put the carrier pin back in, pushing the punch back out. It is easier to do than to describe.

    13 BPS Carrier 05.jpg


    Once the carrier is installed you can place the bolt back into the receiver.

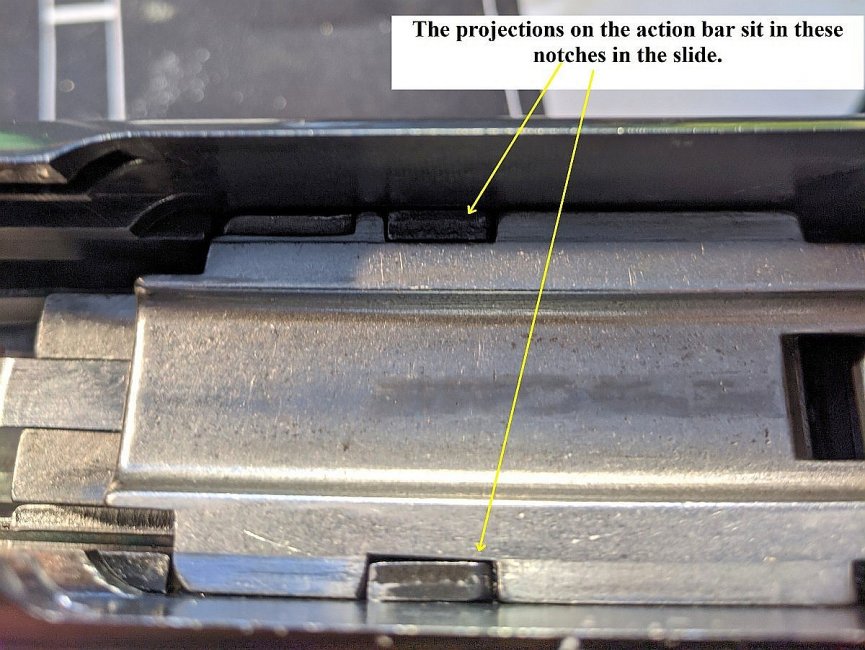
    You can now put the forend/action bar back on the gun. The tabs on the action bar engage notches on the slide.

    14 Slide-Action Bar Notches 01.jpg


    Once you have the action bar properly engaged with the slide move the forend forward most of the way.
     

    marvin02

    Don't Panic
    Site Supporter
    Rating - 100%
    56   0   0
    Jun 20, 2019
    5,252
    77
    Calumet Twp.
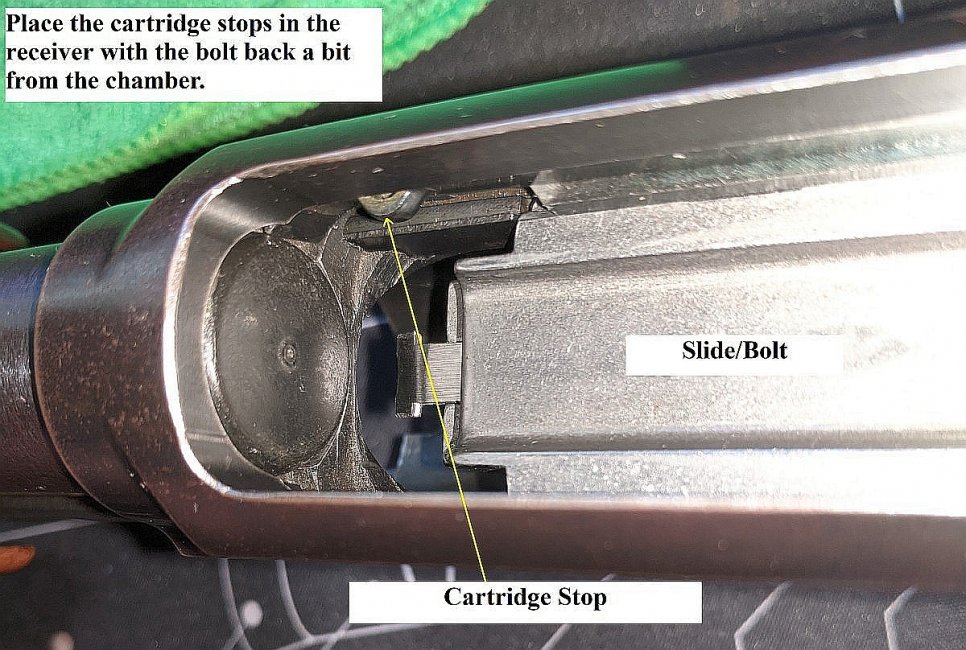
    The cartridge stops have tabs that a shoulder on the slide push outward when the slide is fully forward, so to place the cartridge stops into the receiver the forend needs to be back a bit from it's most forward position. After the cartridge stops are in move the action bar/forend all the way forward, but do not force it.

    15 Cartridge Stop Install 01.jpg 15a Cartridge Stop Position Front 00.jpg


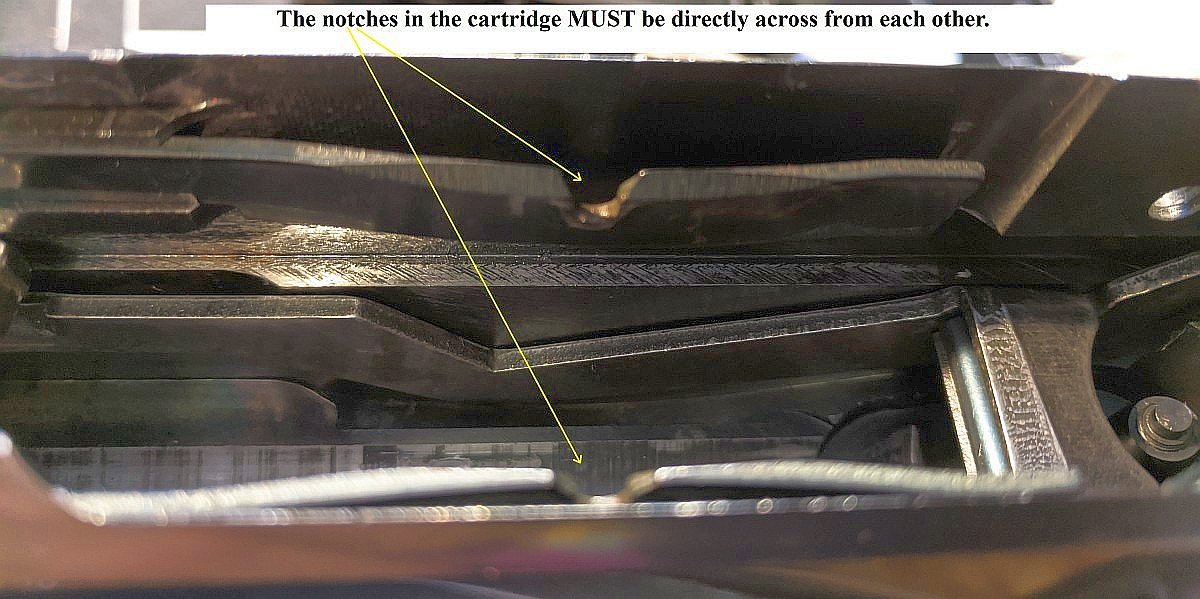
    Position the cartridge stops so that the notches are even with each other and directly across from each other.

    16 Cartridge Stop Install 02.jpg
     

    marvin02

    Don't Panic
    Site Supporter
    Rating - 100%
    56   0   0
    Jun 20, 2019
    5,252
    77
    Calumet Twp.
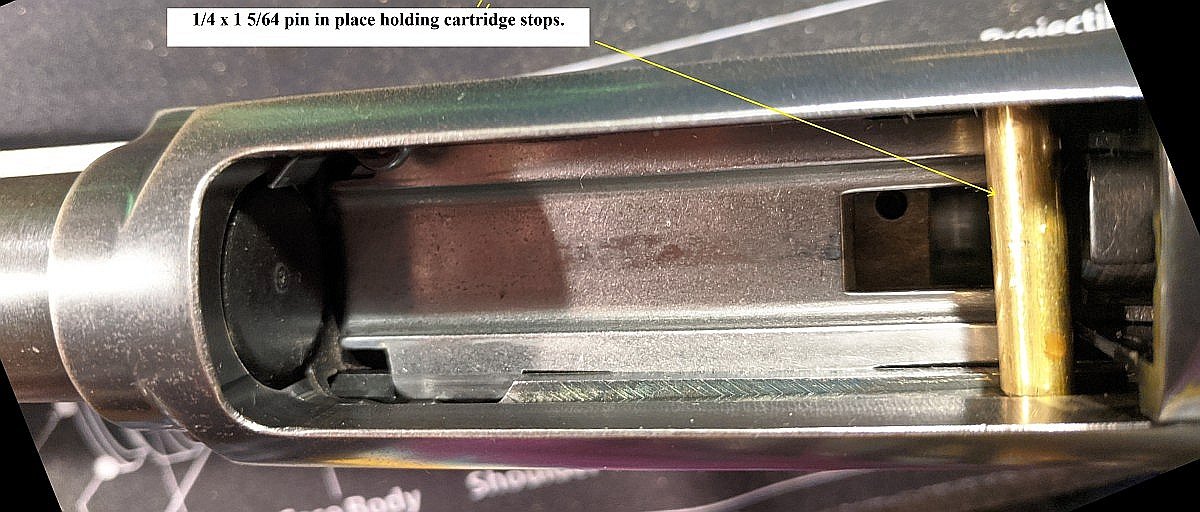
    I made a pin to hold the cartridge stops in place. It is ¼ inch brass rod, 1 5/64 inch (one and five sixty fourths inch) long. I place the pin in front of the trigger guard position, the videos I linked to showed it further back and used a string or other device to rtrieve it when the trigger guard knocked it out when inserted. The forward position worked fine for me.

    17 Cartridge Stop holding pin 01.jpg
     

    marvin02

    Don't Panic
    Site Supporter
    Rating - 100%
    56   0   0
    Jun 20, 2019
    5,252
    77
    Calumet Twp.
    Installing the Trigger Group

    Considerations


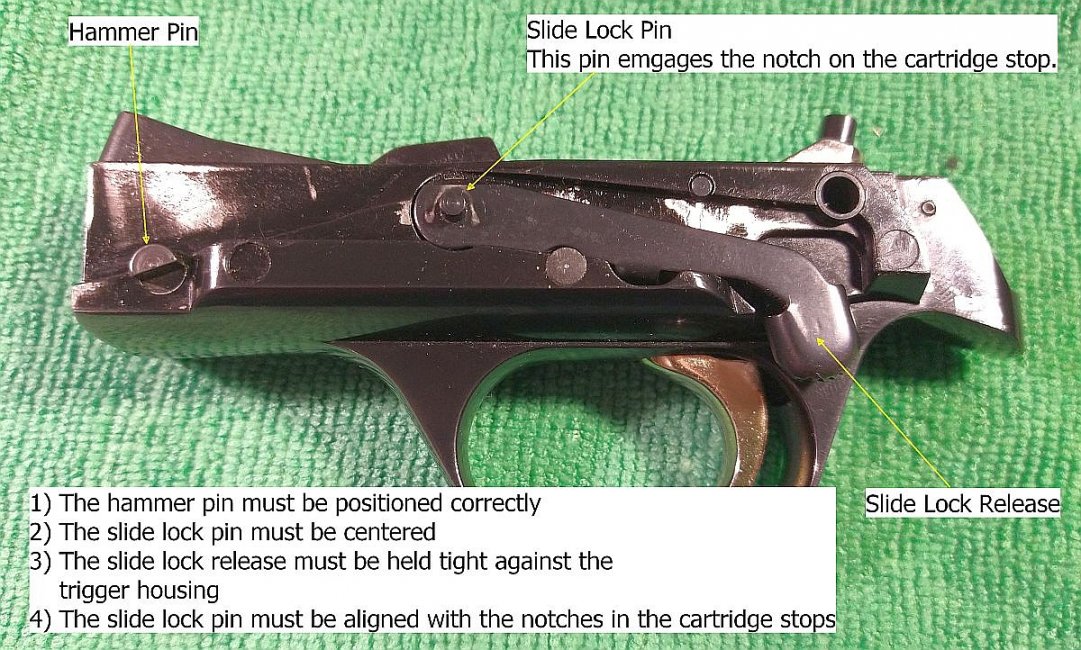
    • The cartridge stops must be positioned correctly so that the slide lock pin will align with them. Make sure they are directly across from each other. You may have to move the cartridge stops a bit to get everything in line.
    • The cartridge stops must be held pushed out to allow clearance for the trigger group. See earlier picture. I used a pin to hold the stops in place.
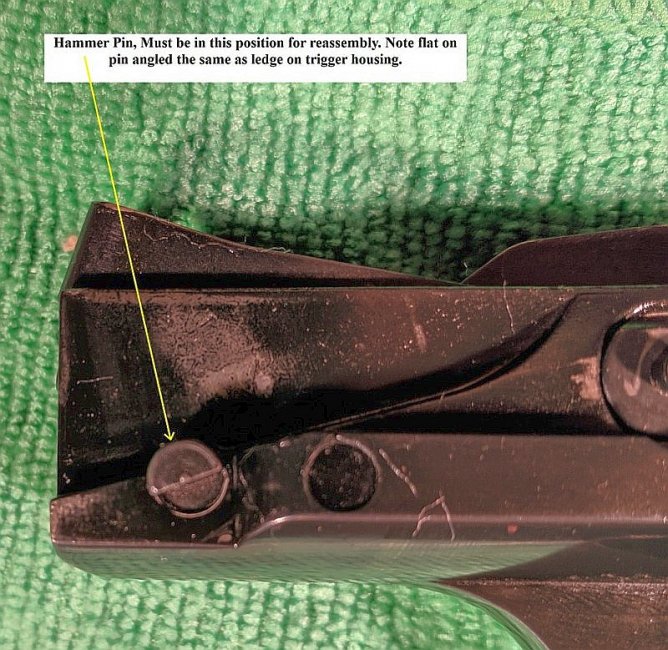
    • The hammer pin must be properly rotated to align with the slot in the receiver. The flat on the hammer pin will be parallel with the angled part of the trigger guard.

    18 Trigger Install Pointers 00.jpg

    • The slide lock pin must be centered.
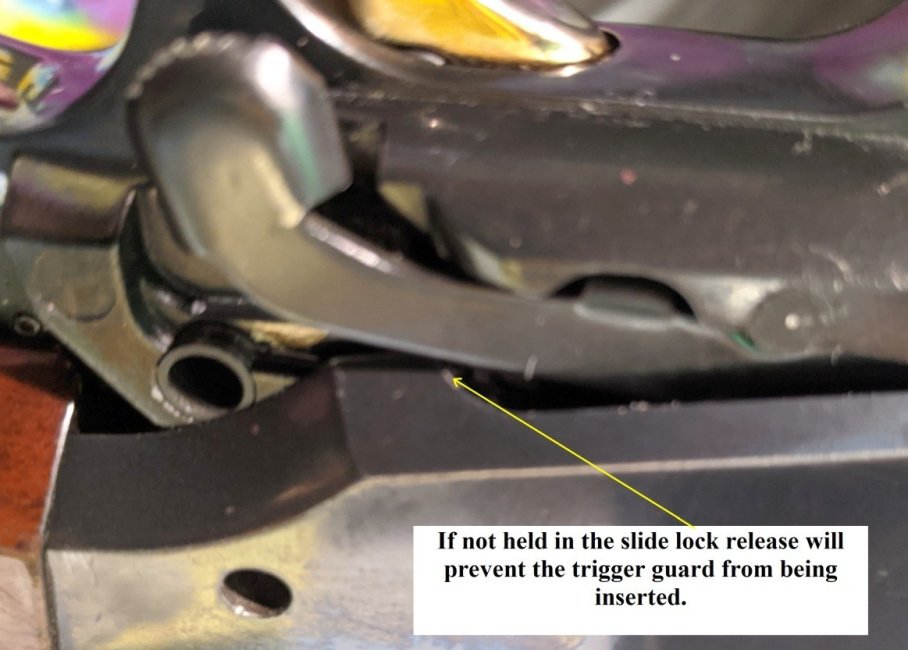
    • The slide lock release lever must be held in while putting the trigger group into the receiver.

    19 Trigger Install Pointers 02.jpg
     

    marvin02

    Don't Panic
    Site Supporter
    Rating - 100%
    56   0   0
    Jun 20, 2019
    5,252
    77
    Calumet Twp.
    Things to watch for:

    20 Trigger Install Pointers 01.jpg


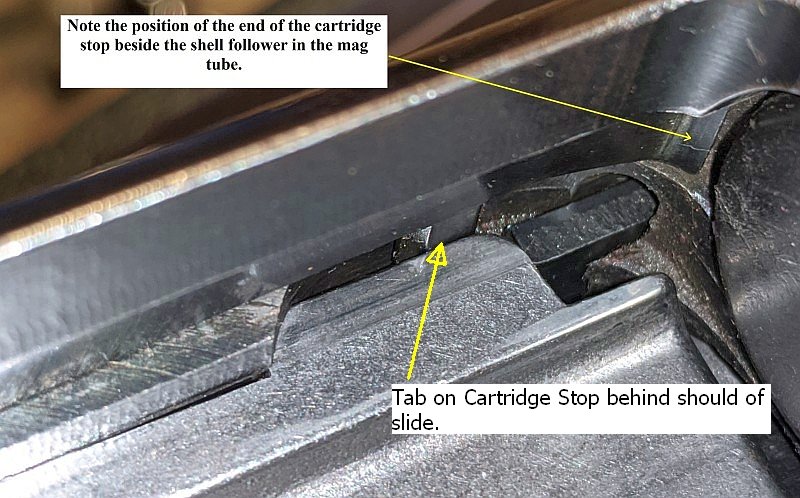
    If the trigger group does not slide in easily, do not force it. When everything is lined up properly the trigger group goes in fairly easily. I found that the location of the notches on the cartridge stops is critical. See the pics earlier of the cartridge stop position. Once you think you have everything aligned you just have to be patient, if the trigger guard does not go in something is not positioned properly.

    For the purposes of this write up I have taken my BPS apart five times. The first and fifth time I had to check and double check the alignment of the cartridge stops. Two through four everything went together very easily. Attempt five was a pain because I had the cartridge stop without the unloading nub on it too far toward the stock end, if you look at the pictures it sits beside the magazine follower not behind it.

    21 Cartridge Stop Front Position.jpg

    If everything is aligned the trigger guard will slide back into the receiver. Put the trigger pin into the slots and push the trigger guard forward and down.
     
    Last edited:

    marvin02

    Don't Panic
    Site Supporter
    Rating - 100%
    56   0   0
    Jun 20, 2019
    5,252
    77
    Calumet Twp.
    Ok, that's the end. I hope this is useful to someone. Feel free to make comments and corrections. Information showing differences with other versions of the BPS are especially welcome.
     

    churchmouse

    I still care....Really
    Emeritus
    Rating - 100%
    187   0   0
    Dec 7, 2011
    191,809
    152
    Speedway area
    I have done a total of 2 of these and no info like this so it was a trial and error affair.

    And the 2nd one was only a teensy weensy easier.....:):

    Thanks for posting this. Good work sir.
     
    Top Bottom