Building a Sten Mark II semi auto pistol.

The #1 community for Gun Owners in Indiana

Member Benefits:

  • Fewer Ads!
  • Discuss all aspects of firearm ownership
  • Discuss anti-gun legislation
  • Buy, sell, and trade in the classified section
  • Chat with Local gun shops, ranges, trainers & other businesses
  • Discover free outdoor shooting areas
  • View up to date on firearm-related events
  • Share photos & video with other members
  • ...and so much more!
  • 1911ly

    Grandmaster
    Site Supporter
    Rating - 100%
    6   0   0
    Dec 11, 2011
    13,419
    83
    South Bend
    I am starting a new project this week. A little more challenging then assembling a AR15 or a 10-22 trigger job. Those are fun too but get to be a little to routine after a few dozen.

    I am taking a WW2 British sub machine parts kit and turning it in to a semi auto pistol. I really wanted to do this as a semi auto rifle. But there are too many hoops to jump threw for 922r compliance. It can be done and I will do one sooner or later. The Mark V is the one I really want to as a rifle.

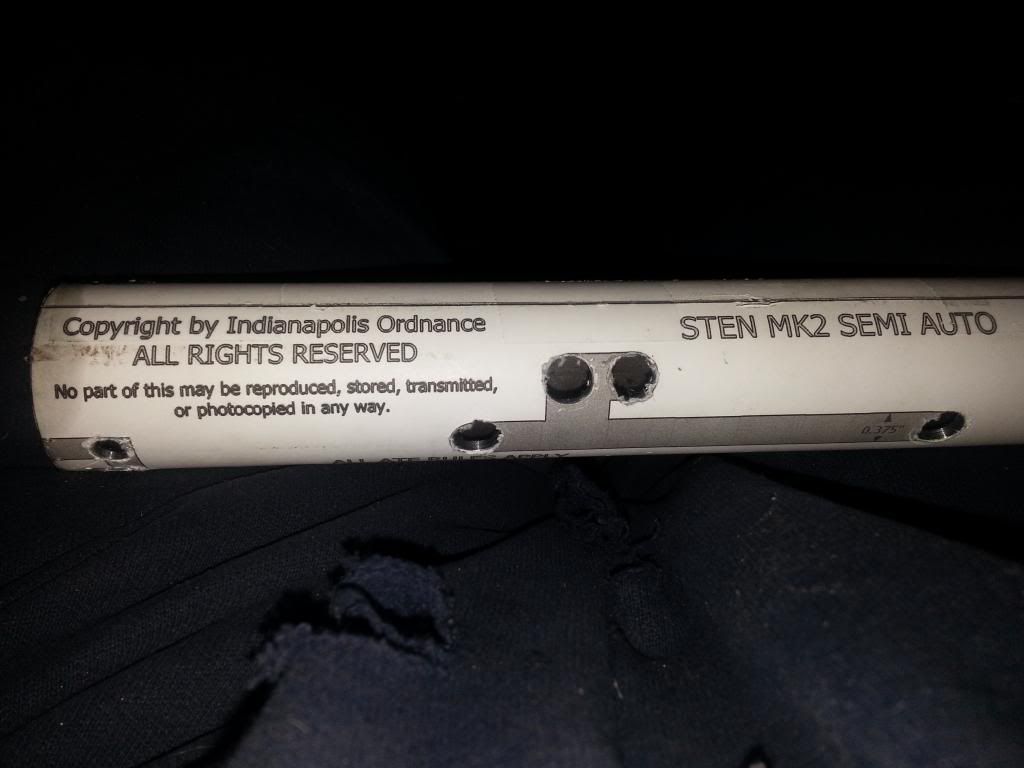
    The semi auto conversion and receiver tube blank is from Indianapolis Ordnance. The Sten Gun parts kits are available from a lot of sources. The Sten came in many versions and configurations. It is well worth Googling Sten Gun if you are a weaposns history buff. If you want to know what a completed one looks like Google it or I am gonna make you wait! I am mean Iike that.

    I have several versions of the Sten. This will be my first build. It's a pretty simple build(so it seems). A Dremel tool or mill, welder, drill press or drill and a few hand tools is all you need to get started. It will be fully legal when complete. The original full auto bolt will not fit in. Semi auto only. A rifle stock will not fit on it. I want any ATF worries.

    Here is the semi auto kit:


    I drilled the holes to start the cuts:


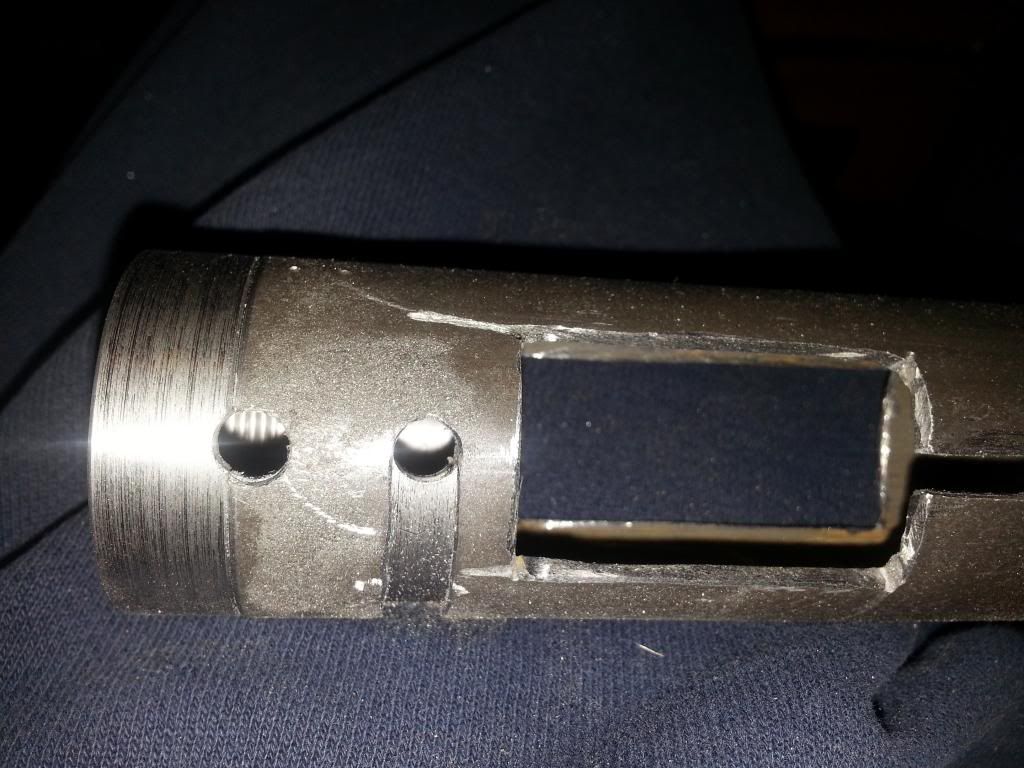
    The mag well and ejection port cut Front barrel nut is just pushed in place. It will be welded. I did the cuts with a dremel. I was going to use the mill but my back is killing me and I was able to sit and dremel. It was not as hard as it sounds. I will use the mill on the major cuts next time.


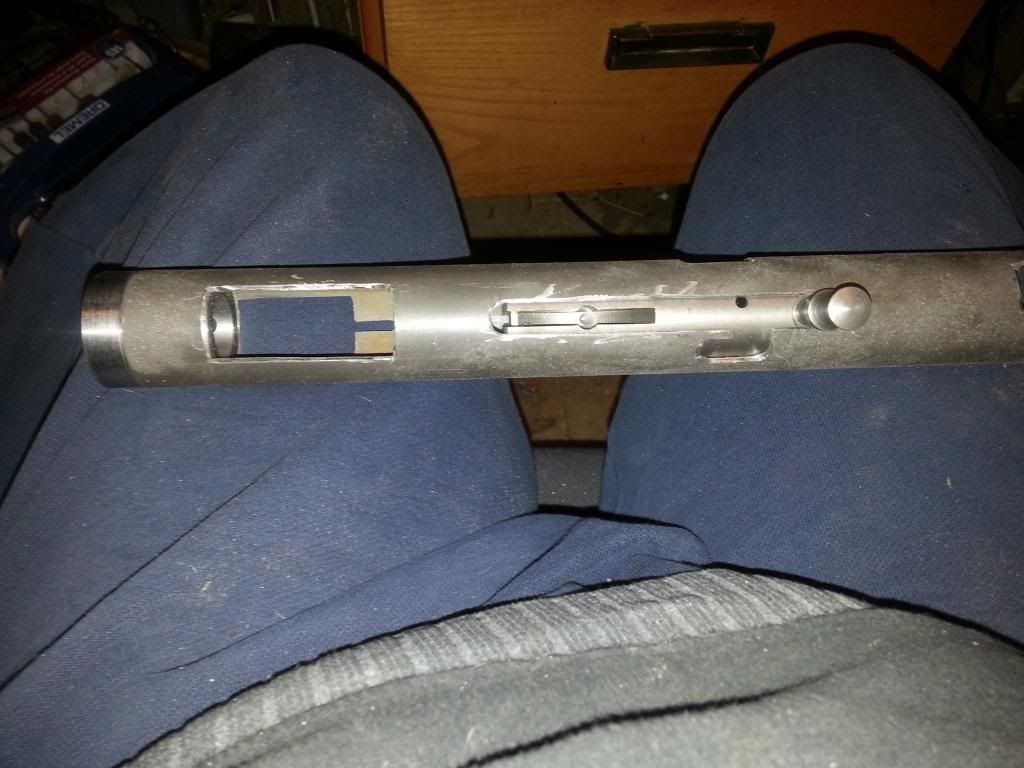
    The charging handle slots are cut out and the bolt is fit. It slides freely and seems great.


    Lots more to do. Stripping the parts kit is next. Then welding the barrel nut and the trigger guard. Then putting in the semi auto bolt kit and lots of tuning to make reliable. Then I have to decide on the finish. I think that will be an AllenM job. I am going to need a dove tail cut for the front sight. Maybe a AllenM job too?
    .
    I am having a medical procedure done tomorrow so I will be a little delayed in getting it complete. Hopefully I will get it shooting in the week or so. Providing I have no major issues with me or the buld. I am in uncharted territory on this build. Hopefully all goes well.

    More info to follow... Stay tuned...
     

    Racechase1

    Sharpshooter
    Rating - 0%
    0   0   0
    Jan 17, 2013
    459
    18
    Indy
    I've been thinking of buying a kit for the last month. I'll watch this, it may make the decision for me, we'll see. I've always liked the look of the Sten.The whole form follows function deal. When you look at it , you know exactly what it is.
     

    1911ly

    Grandmaster
    Site Supporter
    Rating - 100%
    6   0   0
    Dec 11, 2011
    13,419
    83
    South Bend
    I can't say google'ing did it for me but a couple youtube videos and well, yep I want one. Looking forward to the updates on this!

    Lol! I glad I got you thinking about something different! Hickcock45 has a nice video. And there are a few assembly videos but most aren't very good. Very basic. I wish my video skills were better!

    I worked on the demilled receiver this evening. I will post picks when I get a little more farther along.
     

    Catfish33

    Plinker
    Rating - 100%
    8   0   0
    May 21, 2009
    137
    18
    Clifford, In
    I have my Kit almost stripped and ready for the IO tube and Bolt. I will TRY and take pics. I am not very good at documenting things though. Thinking I will build it as a pistol but am unsure yet.
     

    1911ly

    Grandmaster
    Site Supporter
    Rating - 100%
    6   0   0
    Dec 11, 2011
    13,419
    83
    South Bend
    I have my Kit almost stripped and ready for the IO tube and Bolt. I will TRY and take pics. I am not very good at documenting things though. Thinking I will build it as a pistol but am unsure yet.

    Building it as a pistol is a lot easier. There a lot of legal hoops to jump threw when doing a rifle. There is a limit on import parts. 10 parts. You will have to fab a most of pieces or pay someone to do it. I have source most of the pieces. Please share your photo's and any documentation! Feel free it add it to this post.

    Who's SA kit are you going use?
     

    1911ly

    Grandmaster
    Site Supporter
    Rating - 100%
    6   0   0
    Dec 11, 2011
    13,419
    83
    South Bend
    I am going to use an Indianapolis Ordinance SA bolt and tube.

    I hope it works as good as it looks!. There workmanship is great. I think you will like it. They are slow to ship but they can't seem to keep up with demand. I just did a butt load of work to mine today. I will be posting an update here shortly. I am really happy so far. I am just about done and will be test firing on the next day or so if all goes well.
     

    1911ly

    Grandmaster
    Site Supporter
    Rating - 100%
    6   0   0
    Dec 11, 2011
    13,419
    83
    South Bend
    Update: 11-30-13

    I am recouping pretty well and had a good time tinkering with the project today. I got a lot done! Here is some of the progress:

    Here is the ejector in place ready to be welded. Sadly I forgot to take a pic of the weld before grinding. It came out well for MIG welding on light metal. It seemed pretty easy to get carried a way and blow threw but it did not over penetrate on any of the welds. A buddy of mine did the welding. I am to shakey at the moment and he's a great welder. He would have rather TIG welded it but he did not have his new welder set up and MIG worked fine.


    The trigger guard is welded in place. They just need ground down.


    Grinding down some of the welds.


    If you look at the end closest to the welder you will see the plug welds that hold the front barrel nut on. there are 6 of them spaced around the tube. the nut could be welded solid all the way around but not easily with the MIG. This welder is 300 amps and kind of over kill for the job. The nut isn't going anywhere.


    Here is the hammer/recoil guide rod assembly set up in the pana-vise ready to be welded. The rods go threw a washer that has been drill to hold the guide rods. The springs slide over the guide rods. that assembly it temporarily slid in to the bolt for alignment reasons. I wrapped the bolt and rods in tin foil so the splatter would not stick to the guide rods. It makes for a smoother spring travel and a lot less clean up if it does splatter.


    Hear is a pic of the center rod tack welded on both sides. It does not need to be welded all the way around. The smaller rods need welded next. The manual says to just peen the ends on the smaller rods but that doesn't seem like the way to do it to me Doesn't seem solid enough. It's welded now. I think it will be fine. If not I have a little more work... :-P


    I have more to do. I need to cut the extractor down to fit the reduce bolt diameter. The hammer and recoill springs need cut to size. They also need to be compressed about 200 times to size them. I will need to tinker with the spring length if I have issues with the action. Hopefully not!

    More info, progress and pics to follow. Please comment if you find it interesting or have any tips. Be nice though :-) This my first major build. So far so good. I think!
     
    Last edited:

    1911ly

    Grandmaster
    Site Supporter
    Rating - 100%
    6   0   0
    Dec 11, 2011
    13,419
    83
    South Bend
    Everything is in pieces and ready for assembly. All the parts have been fit and thoroughly cleaned. The hammer and bolt recoil springs are cut to size and I have cycled the action about 300 rounds, you do that to break the springs in. It is ready to go together,


    Here it is. A sde view:


    Other side view:


    Here is Zombie bait holding it. He really wants to shoot it too!! :


    It shoots!!

    I put 2 rounds in it. Cycled the bolt. It loaded a round from the mag, I pulled back the bolt again and the round ejected just fine. I fired 1 round, The bolt cycled and locked the hammer bar back. Awesome! I Put 10 rounds in the mag and it ran the mag empty one shot at a time! Absolutely no issue! No tuning was needed. I need to have a dovetail cut for the front sight, Then figure out the finish. So close to complete

    I will post some video of it shooting, I will up date as I finish up.

    Thanks for following. Please feel free to comment.
     

    1911ly

    Grandmaster
    Site Supporter
    Rating - 100%
    6   0   0
    Dec 11, 2011
    13,419
    83
    South Bend
    More Progress:

    Everything is in pieces and ready for assembly. All the parts have been fit and thoroughly cleaned. The hammer and bolt recoil springs are cut to size and I have cycled the action about 300 times,
    you do that to break the springs in. It is ready to go together,


    Here it is. Side view:


    Other Side view:


    Here is Zombie bait holding it. He really wants to shoot it too!! :


    It shoots!!

    I put 2 rounds in it. Cycled the bolt. It loaded a round from the mag, I pulled back the bolt again and the round ejected just fine. I fired 1 round, The bolt cycled and locked the hammer bar back. Awesome! I Put 10 rounds in the mag and it ran the mag empty one shot at a time! Absolutely no issue! No tuning was needed. I need to have a dovetail cut for the front sight, Then figure out the finish. So close to complete

    I will post some video of it shooting, I will up date as I finish up.

    Thanks for following along. Please feel free to comment on the good the bad and the ugly! A Mark 3 or 5 is the next gun.
     

    1911ly

    Grandmaster
    Site Supporter
    Rating - 100%
    6   0   0
    Dec 11, 2011
    13,419
    83
    South Bend
    Awesome project.

    Thank you. I was hoping to get to put some more rounds threw it today :-(. Everyone kept me to busy. O want to get a little video of it shooting. It is nothing special to shoot. Heavy trigger, not to mention it weights a ton! lol. But it is cool to shoot a bit of history. And it is a awesome feeling to pull the trigger on something that you built yourself. I am hooked on gun building now!
     

    1911ly

    Grandmaster
    Site Supporter
    Rating - 100%
    6   0   0
    Dec 11, 2011
    13,419
    83
    South Bend
    Could you elaborate on the ejector install? How do you know you have it set correctly?

    Sure! NP.

    The ejector has to allow the bolt to freely pass over it. Just use a small piece of paper wedge between the bolt and the ejector. I folded it a couple times. Put the paper between the bolt and the ejector and push the ejector in. The slot in the bolt is a V and it will align it's self. If you end up making the slot in the tube a little to wide (like I did :( ) just use a really tiny piece of paper and put it between the ejector and the tube. It makes it a breeze to weld the ejector. It will stay in place while you weld it. The paper will just burn away. Put the bolt cocking lever in the bolt to keep it centered. If for some reason you don't end up with enough clearance you can dremel the ejector edge a little. The ejector tab has to only be close. As long as the bolt moves free and the tab hits the back of the shell it will work.

    Hind sight being 20-20 I would have cut the slot differently. I would have V'ed it a little bent the edge of the tube in a tiny bit. It would allow the ejector to stick it up a little. It would have been a better weld I think. Instead I ground down the side of the tube a little so more of the ejector is exposed. I can make some drawings if it would help explain it better.


    Let me know before you cut your tube. I am curious as to what length of your cocking handle slot is. The template as it way to long in front. I will give you the measurement so the slot is not so long. It's fine but I don't think it looksas good.
     

    Catfish33

    Plinker
    Rating - 100%
    8   0   0
    May 21, 2009
    137
    18
    Clifford, In
    Will be milling my tube this week sometime. So I need to trim my ejector to the .625 length and possibly shorten it the overall height too? My ejector as of right now is still attached to part of the old tube. That is the last thin I need to strip off of the old kit. Thanks for the help.
     
    Top Bottom