*10mm* Smith & Wesson M&P 2.0

The #1 community for Gun Owners in Indiana

Member Benefits:

  • Fewer Ads!
  • Discuss all aspects of firearm ownership
  • Discuss anti-gun legislation
  • Buy, sell, and trade in the classified section
  • Chat with Local gun shops, ranges, trainers & other businesses
  • Discover free outdoor shooting areas
  • View up to date on firearm-related events
  • Share photos & video with other members
  • ...and so much more!
  • russc2542

    Master
    Rating - 100%
    24   0   0
    Oct 24, 2015
    2,127
    83
    Columbus
    What all did you polish? Just the plunger and the trigger bar where it interfaces with the plunger?
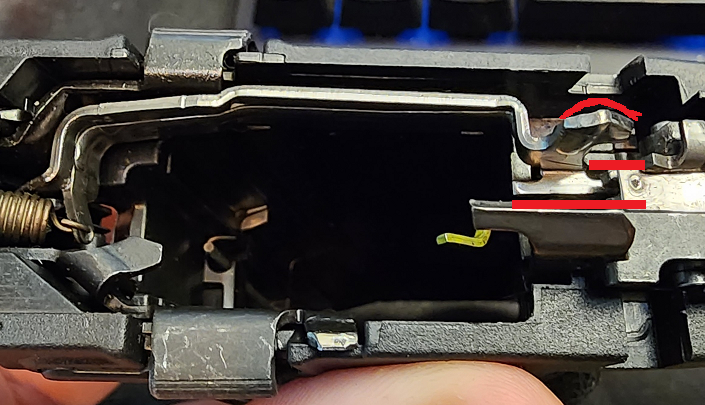
    The bottom of the plunger (rounded & polished)
    The hump on the trigger bar that pushes the plunger up (polished)
    The straight bit of the end of the trigger bar where it pushes sideways against the fire control housing (polished)

    From the factory it's just stamped sheet metal and it's rough AF.

    1690474983196.png
     

    nucular

    Expert
    Rating - 100%
    10   0   0
    Dec 17, 2012
    1,181
    113
    Brownsburg
    The bottom of the plunger (rounded & polished)
    The hump on the trigger bar that pushes the plunger up (polished)
    The straight bit of the end of the trigger bar where it pushes sideways against the fire control housing (polished)

    From the factory it's just stamped sheet metal and it's rough AF.

    View attachment 289548

    I'll take another stab. I polished the crap out of that plunger and dry fired about 1000 times. Its better but still gritty. What did you polish with? I was being pretty gentle.
     

    88E30M50

    Grandmaster
    Site Supporter
    Rating - 100%
    12   0   0
    Dec 29, 2008
    22,780
    149
    Greenwood, IN
    I'll take another stab. I polished the crap out of that plunger and dry fired about 1000 times. Its better but still gritty. What did you polish with? I was being pretty gentle.
    When I polished mine, I focused on the plunger in the slide. Both the plunger itself and the hole that it fits into. That seems to be the source of a big part of the grit. I think that I used either 600 or 1000 grit sandpaper wrapped around a wooden dowel to remove any production burrs in the bore.
     

    jamil

    code ho
    Site Supporter
    Rating - 0%
    0   0   0
    Jul 17, 2011
    60,607
    113
    Gtown-ish
    Me too. One of just a very few I have seen posted that would make me interested in picking up a 1911.
    I dunno. I am a 1911 fan. Not exclusively of course. I likes my plastic-tacticools too. But that is sweet. Makes my blood sugar go up just looking at a photo.
     

    DadSmith

    Grandmaster
    Rating - 100%
    1   0   0
    Oct 21, 2018
    22,718
    113
    Ripley County
    When I polished mine, I focused on the plunger in the slide. Both the plunger itself and the hole that it fits into. That seems to be the source of a big part of the grit. I think that I used either 600 or 1000 grit sandpaper wrapped around a wooden dowel to remove any production burrs in the bore.
    So my 3000 and 5000 grit is probably way to fine?
    When I'm done it is really smooth though. Probably takes a lot more time no doubt.
     

    russc2542

    Master
    Rating - 100%
    24   0   0
    Oct 24, 2015
    2,127
    83
    Columbus
    I'll take another stab. I polished the crap out of that plunger and dry fired about 1000 times. Its better but still gritty. What did you polish with? I was being pretty gentle.
    Knife polishing kit. started 500grit but only briefly. 1k then whatever the saphhire stone is.

    When I polished mine, I focused on the plunger in the slide. Both the plunger itself and the hole that it fits into. That seems to be the source of a big part of the grit. I think that I used either 600 or 1000 grit sandpaper wrapped around a wooden dowel to remove any production burrs in the bore.
    On mine the plunger gave it a lot of unevenness and caught but the straight leg at the end was the part that was gritty AF throughout. A spring pulls it sideways running the stamped edge against the FCG body.
     
    Top Bottom