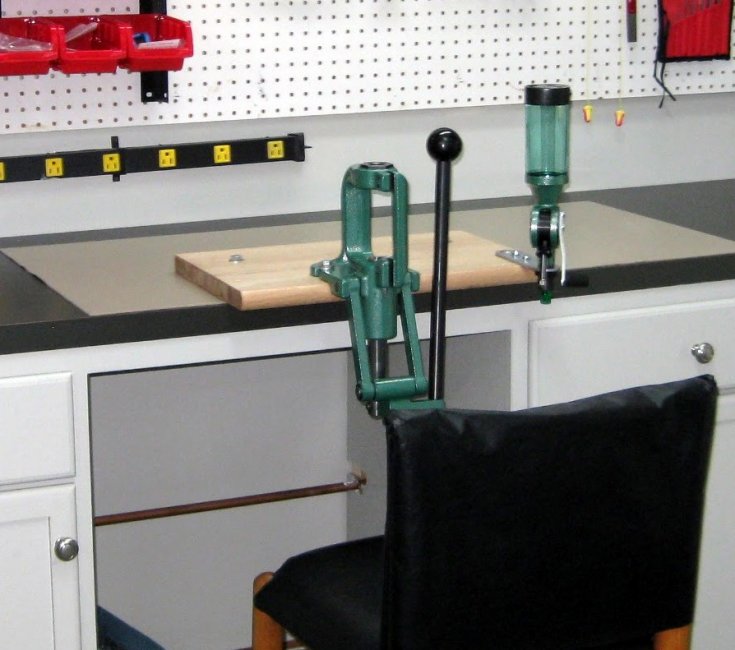
Quick change mounts?

The #1 community for Gun Owners in Indiana

Member Benefits:

  • Fewer Ads!
  • Discuss all aspects of firearm ownership
  • Discuss anti-gun legislation
  • Buy, sell, and trade in the classified section
  • Chat with Local gun shops, ranges, trainers & other businesses
  • Discover free outdoor shooting areas
  • View up to date on firearm-related events
  • Share photos & video with other members
  • ...and so much more!
  • Notalentbum

    Expert
    Rating - 100%
    4   0   0
    Jun 12, 2013
    1,330
    48
    Indy westside
    I’m setting up a new bench, 72”x 36” hardwood top. Bench will be firmly attached to the wall. I’m thinking I’d like some kind of quick change system so when my various presses aren’t needed they can be stored under the bench and I have a clean bench top. I’ve seen one company called InLine Fabrication and kind of like their approach but thought I’d check in here and see what else may be in use by fellow INGOers.
    I have a Dillon 650 and a Lyman single stage. I liked InLine’s optional plates for mounting vises and whatever else you can think of. Also liked their flush mount plate.

    Thanks, Matt
     

    ilcaveman

    Marksman
    Rating - 0%
    0   0   0
    Aug 25, 2013
    174
    18
    elizabeth
    I have the flush plate, Its a great setup. I have the plates for a rockchucker, vice and a lyman case trimmer. They make great stuff, I have a lot of their stuff. The light for the press is a big help for aging eyes.
     

    Falconpuch

    Plinker
    Rating - 100%
    8   0   0
    May 25, 2014
    71
    8
    NW Laf
    I have 2 Inline quick change mounts and love them. I have one for in the garage and house. I have 3 presses on quick change plates, Dillon super swager, rcbs primer tool all on quick change plates also. They give you all the bolts you need to mount each item and just works great.
     

    gregkl

    Outlier
    Site Supporter
    Rating - 100%
    33   0   0
    Apr 8, 2012
    11,913
    77
    Bloomington
    I took a lower cost approach. I purchased some oak stair treads and mounted my press and powder measure on one, my vice on another and my grinder on yet another. I then drilled two holes in my bench top and use two bolts with wing nuts to secure them as I need them to the bench.

    They are rock solid and don't take long to change.

    I actually have three benches in my home. Two of them are set up to be able to accept any of the tools.

    I had the RCBS mounting plate but decided that I wanted more versatility so that's why I ended up with the above set up.

    When I built my new tops, I looked into using T-slot. I really like it, but I couldn't pull the trigger due to the cost.:)
     

    Notalentbum

    Expert
    Rating - 100%
    4   0   0
    Jun 12, 2013
    1,330
    48
    Indy westside
    I took a lower cost approach. I purchased some oak stair treads and mounted my press and powder measure on one, my vice on another and my grinder on yet another. I then drilled two holes in my bench top and use two bolts with wing nuts to secure them as I need them to the bench.

    They are rock solid and don't take long to change.

    I actually have three benches in my home. Two of them are set up to be able to accept any of the tools.

    I had the RCBS mounting plate but decided that I wanted more versatility so that's why I ended up with the above set up.

    When I built my new tops, I looked into using T-slot. I really like it, but I couldn't pull the trigger due to the cost.:)

    I was nearly convinced to go ahead and buy the InLine system this morning until I read this. For the cost of a stair tread or two, it’s worth a shot. If I don’t like it that well, the InLine stuff is only a few clicks away!

    Matt

    Thank you gregkl!
     

    BiscuitsandGravy

    Future 'shootered'
    Site Supporter
    Rating - 100%
    11   0   0
    Nov 8, 2016
    3,925
    113
    At the Ranch.
    Same on the 'low cost' method here... Bolted a 1x2 trim piece the width of the bench along the back with a 2x8 thickness gap. Then bolt the presses their own 2x8 that is the 'depth' of the bench. Now take the long 2x8, w press attached on one end and slide the opposite end under the 1x2 trim piece at the back to pinch tight. Use a C clamp to clamp 2x8 down tight w press on front edge of bench. Nothing moves. Remove C clamp, lift off press and store when done. As it turns out, we never remove the presses. YMMV.
     

    Karl-just-Karl

    Retired
    Rating - 0%
    0   0   0
    Nov 5, 2014
    1,205
    113
    NE
    Same on the 'low cost' method here... Bolted a 1x2 trim piece the width of the bench along the back with a 2x8 thickness gap. Then bolt the presses their own 2x8 that is the 'depth' of the bench. Now take the long 2x8, w press attached on one end and slide the opposite end under the 1x2 trim piece at the back to pinch tight. Use a C clamp to clamp 2x8 down tight w press on front edge of bench. Nothing moves. Remove C clamp, lift off press and store when done. As it turns out, we never remove the presses. YMMV.


    I've taken a very similar approach to the above. My presses are attached to wooden substructures that are C-clamped in place on both sides of the press.

    I made my own "mounting plates" out of 3/4 MDF and plywood, leaving generous "ears" or tabs on both sides of the press mounting area.

    Of course this requires your bench top to be pretty solid.

    After I added a progressive, I ended up drilling a hole towards the back/middle of the bench I can put a bolt through to add a third attachment point.

    Not the approach for everyone. No, it isn't the prettiest, but it is cheap, solid and easily reconfigurable.
     

    gregkl

    Outlier
    Site Supporter
    Rating - 100%
    33   0   0
    Apr 8, 2012
    11,913
    77
    Bloomington
    Here is a slightly blurry pic of my original set-up in my last house. I still use it in my current house but haven't taken any pics of it. My new benches are made from leftover 3/4" oak hardware flooring attached to two layers of 1/2" OSB. I have basically the same platform for my grinder and vice.

    And I can just keep adding them if I have other items to mount to a workbench.

    Old Bench.jpg
     

    russc2542

    Master
    Rating - 100%
    24   0   0
    Oct 24, 2015
    2,132
    83
    Columbus
    Same on the 'low cost' method here... Bolted a 1x2 trim piece the width of the bench along the back with a 2x8 thickness gap. Then bolt the presses their own 2x8 that is the 'depth' of the bench. Now take the long 2x8, w press attached on one end and slide the opposite end under the 1x2 trim piece at the back to pinch tight. Use a C clamp to clamp 2x8 down tight w press on front edge of bench. Nothing moves. Remove C clamp, lift off press and store when done. As it turns out, we never remove the presses. YMMV.

    I have the same thing but using Oak 1x. I also use some UHMW strips underneath to give space for the bolt heads... and unfortunately brass to roll under. But it's rock solid.

    Nice thing about it (whatever wood you use) is you can position it anywhere along the bench.
     
    Top Bottom