-
Be sure to read this post! Beware of scammers. https://www.indianagunowners.com/threads/classifieds-new-online-payment-guidelines-rules-paypal-venmo-zelle-etc.511734/

You are using an out of date browser. It may not display this or other websites correctly.
You should upgrade or use an alternative browser.
You should upgrade or use an alternative browser.
Rust bluing
- Thread starter Clayshoot07
- Start date
The #1 community for Gun Owners in Indiana
Member Benefits:
Fewer Ads! Discuss all aspects of firearm ownership Discuss anti-gun legislation Buy, sell, and trade in the classified section Chat with Local gun shops, ranges, trainers & other businesses Discover free outdoor shooting areas View up to date on firearm-related events Share photos & video with other members ...and so much more!
Member Benefits:

Gunsmiff12B
Marksman
I have done it a few times, it’s time consuming but very easy to do.
I really want to try it on a few firearms. I need to get off my butt and order some solution from this guy…
 www.rustblue.com
If you don’t already watch Mark Novak’s videos, this is a great one to learn about rust bluing. I find his videos very informative and interesting.
Blog | Rust Blue
If you don’t already watch Mark Novak’s videos, this is a great one to learn about rust bluing. I find his videos very informative and interesting.
Do it outside. Chemicals are poison and the fumes will rust any metal around. Including exposed drywall screws and metal roof.
Clayshoot07
Plinker
I really want to try it on a few firearms. I need to get off my butt and order some solution from this guy…
Blog | Rust Blue
If you don’t already watch Mark Novak’s videos, this is a great one to learn about rust bluing. I find his videos very informative and interesting.
Yes, Mark and Bob are quite interesting.....
Clayshoot07
Plinker
I will look for them, thanksGoogle brownells rust bluing pdf and you can download very good instructins
Clayshoot07
Plinker
Good idea, thanksDo it outside. Chemicals are poison and the fumes will rust any metal around. Including exposed drywall screws and metal roof.
Rust blued a couple Recreator AK receivers to match the beautiful wear on their accompanying surplus Romanian PM d. 90 kits:
A few additional steps were taken to create this BFPU blotchy patina, but I could not be happier with the results (if you simply follow 1-8 and don't try to intentionally distress the finish, your metal will give a dark, deep, consistent color):
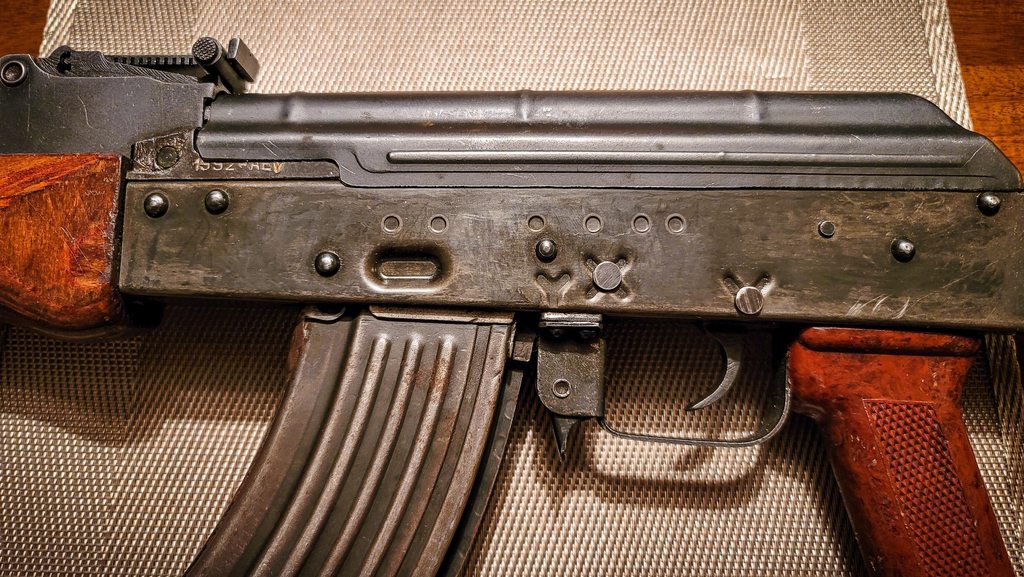
- Sand blast the metal
- Put on gloves
- Degrease
- Keep gloves on
- Apply a thin layer of Brownell's Rust Blue (or similar hydrochloric and nitric acid formula) on the metal
- Let sit in a warm, humid environment and allow everything to rust
- Move metal to a boiling pot of distilled water for 30 minutes
- With gloves still on, pat everything dry and scrub with a carding brush or 0000 steel wool
A few additional steps were taken to create this BFPU blotchy patina, but I could not be happier with the results (if you simply follow 1-8 and don't try to intentionally distress the finish, your metal will give a dark, deep, consistent color):
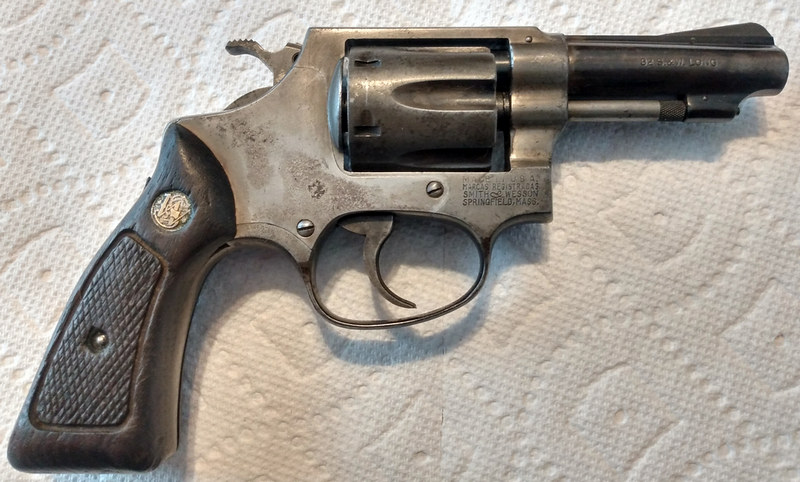
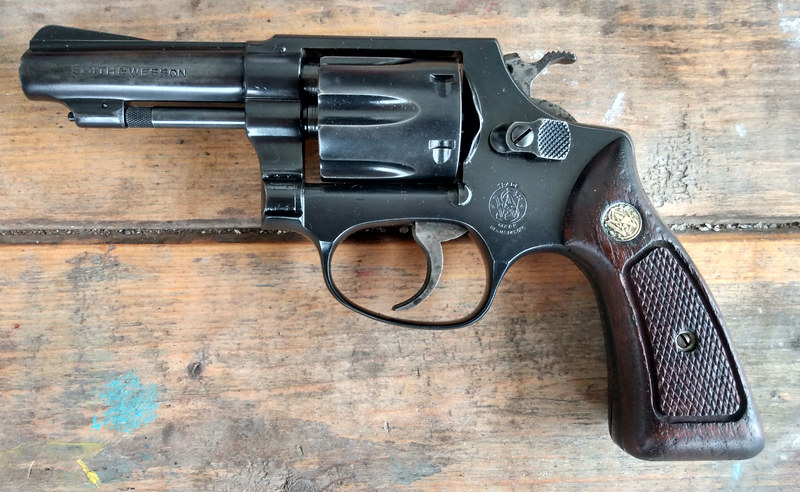
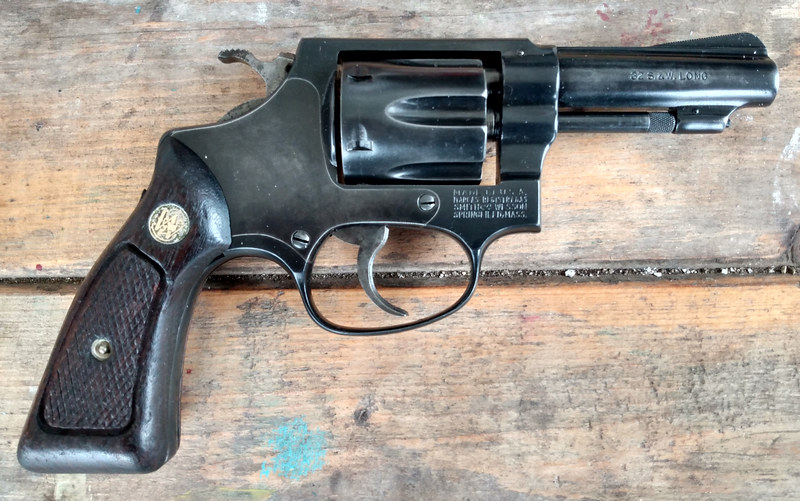
I did an old S&W Model 31 a few months back that I got cheap because somebody else had tried to cold blue it, and it had not gone well. I used Mark Lee Express Blue that I got from Brownells, because it's quicker than some other methods. I first detail stripped the gun and soaked it in evaporust for a couple of days, then brushed off all the residue with steel wool. Then it got a bath in acetone, and completely degreased. There was some etching on the side plate that I mostly polished off, then more degreasing.
I wasn't sure what the rust blue would do to areas of tight tolerances, so I opted to cold blue the small parts. In hindsight, I likely would have been fine to rust blue them. I left the hammer and trigger alone apart from brushing off some surface rust and oiling them. The frame, barrel, cylinder, side plate, and crane got the rust blue treatment.
I heated the parts to about 150 degrees in an oven, then applied 2 coats of the bluing solution, allowed them to set for several minutes, then boiled in a pot of water on the stove. They say to use distilled water...I used melted snow. Once boiled, remove, brush off the rust scale and repeat. This process got repeated over and over again...took about 7 hours total to get it all done, as I did the smaller parts in one batch and the frame/barrel in another. Once you start, gloves stay on....and if you get any oil on them whatsoever, change them before touching the gun as it'll keep the blueing solution from working. When finished, I washed the parts thoroughly and let them soak in oil for another day before re-assemble.
Overall, I'm happy with it. It's not perfect...the barrel didn't take the bluing as well as I'd hoped...I'm not sure if there was oil down in the lettering that didn't get completely removed during degreasing, or what...but you can see that the bluing is lighter around the rollmarks. It's also possible I could have done more coats....I did 9, and it was 4am by that point, and it looked good, so I decided it was enough. It faded just a bit as it dried. I still think it's much better than it was, and some companies charge more for that "battleworn" look these days anyway .
.
Before:
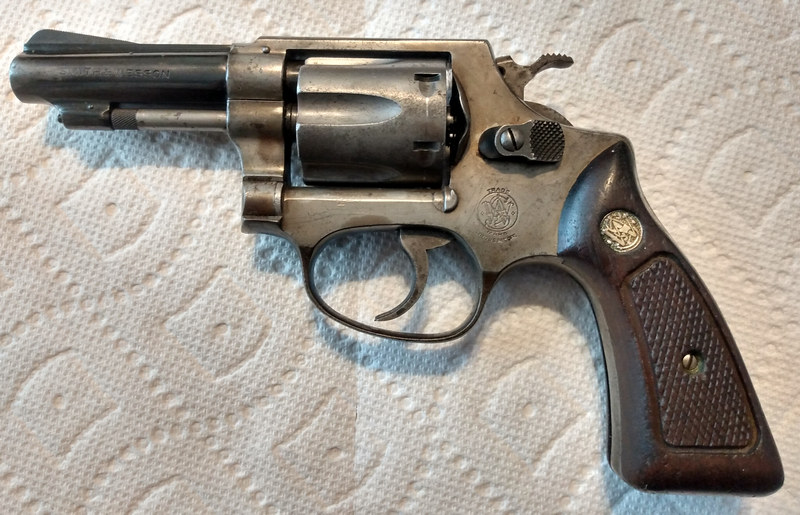
After:
I wasn't sure what the rust blue would do to areas of tight tolerances, so I opted to cold blue the small parts. In hindsight, I likely would have been fine to rust blue them. I left the hammer and trigger alone apart from brushing off some surface rust and oiling them. The frame, barrel, cylinder, side plate, and crane got the rust blue treatment.
I heated the parts to about 150 degrees in an oven, then applied 2 coats of the bluing solution, allowed them to set for several minutes, then boiled in a pot of water on the stove. They say to use distilled water...I used melted snow. Once boiled, remove, brush off the rust scale and repeat. This process got repeated over and over again...took about 7 hours total to get it all done, as I did the smaller parts in one batch and the frame/barrel in another. Once you start, gloves stay on....and if you get any oil on them whatsoever, change them before touching the gun as it'll keep the blueing solution from working. When finished, I washed the parts thoroughly and let them soak in oil for another day before re-assemble.
Overall, I'm happy with it. It's not perfect...the barrel didn't take the bluing as well as I'd hoped...I'm not sure if there was oil down in the lettering that didn't get completely removed during degreasing, or what...but you can see that the bluing is lighter around the rollmarks. It's also possible I could have done more coats....I did 9, and it was 4am by that point, and it looked good, so I decided it was enough. It faded just a bit as it dried. I still think it's much better than it was, and some companies charge more for that "battleworn" look these days anyway
.Before:
After:
Last edited:
Clayshoot07
Plinker
Looks amazing, makes me want an AK nowRust blued a couple Recreator AK receivers to match the beautiful wear on their accompanying surplus Romanian PM d. 90 kits:
Repeat these steps until you achieve the level of blueing you want ... don't forget the gloves!
- Sand blast the metal
- Put on gloves
- Degrease
- Keep gloves on
- Apply a thin layer of Brownell's Rust Blue (or similar hydrochloric and nitric acid formula) on the metal
- Let sit in a warm, humid environment and allow everything to rust
- Move metal to a boiling pot of distilled water for 30 minutes
- With gloves still on, pat everything dry and scrub with a carding brush or 0000 steel wool
A few additional steps were taken to create this BFPU blotchy patina, but I could not be happier with the results (if you simply follow 1-8 and don't try to intentionally distress the finish, your metal will give a dark, deep, consistent color):
Clayshoot07
Plinker
It may not be perfect but it surely is a significant improvement.I did an old S&W Model 31 a few months back that I got cheap because somebody else had tried to cold blue it, and it had not gone well. I used Mark Lee Express Blue that I got from Brownells, because it's quicker than some other methods. I first detail stripped the gun and soaked it in evaporust for a couple of days, then brushed off all the residue with steel wool. Then it got a bath in acetone, and completely degreased. There was some etching on the side plate that I mostly polished off, then more degreasing.
I wasn't sure what the rust blue would do to areas of tight tolerances, so I opted to cold blue the small parts. In hindsight, I likely would have been fine to rust blue them. I left the hammer and trigger alone apart from brushing off some surface rust and oiling them. The frame, barrel, cylinder, side plate, and crane got the rust blue treatment.
I heated the parts to about 150 degrees in an oven, then applied 2 coats of the bluing solution, allowed them to set for several minutes, then boiled in a pot of water on the stove. They say to use distilled water...I used melted snow. Once boiled, remove, brush off the rust scale and repeat. This process got repeated over and over again...took about 7 hours total to get it all done, as I did the smaller parts in one batch and the frame/barrel in another. Once you start, gloves stay on....and if you get any oil on them whatsoever, change them before touching the gun as it'll keep the blueing solution from working. When finished, I washed the parts thoroughly and let them soak in oil for another day before re-assemble.
Overall, I'm happy with it. It's not perfect...the barrel didn't take the bluing as well as I'd hoped...I'm not sure if there was oil down in the lettering that didn't get completely removed during degreasing, or what...but you can see that the bluing is lighter around the rollmarks. It's also possible I could have done more coats....I did 9, and it was 4am by that point, and it looked good, so I decided it was enough. It faded just a bit as it dried. I still think it's much better than it was, and some companies charge more for that "battleworn" look these days anyway
Before:
After:
Thanks. I like it. It's kinda neat to have a 6-shot centerfire J-Frame, and it was a fun project. I started with downright ugly and ended up with acceptable, and learned some stuff in the process, so it was a worthwhile exercise for sure!It may not be perfect but it surely is a significant improvement.
Clayshoot07
Plinker
Looks good to me
Looks really good compared to how it looked before you got ahold of it.I did an old S&W Model 31 a few months back that I got cheap because somebody else had tried to cold blue it, and it had not gone well. I used Mark Lee Express Blue that I got from Brownells, because it's quicker than some other methods. I first detail stripped the gun and soaked it in evaporust for a couple of days, then brushed off all the residue with steel wool. Then it got a bath in acetone, and completely degreased. There was some etching on the side plate that I mostly polished off, then more degreasing.
I wasn't sure what the rust blue would do to areas of tight tolerances, so I opted to cold blue the small parts. In hindsight, I likely would have been fine to rust blue them. I left the hammer and trigger alone apart from brushing off some surface rust and oiling them. The frame, barrel, cylinder, side plate, and crane got the rust blue treatment.
I heated the parts to about 150 degrees in an oven, then applied 2 coats of the bluing solution, allowed them to set for several minutes, then boiled in a pot of water on the stove. They say to use distilled water...I used melted snow. Once boiled, remove, brush off the rust scale and repeat. This process got repeated over and over again...took about 7 hours total to get it all done, as I did the smaller parts in one batch and the frame/barrel in another. Once you start, gloves stay on....and if you get any oil on them whatsoever, change them before touching the gun as it'll keep the blueing solution from working. When finished, I washed the parts thoroughly and let them soak in oil for another day before re-assemble.
Overall, I'm happy with it. It's not perfect...the barrel didn't take the bluing as well as I'd hoped...I'm not sure if there was oil down in the lettering that didn't get completely removed during degreasing, or what...but you can see that the bluing is lighter around the rollmarks. It's also possible I could have done more coats....I did 9, and it was 4am by that point, and it looked good, so I decided it was enough. It faded just a bit as it dried. I still think it's much better than it was, and some companies charge more for that "battleworn" look these days anyway
Before:
After:
Site Supporter

Staff online
-
 texkevAdministrator
Members online
- DDadams
- X3r0h0uR
- Mauser Fanatic
- Relax_36
- Phil502
- Colt556
- snorko
- SolidDragon74
- nobletucky
- bigz82
- Timjoebillybob
- Ingomike
- Squid556
- jburns89
- Gabriel
- rgreldridge
- jdadkins87
- MrSmitty
- morve80
- Triton
- MAG58
- KeeperoftheH
- Basher
- RobF
- ISO400
- 10mm
- iflybeech
- VostocK
- mmpsteve
- fullmetaljesus
- texkev
- PowderApe
- garagegunmaker
- dieselrealtor
- Twinsen
- KMaC
- Machinist68
- 762god
- rvb
- Win52C
- BOLTGUN
- ArevaloSocom
- jake 2000
- Principal Skinr
- gds
- JRR85
- bwframe
- Lee9
- indyartisan
- CheeseRat
Total: 1,782 (members: 106, guests: 1,676)
