
eldirector
Grandmaster

I've been trying to convince LaDirectora that we need chickens (actually, the eggs, but the chickens come first) for a while. My sister is moving this month, and cannot take her mini-flock with her. So, we are inheriting 3 laying hens (the 2 calling birds must be next year).
Now, we need a place for them to stay. Enter "Casa de Pollo", or more formally known as the Chicken Pall-ace/ets. My over-built coop made from 6 shipping pallets. I snapped a few pics during construction, and thought I would share.
This coop is approx. 36" 42" in footprint, and about 6' tall at the highest point (front roof overhang). Probably too tall, but I think it looks fine. It was built on the cheap (pun intended), as I was not going to spend a lot on free chickens. This is where my pack-rat nature helped.
Supplies and rough costs:
6 pallets - FREE
1/2 sheet of 3/4" plywood - also free-ish from my cut-off stash
Hinges/clasps - nice brass ones - $10 or so
Roofing - some sort of asphalt composite - $15
Clean-out tray - $15
Screws and nails - free-ish from my stash
Paint - free-ish, left over from painting the shed this spring
Total cost = $40, plus I'll need to restock on screws/nails at some point
Step 1 - PALLETS
I've been sketching plans for a coop since we learned we were getting the birds. My wife saw a pallet coop on Pinterest, and asked I could build it. Sure! Why not? After some CraigsListing, I found a dealership on the south side of Indy giving away LARGE pallets (42" wide, and 6" feet long) for FREE. SCORE!!!!! We were heading south to see family that night anyway, so I took the trailer and grabbed 6 pallets. Turns out, that was nearly perfect. We ended up with this:

Step 2 - Disassemble pallets
No pics. But, a SawzAll with a metal blade makes short work of cutting the nails. Slip the blade between the boards, and cut them flush.
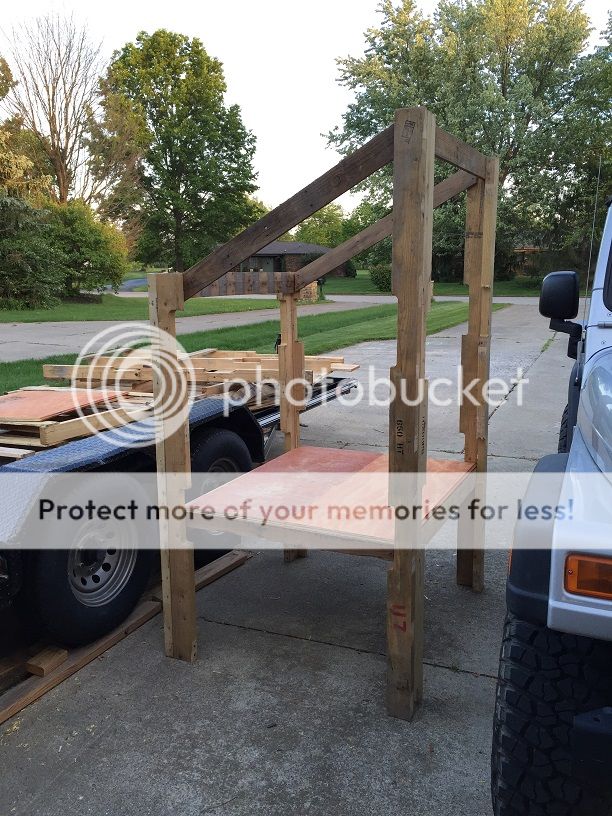
Step 3 - Frame and Floor
Cut the 2x4 pallet frames to length, and nail together. Measure and cut a section of 3/4" plywood for the floor. Nail it down.
Step 4 - Enclose walls with pallet slats
The slats are not exactly straight in ANY dimension. There are "ventilation" gaps all over. I may have to do something about that come winter. For summer... PERFECT. Also, a pneumatic brad nail gun is AWESOME for this. Cut, fit, bang, bang, bang, done.
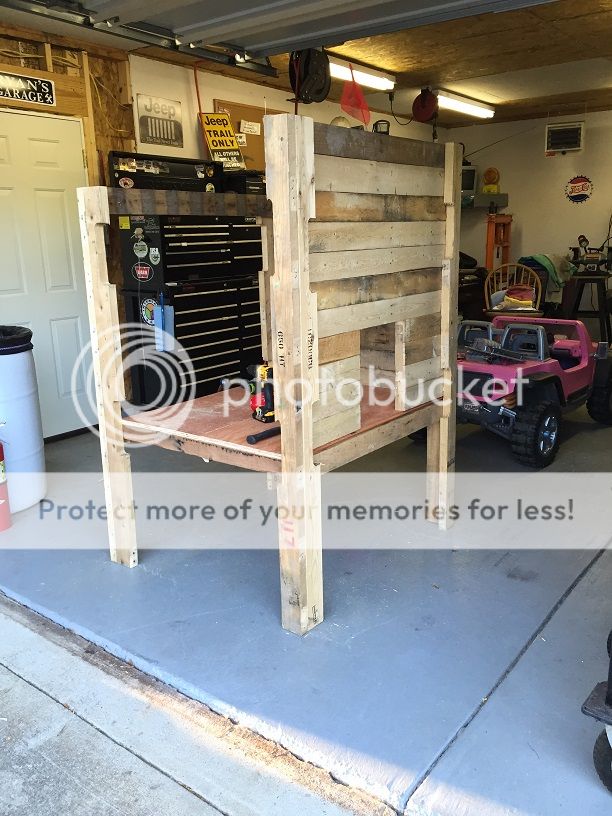
Step 5 - Made some doors and windows.
I framed out the door, a little window, and then a LARGE side door for clean-out. Also built and hung the nest boxes, with a lift-up door for eggs.

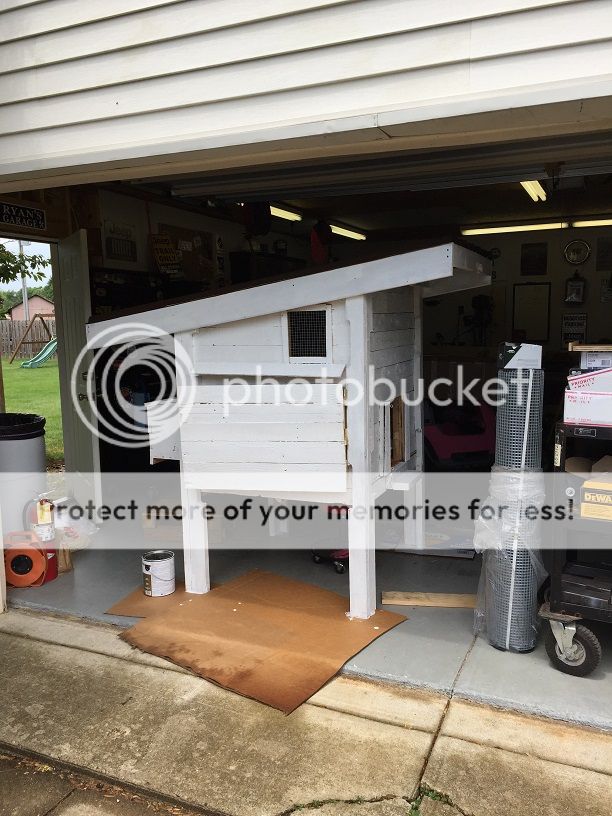
Step 6 - Roof and Paint
I was just going to spray it with tinted sealer, but my wife wanted it painted. So.... knock yourself out, honey! Primed in an hour or so, and then she painted it in a couple more hours over 2 days. This pic also shows the roof framing, made from some left over 5/4" deck boards.
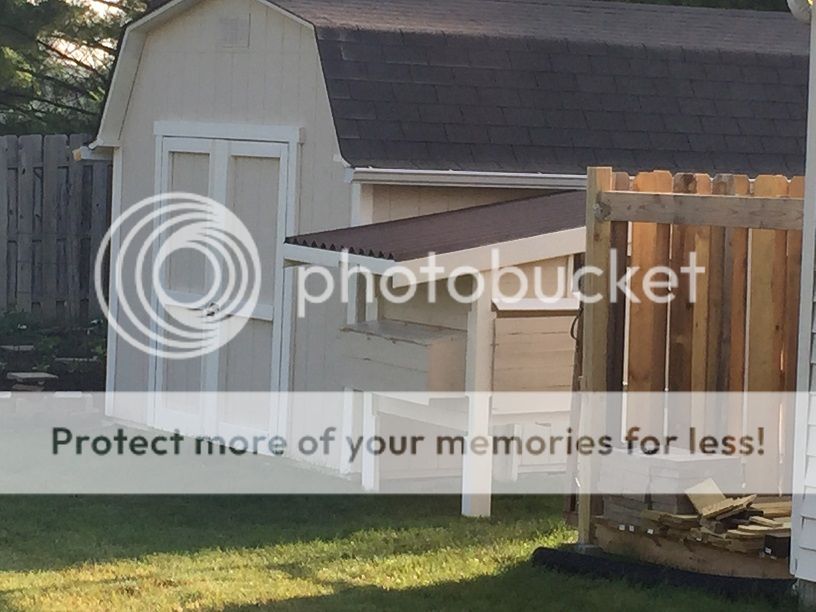
Step 7 - Finished and relocated
Attached the roofing material. I had cut the boards to the same size the the roofing, so didn't need to trim it (seemed easier). This this was HEAVY, and took some effort to get onto our garden trailer to move from the garage around to its new home. Say "hi" to LaDirectora, as she provides relocation services.

FINISHED!!!!!
Coop in its new home.
Still to do:
- Finish the run
- build a 1/2" hole hardware cloth fence across the front. Gate is already done.
What I would have done different:
- Better measurements! Thankfully, I had plenty of material, and still have some left over.
- Grab 7 or 8 pallets. That would have reduced the need for some other material that I happened to have (like the plywood).
- probably didn't need to be this large. It is HEAVY.
So, there it is ! Just waiting on chickens.
EDIT: Fixed the &@&$&@## images. Sorry about that.
Now, we need a place for them to stay. Enter "Casa de Pollo", or more formally known as the Chicken Pall-ace/ets. My over-built coop made from 6 shipping pallets. I snapped a few pics during construction, and thought I would share.
This coop is approx. 36" 42" in footprint, and about 6' tall at the highest point (front roof overhang). Probably too tall, but I think it looks fine. It was built on the cheap (pun intended), as I was not going to spend a lot on free chickens. This is where my pack-rat nature helped.
Supplies and rough costs:
6 pallets - FREE
1/2 sheet of 3/4" plywood - also free-ish from my cut-off stash
Hinges/clasps - nice brass ones - $10 or so
Roofing - some sort of asphalt composite - $15
Clean-out tray - $15
Screws and nails - free-ish from my stash
Paint - free-ish, left over from painting the shed this spring
Total cost = $40, plus I'll need to restock on screws/nails at some point
Step 1 - PALLETS
I've been sketching plans for a coop since we learned we were getting the birds. My wife saw a pallet coop on Pinterest, and asked I could build it. Sure! Why not? After some CraigsListing, I found a dealership on the south side of Indy giving away LARGE pallets (42" wide, and 6" feet long) for FREE. SCORE!!!!! We were heading south to see family that night anyway, so I took the trailer and grabbed 6 pallets. Turns out, that was nearly perfect. We ended up with this:
Step 2 - Disassemble pallets
No pics. But, a SawzAll with a metal blade makes short work of cutting the nails. Slip the blade between the boards, and cut them flush.
Step 3 - Frame and Floor
Cut the 2x4 pallet frames to length, and nail together. Measure and cut a section of 3/4" plywood for the floor. Nail it down.
Step 4 - Enclose walls with pallet slats
The slats are not exactly straight in ANY dimension. There are "ventilation" gaps all over. I may have to do something about that come winter. For summer... PERFECT. Also, a pneumatic brad nail gun is AWESOME for this. Cut, fit, bang, bang, bang, done.
Step 5 - Made some doors and windows.
I framed out the door, a little window, and then a LARGE side door for clean-out. Also built and hung the nest boxes, with a lift-up door for eggs.
Step 6 - Roof and Paint
I was just going to spray it with tinted sealer, but my wife wanted it painted. So.... knock yourself out, honey! Primed in an hour or so, and then she painted it in a couple more hours over 2 days. This pic also shows the roof framing, made from some left over 5/4" deck boards.
Step 7 - Finished and relocated
Attached the roofing material. I had cut the boards to the same size the the roofing, so didn't need to trim it (seemed easier). This this was HEAVY, and took some effort to get onto our garden trailer to move from the garage around to its new home. Say "hi" to LaDirectora, as she provides relocation services.
FINISHED!!!!!
Coop in its new home.
Still to do:
- Finish the run
- build a 1/2" hole hardware cloth fence across the front. Gate is already done.
What I would have done different:
- Better measurements! Thankfully, I had plenty of material, and still have some left over.
- Grab 7 or 8 pallets. That would have reduced the need for some other material that I happened to have (like the plywood).
- probably didn't need to be this large. It is HEAVY.
So, there it is ! Just waiting on chickens.
EDIT: Fixed the &@&$&@## images. Sorry about that.
Last edited:


