
geronimojoe85
Master
- Nov 16, 2009
- 3,716
- 48

From the Wikipedia article:
To disassemble the MkIII
Remove the grips:

Remove the cylinder retaining screw:

Remove the detent and spring:

Slide the cylinder out the front of the frame:

Locate and remove the two small side plate screws:
With a small plastic hammer or wooden handle or other non-marring hammer like tool, gently tap the frame to release the side plate. DO NOT PRY UP THE SIDE PLATE!! The bottom will come up first:


Keeping tension on the cylinder latch will keep it in the frame as you remove it:

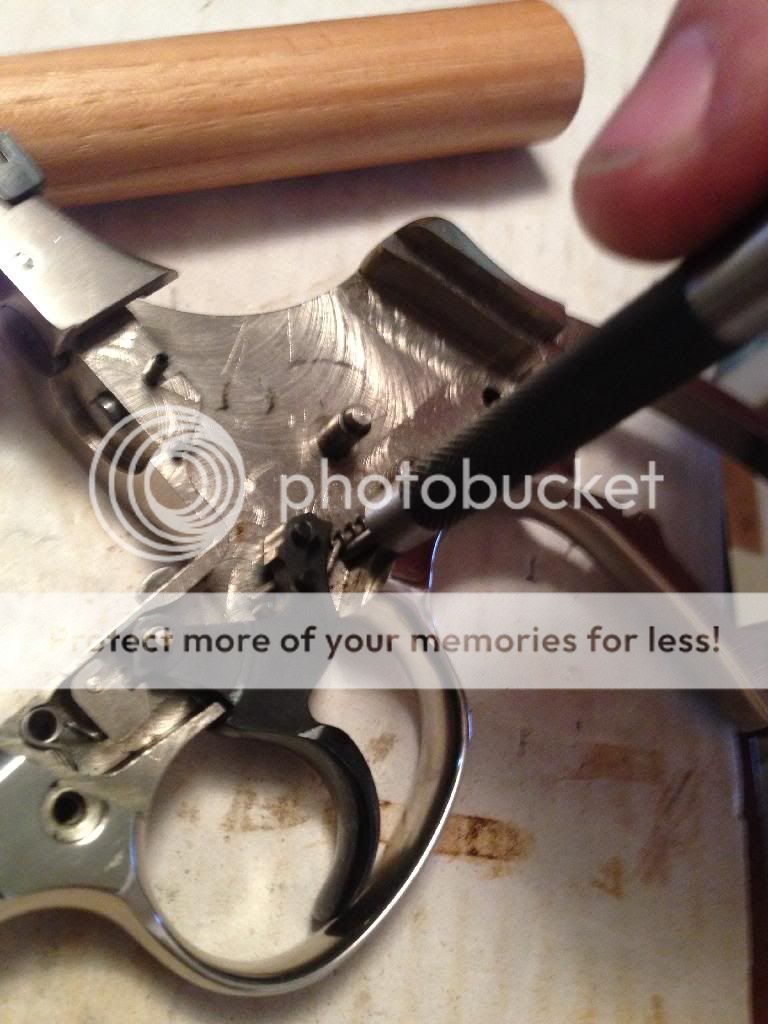
Locate and remove the transfer bar from the trigger:

Remove the hand from the trigger:

Cocking the hammer will compress the coiled mainspring and expose a small hole in the strut:

Place a paperclip into the hole and release the hammer, this will trap the mainspring on the strut:

Lift the mainspring assembly out of the frame:

Pulling the trigger to the rear will allow you to lift the hammer off of its stud in the frame:


At this point you can remove the double action sear from the hammer by sliding it out. Be careful to retain the plunger and spring:


Now you can remove the trigger by placing a punch or a screwdriver tip under the rebound spring to release tension and lifting the trigger off of its stud:

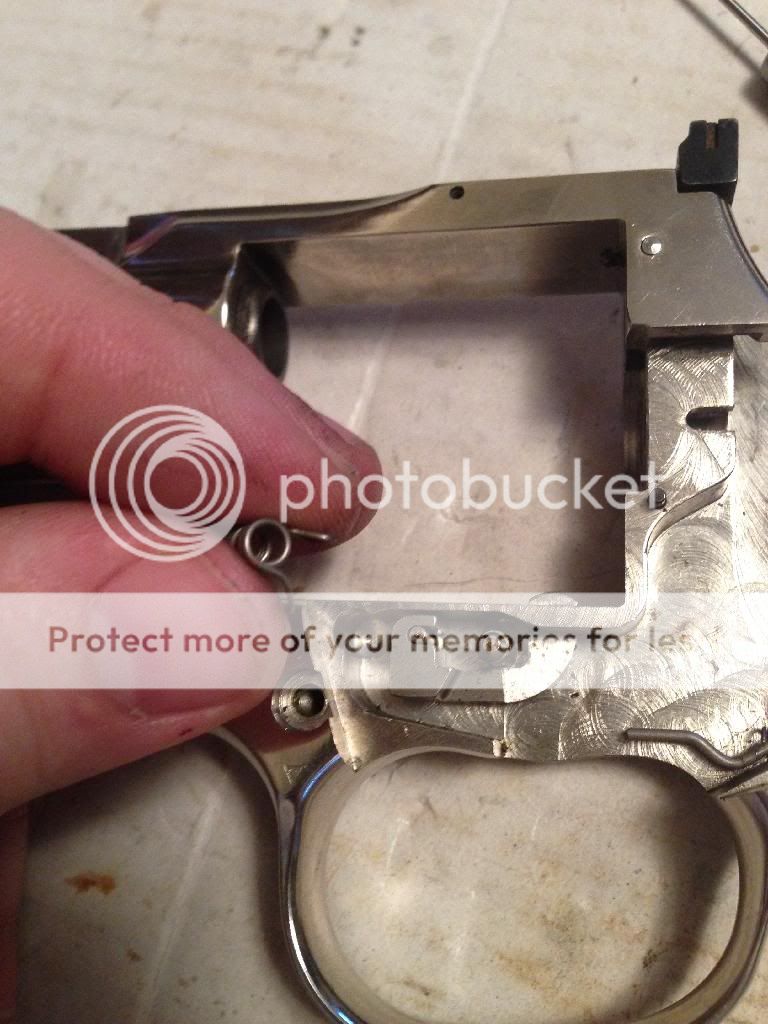
Next you can remove the rebound spring this is done by slowly sliding it up and off the stud using a punch or small screwdriver:

Remove the latch pin:


Remove the bolt by lifting the spring and sliding it out of the frame, keep your finger over the spring to keep it from flying into the dark reaches of your home and getting played with by your stupid cat only to find it after you've already ordered one from a sketchy website for colt parts that I'm pretty sure just steals your credit card information:

Drop the bolt out of the window in the frame and slide it off if the stud and out of the frame:

And there you have it, bare bones.

MK III
1969 - 1982 In the late 1960s, Colt began to be concerned with a decline in its market share because of price increases brought about by the high labor costs inherent in its manufacturing processes. In response, an entirely new product line of revolvers dubbed the MK III series debuted in 1969. Intended to be the first major advancement of Colt’s designs since the beginning of the 20th Century, the MK IIIs used a new ‘J’ frame and had no parts interchangeability with older models. The new revolvers were considered groundbreaking as they were the first modern revolver designs to employ a state of the art transfer-bar lockwork system. This lockwork was not only more sophisticated, but inherently safer due to its superiority to the older hammer-blocking designs; the revolver could fire only if the trigger was deliberately pulled completely to the rear. It also vastly improved on the earlier design in durability, and offered the advantage of employing sintered iron internal parts rather than expensive forged ones. The sintered parts also allowed for improved fabrication tolerances, and could be given a special heat treatment resulting in a harder more wear-resistant composition. Using these parts virtually eliminated hand fitting, significantly lowering labor costs associated with the assembly and manufacture of the MK III line.[2] The springs used in the Mark III internals were also an improvement. Unlike the older flat style, they were coiled and made entirely of corrosion-resistant stainless steel.[3]
The MK III series incorporated a number of models, several of which were updates of existing designs. Classic models included the venerable Colt Official Police chambered in .38 Special as the basic/entry-level offering, and the Trooper in .357 Magnum. New members of the line up included the Lawman, Metropolitan Police, and Border Patrol.[2][3]
Trooper
The .357 Trooper was the premier offering of the new product line, featuring a heavy barrel with a solid top rib as well as a shroud which protected the ejection rod. For the first time, the Trooper was offered with an eight inch barrel length, and as the top of the product line model it boasted a target-grade hammer, target stocks, and adjustable sights. The finish was upgraded to the lustrous Royal Blue or bright Nickel which had been typical on the .357 model, and an additional duller satin-nickel finish option, known as “Coltguard” was added. A new ammunition chambering option, the .22 Winchester Magnum Rimfire, also became available for the first time.[1][2][3]
Lawman
The Lawman was a .357 Magnum 'service grade' or 'police issue' version of the Trooper, equipped with smaller 'Magna Service' type stocks, a standard hammer, fixed sights, and barrel lengths of two inch and four inch only. The two inch barrel was an attribute unique to the Lawman, the only Lawman barrel equipped with shrouded ejector rod.[2][3]
To disassemble the MkIII
Remove the grips:

Remove the cylinder retaining screw:

Remove the detent and spring:

Slide the cylinder out the front of the frame:

Locate and remove the two small side plate screws:
With a small plastic hammer or wooden handle or other non-marring hammer like tool, gently tap the frame to release the side plate. DO NOT PRY UP THE SIDE PLATE!! The bottom will come up first:


Keeping tension on the cylinder latch will keep it in the frame as you remove it:

Locate and remove the transfer bar from the trigger:

Remove the hand from the trigger:

Cocking the hammer will compress the coiled mainspring and expose a small hole in the strut:

Place a paperclip into the hole and release the hammer, this will trap the mainspring on the strut:

Lift the mainspring assembly out of the frame:

Pulling the trigger to the rear will allow you to lift the hammer off of its stud in the frame:


At this point you can remove the double action sear from the hammer by sliding it out. Be careful to retain the plunger and spring:


Now you can remove the trigger by placing a punch or a screwdriver tip under the rebound spring to release tension and lifting the trigger off of its stud:


Next you can remove the rebound spring this is done by slowly sliding it up and off the stud using a punch or small screwdriver:

Remove the latch pin:


Remove the bolt by lifting the spring and sliding it out of the frame, keep your finger over the spring to keep it from flying into the dark reaches of your home and getting played with by your stupid cat only to find it after you've already ordered one from a sketchy website for colt parts that I'm pretty sure just steals your credit card information:


Drop the bolt out of the window in the frame and slide it off if the stud and out of the frame:

And there you have it, bare bones.


