Need help putting a AR-15 together

The #1 community for Gun Owners in Indiana

Member Benefits:

  • Fewer Ads!
  • Discuss all aspects of firearm ownership
  • Discuss anti-gun legislation
  • Buy, sell, and trade in the classified section
  • Chat with Local gun shops, ranges, trainers & other businesses
  • Discover free outdoor shooting areas
  • View up to date on firearm-related events
  • Share photos & video with other members
  • ...and so much more!
  • Rating - 100%
    128   0   0
    Jan 28, 2009
    3,680
    113
    The good news was I did not have to have a triple bypass. the bad news was I had quintuple bypass with 5 arteries replaced. that was on Monday afternoon. the doctor said it was as bad as he's ever seen it. he didn't understand why I had not dropped dead the past sometime during the past 6 months, but I'm all fixed up now and going home today on Thursday
    God is good!!
     

    phatgemi

    Expert
    Rating - 100%
    16   0   0
    Oct 1, 2008
    1,220
    63
    Metamora, IN
    Late to the thread. My son and I are long long way from being amateur gunsmiths but with the help of the Youtube videos we were able to complete ours pretty easily. Same kits from PSA. Good luck on the surgery.
     

    BigRed

    Banned More Than You
    Site Supporter
    Rating - 100%
    7   0   0
    Dec 29, 2017
    19,212
    149
    1,000 yards out
    Hi guys...

    I have a complete AR 15 kit from PSA, with a stripped Anderson lower, that needs to be put together. I have neither the knowledge or setup to do so. If anyone could help me out with the build out it would be greatly appreciated. I'll be happy to slip you a twenty or a six-pack, which ever comes first.

    I live in the Crown Point area, and can travel a bit to get to you. I am available most days and nights.

    Thanks

    Rick


    I am not an expert in this area, but having helped some friends along the way I can pass along a few things that may be helpful.

    As others have noted, there are plenty of instructional videos out there that are very good. Watch a few of them and you will see the common traits....some make it more complicated than it needs to be.

    As the lower is coming together, it is helpful to have a vise device to hold the lower. Once the mag release is in place, you can clamp a magazine in a vice to slide the lower onto. This holds it plenty well. A 30 round mag is best for this as it has more "grip space" for the vice. If you do not have a vice, you can get by by taking 4pieces of 2x4 cut to around 8" each. Screw two pieces together along the long edge so they make an L shape. Do the same with the other two. Now you cam use a C clamp on each end to hold the mag. Slide the lower on once the mag release is in place and you now have a gun vise that will do the jog.

    Setting the detent in the front release pin can be a PITA. A tool like this is worth getting before hand.


    You can do it without, but its a cheap tool that makes a night/ day difference.

    Here is another tool you will find useful:

    Amazon product ASIN B0922LKHDL
    The circular end makes mating the buffer to the lower much easier and effective.

    Others have noted punches....very helpful. You can find kits with the punches and wrench as a package.

    That is really about all you need.

    ETA: As others have mentioned, tape is useful when inserting the pin on the mag release. I have found it is also helpful to have a small pair of vice grips wrapped with tape to "squeeze" the pin in. If the lower gers scratched, don't miss sleep over it....take a sharpie to it....after all, a gun is a tool...scratches on the outside do not impact performance.
     
    Last edited:

    EODFXSTI

    Plinker
    Rating - 100%
    3   0   0
    Dec 14, 2020
    117
    28
    Morgan County
    I have the exact same setup as you and have never built one before. I went on Google and typed how to build an AR lower. The first on the list was https://www.pewpewtactical.com/build-ar-15-lower-receiver/
    This was super helpful as the people on Youtube videos go too fast for me. The site I showed you has tons of pictures step by step and they make it dummy proof. I had some punches laying around and only bought an armorers wrench (which are fairly cheap) and a plastic hammer. The only advice I have for you are take your time and enjoy the build and don't try to catch any springs if they fly out, just watch where they land! Ha ha they will inevitably fly out and catching them is impossible. Be confident and have fun.
     

    Rick Mason

    Sharpshooter
    Rating - 0%
    0   0   0
    Dec 13, 2019
    399
    47
    Lake County
    Welp, I am at home recovering from the surgery. One of the unexpected side effects which seem to affect about 30 percent of the people is a screwed up, semi-paralyzed left hand. My small motor control is gone, and my ring and little finger feel 24/7 like someone drenched them in gasoline and set them on fire. They say eight to twelve weeks for the nerves to calm down and normalize, but about ten percent of the people never heal completely. We shall see. Certainly means the build is off the table for a while for me to do it by myself. And I can't even go to the range either for another two months.
     

    ditcherman

    Grandmaster
    Site Supporter
    Rating - 100%
    22   0   0
    Dec 18, 2018
    7,707
    113
    In the country, hopefully.
    Welp, I am at home recovering from the surgery. One of the unexpected side effects which seem to affect about 30 percent of the people is a screwed up, semi-paralyzed left hand. My small motor control is gone, and my ring and little finger feel 24/7 like someone drenched them in gasoline and set them on fire. They say eight to twelve weeks for the nerves to calm down and normalize, but about ten percent of the people never heal completely. We shall see. Certainly means the build is off the table for a while for me to do it by myself. And I can't even go to the range either for another two months.
    Good to hear your report, we’ll keep hoping for continued, quick recovery!
     

    Cameramonkey

    www.thechosen.tv
    Staff member
    Moderator
    Site Supporter
    Rating - 100%
    35   0   0
    May 12, 2013
    31,921
    77
    Camby area
    Glad to hear you are still on this side of the grass, sir. I'll add you to my (ever growing) prayer list.

    Keep pushing, you'll be back up and at em in no time. (just dont push tooo hard)
     

    BigRed3588

    Sharpshooter
    Rating - 100%
    10   0   0
    Dec 4, 2013
    462
    63
    Boynton Beach
    Setting the detent in the front release pin can be a PITA. A tool like this is worth getting before hand.


    You can do it without, but its a cheap tool that makes a night/ day difference.

    I’d strongly recommend this tool if you plan on building more than 1. It can save you a lot of time and aggravation. I built my first one without it and was lucky enough to get the detent in place on my first attempt. My second build…not so lucky. I had two detents, both of which ended up being fired across the garage. I probably spent over an hour trying to find them to no avail. When I ordered replacements, I bought this tool as well. Haven’t had an issue since.

    As others have said, a set of punches will make the job much easier. I’d recommend spending a little extra for a nice set as the cheaper ones have a tendency to bend.
     

    BiscuitsandGravy

    Future 'shootered'
    Site Supporter
    Rating - 100%
    11   0   0
    Nov 8, 2016
    3,921
    113
    At the Ranch.
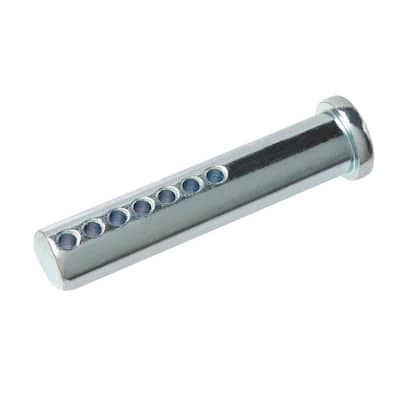
    These also work well to assist in installing the detent pins... About $2 at your local big box...

    metallics-pins-rings-clips-815418-64_400.jpg


    https://www.lowes.com/pd/Hillman-2-in-Clevis-Pin/3012907

    https://www.homedepot.com/p/1-4-in-x-2-in-Zinc-Plated-Universal-Clevis-Pin-815418/204276164

    Good luck on the recovery! :yesway:

    :ingo:
     

    BigRed

    Banned More Than You
    Site Supporter
    Rating - 100%
    7   0   0
    Dec 29, 2017
    19,212
    149
    1,000 yards out
    Welp, I am at home recovering from the surgery. One of the unexpected side effects which seem to affect about 30 percent of the people is a screwed up, semi-paralyzed left hand. My small motor control is gone, and my ring and little finger feel 24/7 like someone drenched them in gasoline and set them on fire. They say eight to twelve weeks for the nerves to calm down and normalize, but about ten percent of the people never heal completely. We shall see. Certainly means the build is off the table for a while for me to do it by myself. And I can't even go to the range either for another two months.

    Wow..... the lengths some folks will go to just to get somebody else to assemble a rifle for them......


    1633632827949.png

    Keep hanging in there!
     

    JeepHammer

    SHOOTER
    Rating - 0%
    0   0   0
    Aug 2, 2018
    1,904
    83
    SW Indiana
    There are a lot of "Autopsy" videos on Boobtube, seeing a few will clue you into what *Can* happen.

    While a lot argue about facing off the upper receiver, the bolt is locked into the carrier,
    Then it gets locked into the barrel/chamber nut,
    Then EXTREME pressure is applied.

    If the bolt carrier and barrel/chamber nut are not lined up directly,
    The locking lugs don't all engage, and the misalignment tries to bend the bolt.

    This produces a lot of broken bolt lugs and broken bolts, not to mention the stress on the bolt carrier.


    Facing off the upper square isn't hard to do,
    And you should probably check barrel/chamber nut for run out, but being lathe turned they usually aren't too far out.

    https://www.brownells.com/gunsmith-...16-upper-receiver-lapping-tool-prod20220.aspx

    The tool to face off the upper is cheap and easy to use, shims to space that barrel are cheap & available, so no real reason other than lazy for not doing it.

    100% locking lug engagement is a big deal, this is where 100% of the recoil force is applied.
    Making sure the bolt fully rotates so lugs are square on each other (not overhanging to one side or the other) and getting all lugs in contact with each other is critical to longevity and no catastrophic failure.

    Facing off the front of the receiver square to bolt carrier bore also aligns the barrel with upper, optics/sights directly inline with sights/optics.
    Getting the bolt to lock up square with bore keeps bolt face from deflecting, so you can get much closer to bolt gun repeatability, increasing accuracy.

    You can (abrasive) lap/polish AR lugs, just like you can a bolt gun, again getting lock up repeatability increasing accuracy, just like you do a bolt gun.

    Its how much work you want to do, but these things can be smooth shooting tack drivers.
    You can even adjust where you want it to throw brass, forward, straight out or backwards.

    This will depend on what cartridge you shoot, but of you stick with an ammo load that works, you can adjust where it piles brass.
    This comes in REAL handy on ranges so you get your brass back.
     
    Top Bottom